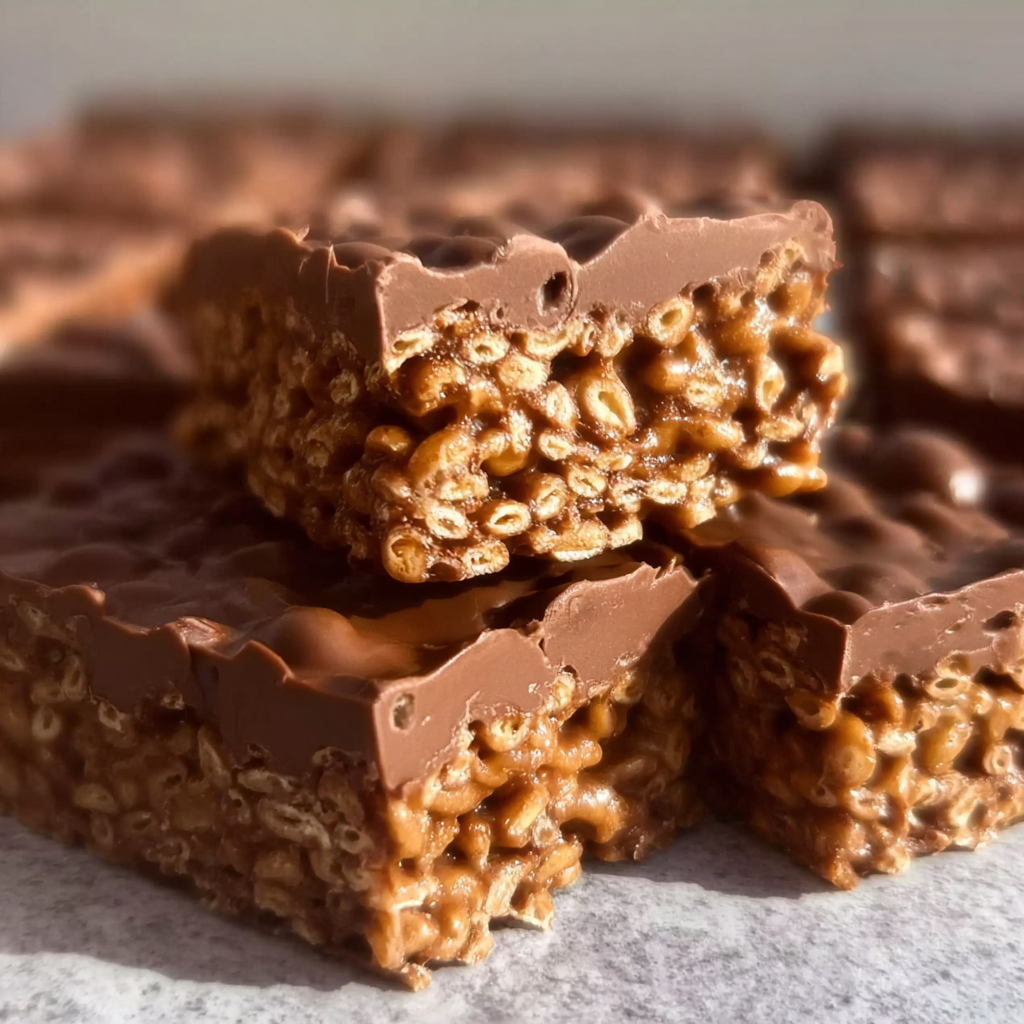

Why You’ll Love These Homemade Crunch Bars
Making chocolate candy at home might sound complicated, but this recipe proves otherwise. These bars are:- Incredibly easy to prepare
- Made with just a few pantry-friendly ingredients
- Perfect for holidays, parties, or gifting
- Completely customizable
- No baking required
Ingredients You’ll Need
The beauty of these Homemade Crunch Bars lies in their simplicity. Here’s what you’ll need:- 2 cups (340 grams) semi-sweet chocolate chips
- 1 cup (150 grams) milk chocolate chips
- 2 1/2 cups (70 grams) crispy rice cereal
- 1 tablespoon (14 grams) unsalted butter
- 1/2 teaspoon pure vanilla extract
- Pinch of salt (about 1/8 teaspoon)
How to Make Homemade Crunch Bars
Step 1: Prepare Your Pan
Line an 8×8-inch (20×20 cm) square baking pan with parchment paper, leaving a slight overhang on the sides. This makes it easier to lift the bars out once they’ve set.Step 2: Melt the Chocolate
In a heatproof bowl, combine:- 2 cups (340 grams) semi-sweet chocolate chips
- 1 cup (150 grams) milk chocolate chips
- 1 tablespoon (14 grams) unsalted butter
- 1/2 teaspoon vanilla extract
- Pinch of salt
Step 3: Fold in the Crispy Rice Cereal
Add 2 1/2 cups (70 grams) crispy rice cereal to the melted chocolate. Gently fold with a spatula until every piece is evenly coated. Work carefully so you don’t crush the cereal—this preserves that signature crunch.Step 4: Spread and Set
Transfer the mixture to your prepared pan. Use a spatula to press it evenly into the corners, smoothing the top. Refrigerate for 1–2 hours, or until fully set.Step 5: Slice and Serve
Lift the chocolate slab from the pan using the parchment overhang. Place on a cutting board and slice into bars or squares using a sharp knife. You now have perfectly crisp, chocolatey Homemade Crunch Bars ready to enjoy.Tips for Perfect Crunch Bars
Use High-Quality Chocolate
Since chocolate is the star ingredient, quality matters. Choose chocolate chips or chopped chocolate with good cocoa content for a rich flavor.Don’t Overheat the Chocolate
Overheated chocolate can become grainy or thick. Melt slowly and stir frequently.Work Quickly
Once you mix in the cereal, the chocolate will begin to thicken. Spread it into the pan promptly for the smoothest finish.Chill Just Until Firm
Refrigerate until set, but don’t leave them in too long before slicing. Extremely cold chocolate can crack unevenly.Flavor Variations and Creative Twists
One of the best parts about this chocolate rice cereal candy is how easy it is to customize.Dark Chocolate Crunch Bars
Replace the milk chocolate chips with 1 cup (170 grams) dark chocolate chips for a richer, deeper flavor.White Chocolate Drizzle
After the bars set, melt 1/2 cup (85 grams) white chocolate chips and drizzle over the top for a decorative finish.Peanut Butter Swirl
Stir in 2 tablespoons (32 grams) creamy peanut butter into the melted chocolate before adding the cereal for a nutty twist.Nutty Crunch
Fold in 1/2 cup (60 grams) finely chopped almonds or hazelnuts for added texture.
How to Store Homemade Crunch Bars
These bars store beautifully, making them ideal for make-ahead treats.- Room Temperature: Store in an airtight container for up to 5 days.
- Refrigerator: Keep chilled for up to 2 weeks.
- Freezer: Freeze for up to 2 months in a sealed container with parchment between layers.
When to Serve Homemade Crunch Bars
These bars fit just about any occasion:- After-school snacks
- Birthday party dessert tables
- Holiday treat boxes
- Bake sales
- Weekend movie nights
- Care packages
Frequently Asked Questions
1. Can I use only one type of chocolate?
Absolutely. You can use 3 cups (510 grams) of either semi-sweet, milk, or dark chocolate chips if you prefer a single flavor profile. Using a combination, however, creates a more balanced sweetness and depth of flavor. Semi-sweet chocolate provides richness, while milk chocolate adds creaminess. Dark chocolate results in a slightly less sweet, more intense bar. If using only dark chocolate, you may want to reduce the salt slightly to keep the flavors harmonious. Experimenting with different cocoa percentages can also change the overall taste and texture of your Homemade Crunch Bars.2. Why did my chocolate turn thick or grainy?
Chocolate can seize if it overheats or comes into contact with even a small amount of water. To prevent this, melt the chocolate slowly in short intervals and stir frequently. If using a double boiler, ensure the bowl fits snugly and steam does not escape into the chocolate. If the chocolate becomes thick but not completely seized, you can sometimes fix it by stirring in 1 teaspoon of neutral oil to smooth it out. Patience is key when melting chocolate for candy recipes.3. Can I make these bars dairy-free?
Yes, with a few substitutions. Replace the 2 cups (340 grams) semi-sweet chocolate chips and 1 cup (150 grams) milk chocolate chips with dairy-free chocolate chips in equal amounts. Substitute the 1 tablespoon (14 grams) unsalted butter with 1 tablespoon (14 grams) coconut oil. Be sure to check that your crispy rice cereal is also dairy-free. The texture remains crisp and delicious, and the coconut oil helps the bars set properly while adding a subtle smoothness.4. How do I get clean, sharp slices?
For professional-looking bars, allow the chocolate to set fully but not become rock hard. Use a sharp knife warmed under hot water and dried thoroughly before slicing. Wipe the blade clean between cuts. If the bars crack, let them sit at room temperature for about 5 minutes before cutting. Press down firmly and slice in one smooth motion instead of sawing back and forth. This technique ensures crisp edges and beautiful presentation.Make It a Family Activity
This is one of those recipes that’s perfect for getting everyone involved. Kids can help measure the 2 1/2 cups (70 grams) crispy rice cereal and stir it into the melted chocolate. Since there’s no oven involved, it’s a safe and fun introduction to homemade candy making. You can even set up a “topping station” with small bowls of chopped nuts, shredded coconut, or mini chocolate chips so everyone can customize their portion before it sets.Nutritional Snapshot
While these are definitely a treat, making them at home allows you to control ingredients and portion sizes. You can adjust sweetness levels, experiment with darker chocolate, or even reduce the chocolate slightly for a lighter cereal-to-chocolate ratio. Enjoying a small square can be incredibly satisfying thanks to the combination of smooth chocolate and airy crunch.
Final Thoughts
Homemade Crunch Bars prove that you don’t need complicated techniques or specialty tools to create something truly special. With just chocolate, crispy rice cereal, and a few simple additions, you can transform everyday ingredients into a nostalgic treat that feels both comforting and impressive. What makes this recipe stand out is its balance. The chocolate melts smoothly and sets with a glossy finish. The cereal maintains its crisp texture without becoming soggy. Each bite delivers that signature snap followed by a satisfying crunch. It’s simple, yet deeply satisfying. These bars are also wonderfully adaptable. You can change the chocolate blend, adjust sweetness, add mix-ins, or drizzle contrasting chocolate over the top. They’re ideal for holiday trays, homemade gifts, or an easy weekend dessert. Because they require no baking, they’re perfect year-round—even on warm days when turning on the oven isn’t appealing. Perhaps the most rewarding part is sharing them. There’s something special about offering a homemade version of a familiar favorite. It sparks conversation, brings back memories, and often leads to recipe requests. Once you try making these Homemade Crunch Bars, you may find they become a regular part of your dessert rotation. They’re quick, reliable, and endlessly customizable—everything a great homemade treat should be.\ PrintEasy Chocolate Crunch Bars Recipe – Crispy Rice Chocolate Candy

Ingredients
2 cups (340 grams) semi-sweet chocolate chips
1 cup (150 grams) milk chocolate chips
2 1/2 cups (70 grams) crispy rice cereal
1 tablespoon (14 grams) unsalted butter
1/2 teaspoon pure vanilla extract
Pinch of salt (about 1/8 teaspoon)
Instructions
-
Line an 8×8-inch (20×20 cm) square baking pan with parchment paper.
-
In a heatproof bowl, combine semi-sweet chocolate chips, milk chocolate chips, and butter. Melt in 30-second intervals in the microwave, stirring between each, until smooth.
-
Stir in vanilla extract and salt.
-
Fold in crispy rice cereal until evenly coated.
-
Transfer mixture to the prepared pan and press evenly into place.
-
Refrigerate for 1–2 hours, or until fully set.
-
Lift from the pan and slice into bars or squares.
Notes
Store in an airtight container at room temperature for up to 5 days or refrigerate for up to 2 weeks. For cleaner slices, warm the knife blade before cutting.