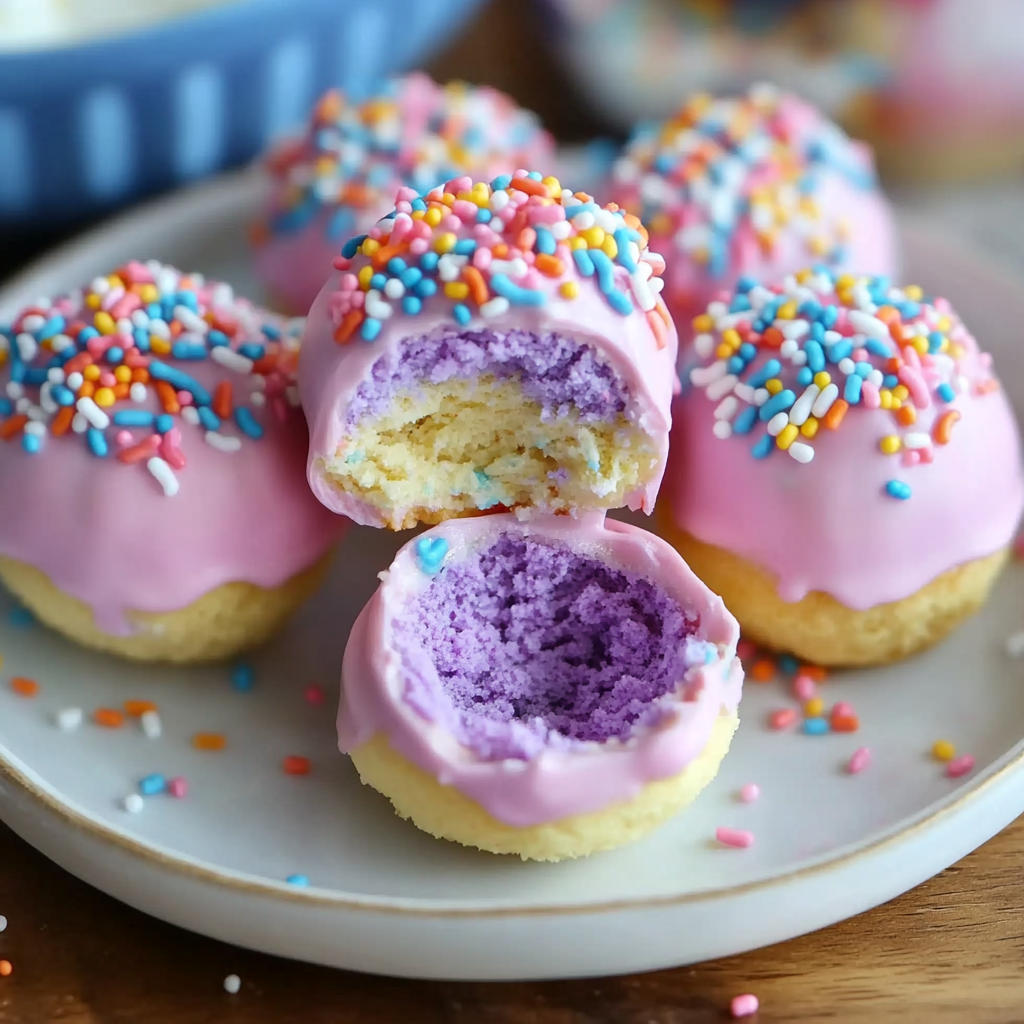
Unicorn Cheesecake Bites are a magical, bite-sized treat that combines a creamy texture with vibrant colors, making them perfect for celebrations or an indulgent dessert. These no-bake delights are not only visually stunning but also easy to prepare, making them a fantastic option for anyone looking to impress without spending hours in the kitchen.
What sets these cheesecake bites apart is their whimsical appearance, which instantly adds charm to events like birthday parties, baby showers, or weddings. They bring the enchantment of unicorn-themed desserts into bite-sized portions, creating an eye-catching addition to any dessert table.
To truly capture the unicorn theme, gel food coloring is a must, allowing for the creation of bright and vivid hues without compromising the texture of the cheesecake filling. For those new to cheesecake, exploring the history of cheesecake gives insight into how this classic dessert has evolved into modern variations like these playful bites. Similarly, the use of a graham cracker crust ensures the bites maintain a firm, flavorful base.
Whether you’re a seasoned baker or a newbie in the kitchen, Unicorn Cheesecake Bites are a delightful recipe that is both easy to customize and incredibly versatile. With just a few simple steps, you can create treats that are as fun to make as they are to eat. Let’s dive into the ingredients and preparation process to bring this dessert to life!

Ingredients Breakdown
To make Unicorn Cheesecake Bites, you’ll need a few basic ingredients that come together to create a vibrant and delicious dessert. Each component of the recipe plays a crucial role in achieving the perfect taste and texture. Let’s break them down:
1. Ingredients for the Crust
The crust is the foundation of your cheesecake bites, providing structure and a satisfying crunch that complements the creamy filling. Here’s what you’ll need:
- Graham Cracker Crumbs (1 ½ cups): These form the base of the crust. The sweet and slightly nutty flavor pairs beautifully with the cheesecake filling.
- Tip: If you don’t have graham crackers, you can substitute with crushed Oreos, digestive biscuits, or a gluten-free alternative.
- Melted Butter (⅓ cup): Acts as the binder, holding the crumbs together. Butter also adds a rich, buttery taste to the crust.
- Granulated Sugar (¼ cup): Provides sweetness and helps to balance the buttery, toasty flavor of the crumbs.
2. Ingredients for the Cheesecake Filling
The filling is the heart of this recipe. It’s light, creamy, and perfectly sweetened, with added color for the unicorn theme.
- Cream Cheese (16 oz or 450g, softened): The star of the cheesecake filling. It’s essential to let it soften to room temperature for easy mixing and a smooth texture.
- Tip: Use full-fat cream cheese for the best flavor and consistency.
- Granulated Sugar (½ cup): Sweetens the cheesecake filling and balances the tanginess of the cream cheese.
- Vanilla Extract (1 tsp): Adds depth and a subtle, warm flavor to the filling.
- Heavy Cream (1 cup, whipped to stiff peaks): Folding whipped cream into the mixture creates a light and airy texture.
- Tip: Ensure the cream is well-whipped to stiff peaks to help the filling set properly.
- Gel Food Coloring (Pink, Purple, Blue, Yellow): Brings the unicorn theme to life with vibrant colors. Gel food coloring is preferred because it doesn’t alter the texture of the cheesecake filling like liquid food coloring might.
3. Ingredients for the Topping
The toppings add a whimsical and fun finishing touch to your Unicorn Cheesecake Bites:
- Whipped Cream: Use either homemade or store-bought whipped cream to pipe or dollop on top of the set cheesecake bites.
- Assorted Sprinkles: Here’s where you can get creative! Choose sprinkles that match the unicorn theme, such as pastel colors, edible glitter, or star-shaped decorations.
- Tip: Edible gold or silver glitter can add an extra magical touch.
Why These Ingredients Work Together
Each ingredient in this recipe serves a specific purpose:
- The crust provides a stable base for the cheesecake bites.
- The cream cheese filling adds a rich, tangy creaminess, balanced by the lightness of whipped cream.
- The gel food coloring and sprinkles bring the visual “unicorn” magic, turning a simple dessert into a statement piece.
Before we dive into the step-by-step instructions, let’s review the tools you’ll need to make the process smooth and enjoyable.
Kitchen Tools You’ll Need
To make Unicorn Cheesecake Bites efficiently and with ease, it’s important to gather the right tools beforehand. Having these items on hand will ensure a smooth preparation process.
Essential Tools
- Mixing Bowls
- You’ll need multiple bowls: one large for the cheesecake base and smaller ones for dividing and coloring the filling.
- Hand Mixer or Stand Mixer
- A mixer makes it easier to achieve a smooth, lump-free cheesecake filling and whip the heavy cream to stiff peaks.
- Measuring Cups and Spoons
- Accurate measurements are crucial, especially for the crust and filling ingredients.
- Muffin Tin or Silicone Mold
- Use a standard muffin tin for individual portions or silicone molds for easier release.
- Parchment Liners or Baking Cups
- These help with easy removal of the bites and reduce mess.
- Spatula or Spoon
- For mixing and transferring the cheesecake filling into the molds.
- Toothpicks or Skewers
- Essential for creating the marbled swirl effect in the colored cheesecake filling.
Optional Tools
- Piping Bag and Tip
- If you want to add a decorative swirl of whipped cream on top, a piping bag will give you a professional finish.
- Offset Spatula
- Useful for leveling and smoothing the filling.
- Cooling Rack
- Handy for cooling the crust after baking.
- Freezer Bags or Airtight Container
- If you plan to make the bites ahead, these will keep them fresh while chilling or freezing.
With these tools ready, you’ll be all set to create your Unicorn Cheesecake Bites without any hiccups. Now, let’s move on to the fun part: making the crust!
Making the Crust
The crust serves as the sturdy, slightly crunchy base for the creamy cheesecake filling. Follow these steps to make a perfect crust:
1. Combine the Ingredients
- In a mixing bowl, combine 1 ½ cups of graham cracker crumbs, ⅓ cup melted butter, and ¼ cup granulated sugar.
- Stir until the mixture resembles wet sand. The butter should coat the crumbs evenly, ensuring they stick together.
2. Press the Mixture into Molds
- Line a muffin tin with parchment liners or baking cups. Alternatively, grease a silicone mold lightly to make it non-stick.
- Divide the crust mixture evenly between the molds, using about 1-2 tablespoons per mold.
- Use the back of a spoon or the bottom of a glass to press the mixture firmly into the bottom of each mold.
3. Bake the Crust (Optional)
- Preheat your oven to 325°F (165°C).
- Bake the crusts for 5-7 minutes to enhance their flavor and create a firmer texture.
- Tip: Baking is optional but highly recommended for better structure and taste. If you’re short on time, you can skip this step and refrigerate the crust to set it instead.
4. Let the Crust Cool
- Allow the crusts to cool completely before adding the cheesecake filling. This prevents the filling from softening or melting the crust.
With the crust ready, it’s time to move on to the star of the recipe: the cheesecake filling.
Preparing the Cheesecake Filling
The cheesecake filling is the creamy, luscious core of your Unicorn Cheesecake Bites. This step-by-step guide will help you achieve the perfect texture and vibrant colors.
1. Mixing the Cheesecake Base
- Soften the Cream Cheese
- Place 16 oz (450g) of cream cheese in a large mixing bowl.
- Ensure the cream cheese is softened to room temperature to make it easier to mix and achieve a lump-free texture.
- Add Sugar and Vanilla
- Add ½ cup of granulated sugar and 1 tsp of vanilla extract to the cream cheese.
- Beat with a hand mixer or stand mixer on medium speed until the mixture is smooth and creamy.
Tip: Scrape down the sides of the bowl to ensure all the ingredients are fully incorporated.
2. Whipping the Heavy Cream
- Whip to Stiff Peaks
- In a separate bowl, pour 1 cup of heavy cream and beat on high speed until stiff peaks form.
- You’ll know it’s ready when the whipped cream holds its shape without collapsing.
Tip: Chill the bowl and beaters beforehand to make whipping easier.
- Fold into the Cream Cheese Mixture
- Gently fold the whipped cream into the cream cheese mixture using a spatula.
- Use light, sweeping motions to avoid deflating the whipped cream. This step ensures the filling is light and airy.
3. Coloring the Cheesecake Mixture
- Divide the Mixture
- Divide the cheesecake filling evenly into four bowls. Each bowl will be colored differently to match the unicorn theme.
- Add Gel Food Coloring
- Add a few drops of pink, purple, blue, and yellow gel food coloring to each bowl (one color per bowl).
- Mix until the color is evenly distributed.
- Adjust the intensity by adding more drops as needed.
Tip: Use gel food coloring instead of liquid to achieve bold colors without altering the consistency of the filling.
Now that your cheesecake filling is ready and vibrantly colored, it’s time to assemble the Unicorn Cheesecake Bites.
 Assembling the Cheesecake Bites
Assembling the bites is where you can let your creativity shine! Here’s how to layer the colors and achieve the signature unicorn swirl.
1. Layer the Colors
- Spoon small dollops of each colored filling (pink, purple, blue, yellow) into the prepared crusts. Alternate colors to create a layered or random pattern.
- Tip: Don’t worry about perfection—imperfections add to the charm of the design!
2. Create the Marbled Swirl Effect
- Once all the molds are filled, use a toothpick or skewer to gently swirl the colors together.
- Insert the toothpick into the filling and drag it in circular or zigzag motions to blend the colors slightly without fully mixing them.
3. Smooth the Surface
- Use a spatula or spoon to lightly smooth the tops of the cheesecake bites, ensuring an even finish.
With the cheesecake bites assembled, it’s time to let them set.
Setting the Cheesecake Bites
The key to firm, sliceable cheesecake bites is allowing them to chill long enough to set completely.
1. Refrigerate the Cheesecake Bites
- Place the assembled bites in the refrigerator and chill for at least 4 hours or until fully set.
- Tip: For the best texture, refrigerate overnight if possible.
2. Alternative Chilling Method
- If you’re short on time, you can place the bites in the freezer for 1-2 hours. However, be cautious not to freeze them solid unless you plan to store them long-term.
Once set, your Unicorn Cheesecake Bites are ready for the final decorative touches!
Adding the Final Touches
Once your Unicorn Cheesecake Bites are set, it’s time to transform them into a magical dessert by adding the finishing touches. This is where the whipped cream and sprinkles bring the unicorn theme to life!
1. Adding Whipped Cream
- Prepare the Whipped Cream
- If using store-bought whipped cream, transfer it to a piping bag fitted with a decorative tip for a polished look.
- For homemade whipped cream, whip ½ cup of heavy cream with 1 tablespoon of powdered sugar until stiff peaks form, then transfer to a piping bag.
- Decorate the Cheesecake Bites
- Pipe a small swirl of whipped cream onto the top of each cheesecake bite. A star or rosette design works beautifully.
- If you don’t have a piping bag, use a spoon to dollop the whipped cream instead.
2. Adding the Sprinkles
- Choose Your Sprinkles
- Use sprinkles that match the pastel and magical unicorn theme, such as:
- Star-shaped sprinkles
- Edible glitter or shimmer dust
- Mini pastel pearls or confetti sprinkles
- Use sprinkles that match the pastel and magical unicorn theme, such as:
- Sprinkle Generously
- Immediately after adding the whipped cream, sprinkle your decorations over the top so they stick. Be creative and mix different sprinkle styles for a fun, layered look.
3. Optional Extra Touches
- Edible Glitter or Gold Leaf
- Add edible glitter or gold leaf accents for an elegant, eye-catching touch. These are especially great for special occasions like weddings or baby showers.
- Themed Toppers
- Consider adding small decorative toppers, like mini unicorn horns or edible flowers, to really emphasize the unicorn theme.
With the toppings in place, your Unicorn Cheesecake Bites are ready to serve. Whether you’re preparing them for a party or as a fun family dessert, they’ll undoubtedly steal the show!
Tips for Success
To ensure your Unicorn Cheesecake Bites turn out perfectly, keep these tips in mind:
- Achieving Smooth Cheesecake Filling
- Always use softened cream cheese to prevent lumps. Beat it thoroughly before adding other ingredients.
- Creating Vibrant Colors
- Stick to gel food coloring for bold hues. Add the coloring gradually to control the intensity.
- Chilling Time is Crucial
- Don’t rush the chilling process! Allow enough time for the bites to fully set, especially if serving at an event.
- Storage Tips
- Store the bites in an airtight container in the refrigerator for up to 3-4 days. For longer storage, freeze them for up to 1 month (without whipped cream).
- Customizing Flavors
- Experiment with extracts like almond, lemon, or strawberry to complement the unicorn theme.
Fun Variations and Substitutions
Unicorn Cheesecake Bites are versatile and easy to adapt. Here are a few ideas to switch things up:
1. Flavor Variations
- Fruit-Flavored Cheesecake Bites
- Add 2-3 tablespoons of fruit puree (e.g., strawberry, raspberry, or mango) to the cheesecake filling for a fruity twist.
- Chocolate Lovers’ Version
- Mix melted white or milk chocolate into the cheesecake base before coloring.
- Citrus Zing
- Add 1 tablespoon of lemon or orange zest to the filling for a refreshing flavor.
2. Substitutions for Dietary Needs
- Gluten-Free Option
- Use gluten-free graham crackers or cookies for the crust.
- Vegan or Dairy-Free Option
- Replace cream cheese with a plant-based cream cheese alternative and use coconut whipped cream for the filling and topping.
3. Creative Themes
- Galaxy Cheesecake Bites
- Swap the pastel colors for dark blue, purple, and black with silver sprinkles for a galaxy-inspired look.
- Holiday-Themed Bites
- Use red and green food coloring for Christmas, or orange and black for Halloween.
Perfect Occasions to Serve Unicorn Cheesecake Bites
These whimsical cheesecake bites are perfect for various events and celebrations:
- Birthday Parties
- Especially for children’s birthdays with a unicorn or fairytale theme.
- Baby Showers
- Add pastel colors to match the baby’s gender or keep it neutral for a surprise.
- Weddings and Engagement Parties
- Use elegant toppings like gold leaf and pearls to elevate them for formal occasions.
- Dessert Platters
- Include them in a mix of desserts for potlucks or gatherings.
- DIY Family Fun
- Let kids join in the process of layering and swirling the colors for a fun family activity.

FAQs
1. Can I freeze Unicorn Cheesecake Bites?
Yes! You can freeze them (without whipped cream) in an airtight container for up to 1 month. Let them thaw in the refrigerator for a few hours before serving.
2. What type of food coloring works best?
Gel food coloring is ideal because it provides vibrant colors without altering the texture of the filling.
3. Can I make them without baking the crust?
Yes, you can skip baking the crust. Simply refrigerate the crust for about 20-30 minutes to help it set before adding the filling.
4. How long do they last in the fridge?
They can be stored in an airtight container in the refrigerator for 3-4 days.
5. What’s the best way to make them ahead of time?
Prepare the cheesecake bites (without whipped cream) a day in advance and refrigerate. Add the whipped cream and sprinkles just before serving for the freshest presentation.
Unicorn Cheesecake Bites

Unicorn Cheesecake Bites are colorful, bite-sized treats that combine the rich creaminess of classic cheesecake with a whimsical, pastel design. Perfect for parties, celebrations, or even a fun DIY baking project, these no-bake cheesecake bites are as delightful to make as they are to eat. Featuring a buttery graham cracker crust, a light and fluffy cheesecake filling, and a swirl of vibrant unicorn-inspired colors, this dessert is both eye-catching and delicious. Top them off with whipped cream and sprinkles for a magical finishing touch.
Whether you’re a seasoned baker or a beginner, this simple recipe will help you create a dessert that looks straight out of a fairytale. Best of all, these cheesecake bites can be customized to match any theme or occasion, making them a versatile addition to your recipe collection.
- Author: Clara
Ingredients
For the crust:
- 1 ½ cups graham cracker crumbs
- ⅓ cup melted butter
- ¼ cup granulated sugar
For the cheesecake filling:
- 16 oz (450g) cream cheese, softened
- ½ cup granulated sugar
- 1 tsp vanilla extract
- 1 cup heavy cream, whipped to stiff peaks
- Gel food coloring (pink, purple, blue, yellow)
For the topping:
- Whipped cream
- Assorted sprinkles
Instructions
Preheat your oven to 325°F (165°C).
Combine graham cracker crumbs, melted butter, and sugar in a bowl. Mix until the texture resembles wet sand. Press the mixture firmly into the bottom of a lined muffin tin or silicone mold. Bake for 5-7 minutes, then allow to cool completely.
In a large mixing bowl, beat softened cream cheese until smooth. Add granulated sugar and vanilla extract, and continue mixing until well combined.
Gently fold in whipped heavy cream until the mixture is light and fluffy.
Divide the cheesecake filling into four bowls. Add a few drops of gel food coloring to each bowl (one color per bowl) and mix until evenly colored.
Layer the colored cheesecake mixtures into the prepared crusts in your desired pattern. Swirl lightly with a toothpick if you want a marbled effect.
Refrigerate the cheesecake bites for at least 4 hours or until set.
Top each cheesecake bite with whipped cream and sprinkles before serving.
Notes
Preparation Tips
- Softening Cream Cheese
- Make sure the cream cheese is at room temperature before mixing. Cold cream cheese can result in a lumpy filling.
- Gel Food Coloring
- Use gel food coloring for bold, vibrant colors without affecting the texture of the cheesecake filling. A little goes a long way!
Customization Ideas
- Flavors
- Add fruit purees (like raspberry or mango) for a fruity twist or experiment with extracts (like almond or lemon) to complement the cheesecake flavor.
- Themes
- Change the colors to match specific occasions, such as red and green for Christmas or blue and silver for a Frozen-inspired party.
Storage Tips
- Refrigeration
- Store in an airtight container in the fridge for up to 4 days.
- Freezing
- Freeze without whipped cream and sprinkles for up to 1 month. Thaw in the fridge before serving.
Troubleshooting
- Runny Filling
- If the filling doesn’t set properly, check that the whipped cream was whipped to stiff peaks before folding it into the mixture.
- Crumbly Crust
- Ensure the graham cracker crust mixture is well-combined with melted butter and firmly pressed into the molds.