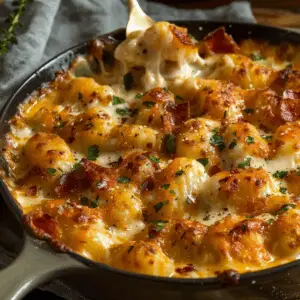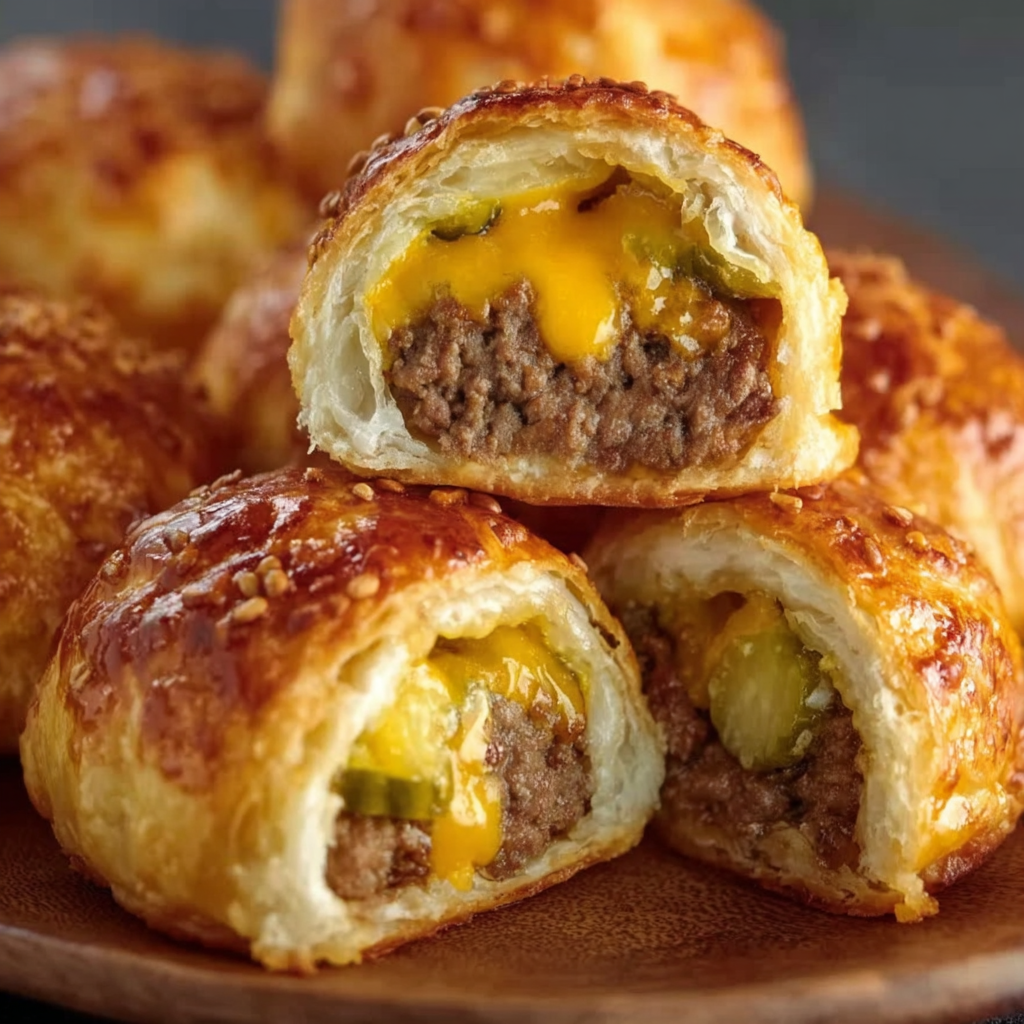
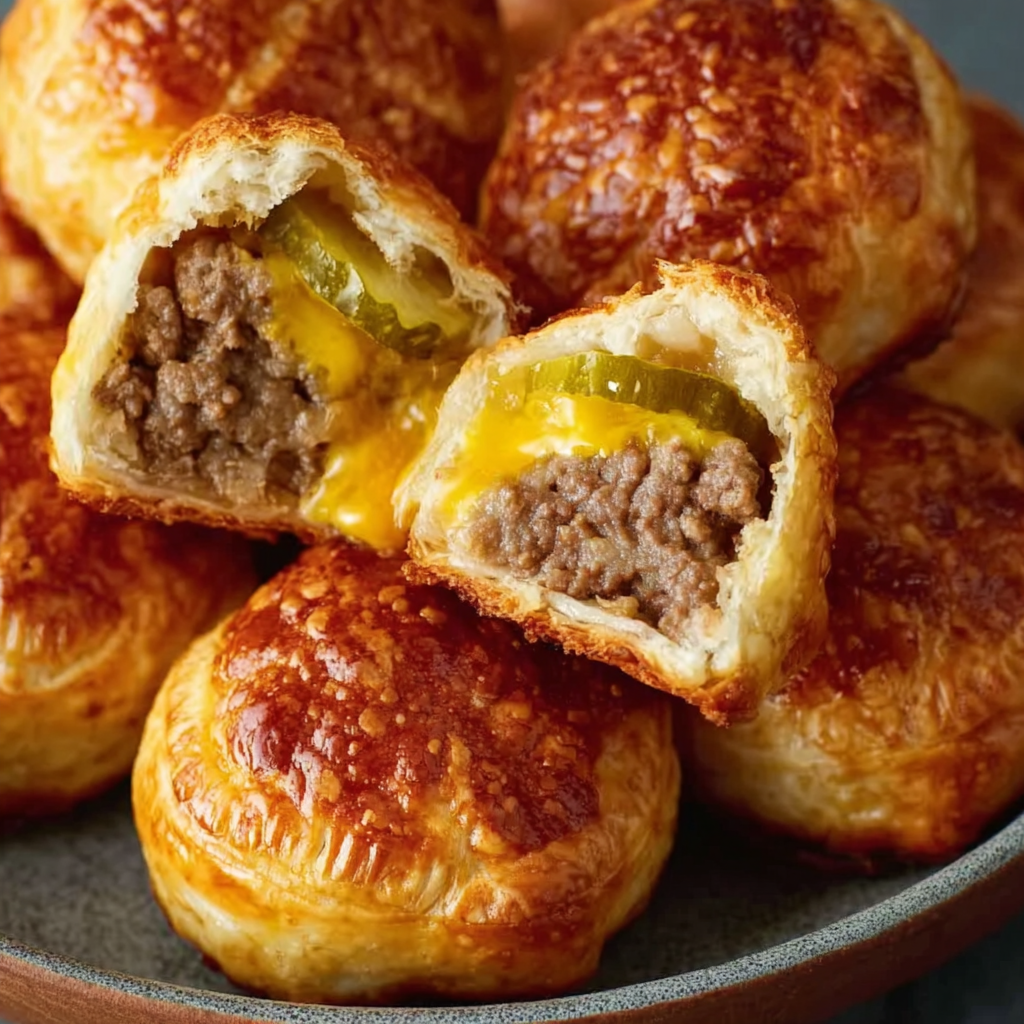
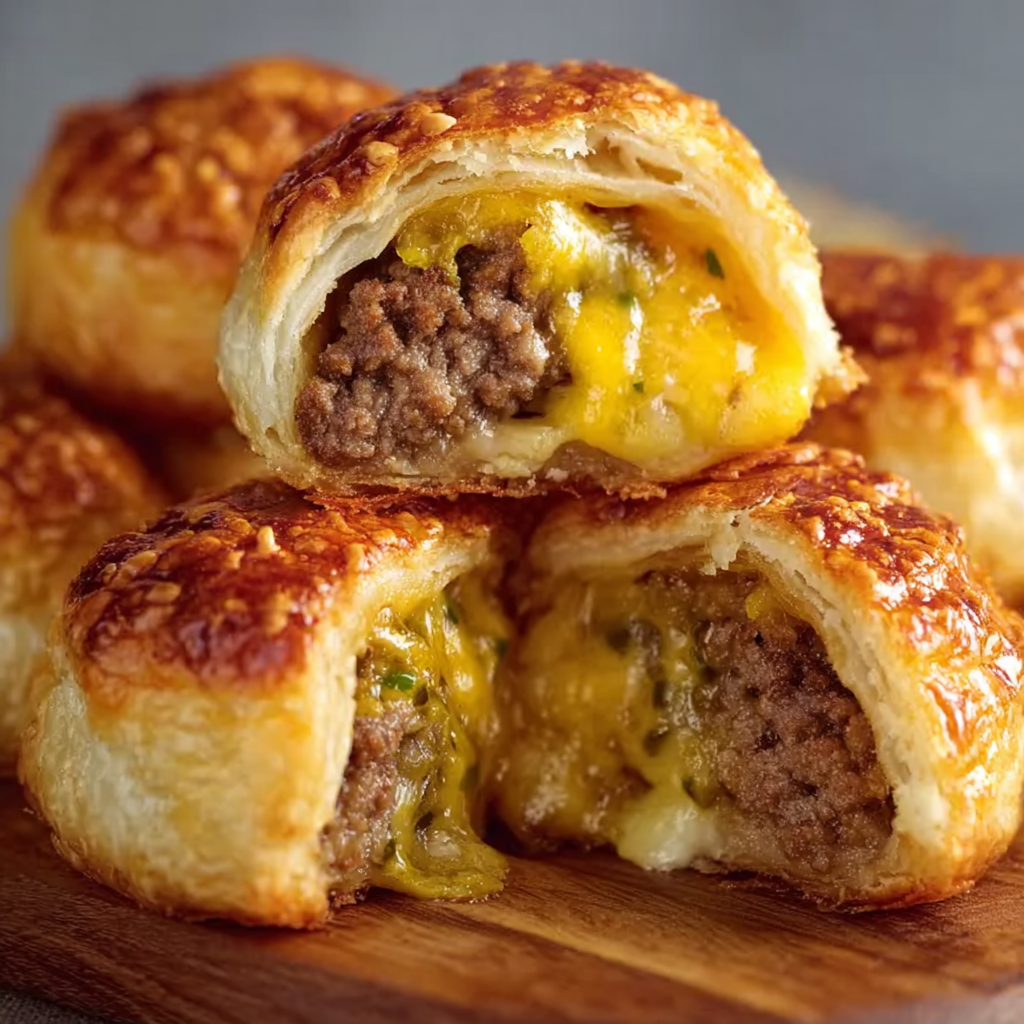
1. Cheeseburger Snack Bombs
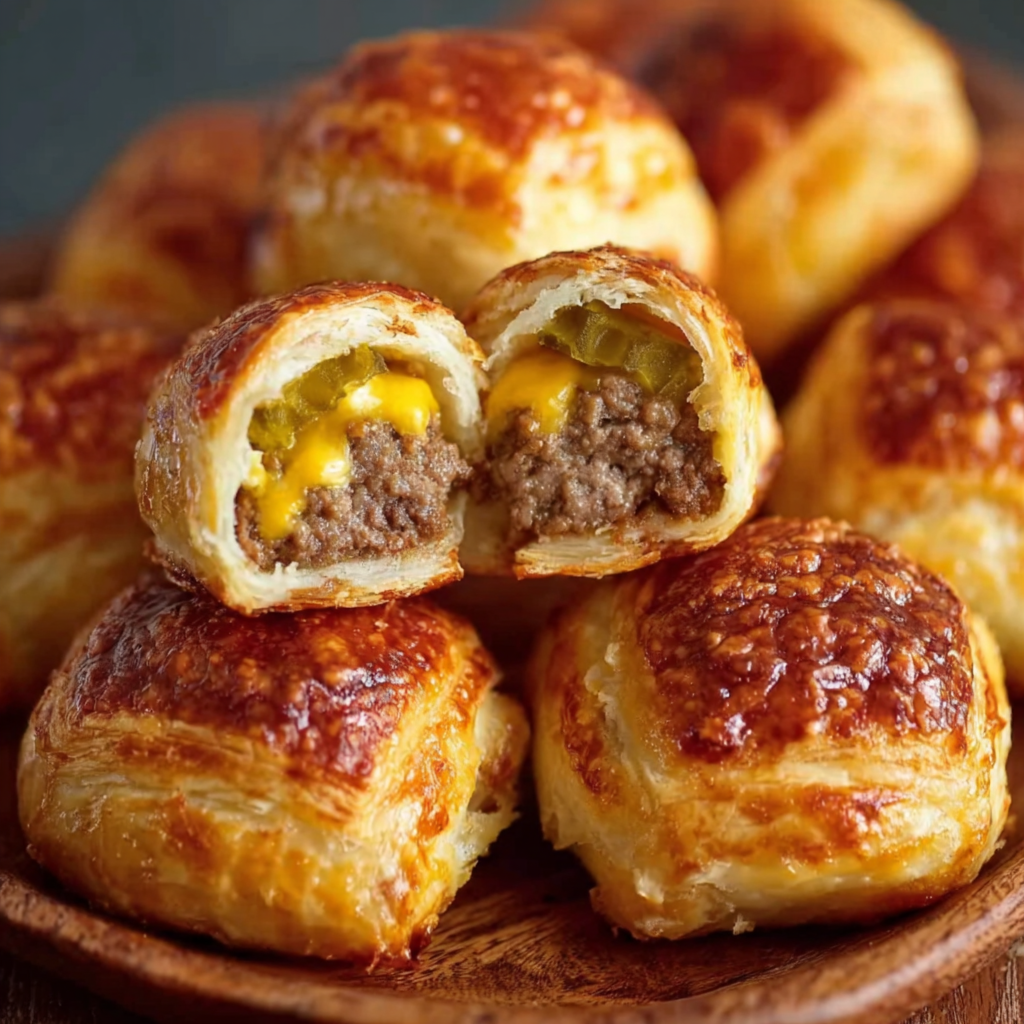
Cheeseburger snack bombs are a game-changing twist on a classic comfort food. Designed to be bite-sized, hand-held, and packed with flavor, these savory bombs capture everything you love about a traditional cheeseburger—but in a flaky, golden pastry. Imagine juicy ground beef, tangy pickles, melty cheddar cheese, and creamy sauce all wrapped in warm biscuit dough. These treats are the perfect addition to any snack table or weekday meal plan.
What sets these snack bombs apart is their Big Mac-inspired taste, which appeals to both nostalgic burger fans and modern snackers. The inclusion of an optional special sauce—a homemade version of the famous Big Mac spread—brings a zesty kick that elevates every bite. Whether you’re making them for a party, family movie night, or packing school lunches, they offer a versatile solution to your snack-time cravings.
Their popularity has surged thanks to platforms like Pinterest, where creative cooks share their own variations of these savory bombs. For example, see this game day snack board featuring cheeseburger bombs as the centerpiece. The idea taps into the long-standing history of the hamburger, which you can read more about here on Wikipedia. By reimagining the burger into a pocket-size pastry, this recipe keeps the spirit of the original while delivering it in a more convenient, less messy format.
2. Why Cheeseburger Snack Bombs Are the Ultimate Snack
Cheeseburger snack bombs aren’t just another trendy snack—they’re a thoughtfully engineered combination of flavor, texture, and convenience. One of the biggest draws is the flavor explosion in every bite. The blend of savory beef, melted cheddar cheese, chopped dill pickles, and tangy condiments creates a profile that is both nostalgic and intensely satisfying. These ingredients mirror the iconic flavors of a Big Mac, but in a compact, no-fuss form.
Unlike traditional cheeseburgers, these snack bombs are mess-free, making them perfect for on-the-go eating. No buns sliding apart, no condiments dripping out. Just sealed, golden parcels of goodness. Their small size also makes them perfect for appetizer spreads, potlucks, or even meal prepping for lunchboxes. Parents love them because they’re kid-friendly, and adults love them because they’re rich in flavor without being overly greasy.
For those interested in nutritious snacking, it’s worth noting that elements like cheddar cheese provide calcium and protein, and sesame seeds—sprinkled on top—add a subtle crunch and nutritional value. You can explore more about the benefits of these seeds in this Wikipedia entry on sesame. Looking for fun, family-approved lunchbox fillers? Check out this creative roundup on Pinterest for lunchbox snack ideas that include cheeseburger bombs as a top pick.
What also makes them the ultimate snack is their adaptability. You can customize the fillings to suit different tastes or dietary preferences—making them spicy, vegetarian, or low-carb. They’re as flexible as they are flavorful, and that’s what makes them unbeatable on the snack table.
3. Ingredients Breakdown & Substitutions
The key to irresistible cheeseburger snack bombs lies in the thoughtful layering of ingredients. Each component plays a critical role in delivering the signature bite that balances juicy, tangy, savory, and creamy elements. Below is a breakdown of the essential ingredients and possible substitutions to suit different dietary needs or flavor preferences.
For the Beef Filling:
-
Ground Beef (1 lb): The heart of the snack bomb. Opt for 80/20 for juicy results.
Substitute: Ground turkey or a plant-based alternative like Beyond Meat for a leaner or vegetarian option. -
Yellow Onion (1 small, diced): Adds subtle sweetness and depth of flavor when sautéed.
Pro Tip: Learn more about the technique of sautéing here on Wikipedia. -
Ketchup (1 tbsp) & Yellow Mustard (1 tbsp): Classic condiments that bind the filling and add tang.
Alternate: Use Dijon mustard for a spicier bite. -
Salt and Pepper: Adjust to taste.
-
Shredded Cheddar Cheese (1 cup): Melts into the beef for a creamy, gooey texture.
Discover more about this cheese’s flavor profile on Wikipedia. -
Chopped Dill Pickles (½ cup): Offers the essential sour crunch.
Alternate: Swap for sweet pickles or pickled jalapeños for variation.
For the Dough:
-
Refrigerated Biscuit Dough (1 tube, 8-count): Quick and convenient; the dough puffs up around the filling.
Alternate: Crescent roll dough or pizza dough works well too. -
Egg (1, beaten): Used for the egg wash that gives the bombs a shiny, golden finish.
-
Sesame Seeds (2 tbsp): For that signature “burger bun” look and a nutty note.
Nutrition tip: Learn about the health benefits of sesame in this Wikipedia article.
For the Optional Big Mac-Style Sauce:
-
Mayonnaise (½ cup), Yellow Mustard (1 tbsp), Ketchup (1 tbsp): Forms the creamy base.
-
Sweet Pickle Relish (2 tsp): Adds sweetness and crunch.
-
Garlic Powder & Onion Powder (½ tsp each): Intensifies the flavor.
For those seeking creative twists or prepping ideas, Pinterest boards like this DIY frozen snack collection can provide inspiration on freezing portions ahead. Combined with practical food preservation tips like those found in this Wikipedia entry, it’s easy to make these bombs part of your weekly rotation.
With ingredients this versatile, cheeseburger bombs can be adapted for picky eaters, spice lovers, or health-conscious snackers.
4. Step-by-Step Recipe Instructions
Crafting cheeseburger snack bombs is simple and fun, making it a great activity even for beginner cooks or families with kids. The process blends traditional burger elements with the technique of encasing them in soft dough for a mess-free eating experience. Below is a detailed, step-by-step guide that ensures your snack bombs turn out golden, flavorful, and fully sealed.
Step 1: Preheat and Prepare
-
Preheat your oven to 375°F (190°C).
-
Line a baking sheet with parchment paper or a nonstick baking mat to prevent sticking.
Step 2: Sauté the Onion and Cook the Beef
-
Heat a skillet over medium heat and sauté the finely diced onion until it softens, releasing its sweetness.
-
Add the ground beef and cook until fully browned, breaking it up with a spatula.
-
Drain excess fat to avoid soggy filling.
-
Stir in ketchup, mustard, salt, and pepper. Simmer for 2–3 minutes to blend flavors, then remove from heat.
The cooking method here mirrors the sautéing process commonly used in stovetop recipes. Learn more about its technique and importance on Wikipedia. Once the mixture cools slightly, it becomes easier to handle and prevents steam from interfering with the dough.
Step 3: Mix in Cheese and Pickles
-
Once the beef mixture has cooled for a few minutes, fold in the shredded cheddar cheese and chopped dill pickles.
-
This combination creates a cohesive, creamy filling that holds together well during baking.
This creamy, savory interior draws inspiration from the classic cheeseburger. In fact, the concept owes a nod to the flavor legacy of the Big Mac, which also balances meat, cheese, pickles, and sauce.
Step 4: Assemble the Snack Bombs
-
Take the biscuit dough rounds and flatten each slightly using your hands or a rolling pin.
-
Spoon a heaping tablespoon of the beef mixture into the center of each dough piece.
-
Carefully bring the edges of the dough together, pinching to seal tightly and form a ball.
-
Place each ball seam-side down on your prepared baking sheet.
For similar visual inspiration, visit this Pinterest snack board showcasing hand-held savory snacks like cheeseburger bombs.
Step 5: Finish and Bake
-
Brush the tops of each dough ball with the beaten egg to promote browning.
-
Sprinkle with sesame seeds for that iconic burger bun appearance.
Bake for 15–18 minutes, or until the tops are golden brown and slightly crisp.
Step 6: Make the Optional Sauce
While the bombs are baking, combine the sauce ingredients in a bowl:
-
Mayonnaise
-
Ketchup
-
Mustard
-
Sweet pickle relish
-
Garlic powder and onion powder
Whisk until smooth. This Big Mac-style sauce brings a creamy tang that enhances the baked bombs. For extra flair, drizzle it on top or serve as a dipping sauce.
Explore more sauce presentation ideas through this Pinterest lunchbox snack guide, which often features dips in compartmentalized containers for on-the-go convenience.
Once your bombs are done baking, allow them to cool for a few minutes before serving. They’re best enjoyed warm when the cheese is melty and the dough is at peak fluffiness.
5. Tips for Perfect Cheeseburger Bombs Every Time
While cheeseburger snack bombs are relatively easy to make, a few simple techniques can elevate them from good to great. The following tips ensure each bite delivers a crisp exterior, a juicy center, and the unmistakable flavor of a classic cheeseburger—without any mess or sogginess.
Cool the Filling Before Wrapping
One of the most common mistakes is placing hot beef filling directly into the dough. This creates steam, which can soften or tear the dough during baking. Let the beef mixture cool for at least 5–10 minutes before assembling. This step also helps the cheddar cheese hold its shape better inside the pastry.
Avoid Overstuffing
It’s tempting to fill each biscuit round to the brim, but less is more. Use about 1 heaping tablespoon of filling per bomb. Overfilling makes it difficult to seal the dough and can lead to leaks or burst seams in the oven.
Seal the Edges Tightly
Pinch the dough edges thoroughly to form a complete seal. Any gaps can cause the cheese to ooze out during baking. If needed, lightly wet your fingers or use a fork to crimp the edges.
Use an Egg Wash for Golden Color
Brushing the tops with beaten egg not only adds shine but helps achieve that bakery-quality finish. Sprinkle with sesame seeds to give them the appearance of mini burger buns, a nod to traditional cheeseburger aesthetics.
Bake on Parchment or Silicone
Using parchment paper or a silicone baking mat prevents sticking and ensures an even bake. This is especially useful if any cheese or filling escapes during the cooking process.
For additional inspiration and presentation techniques, check out this Pinterest board featuring savory snack recipes. You’ll find great ideas for arranging and serving your snack bombs, especially for gatherings or lunchboxes.
By following these tips, your cheeseburger snack bombs will be perfectly sealed, golden on the outside, and packed with delicious, melty goodness on the inside.
6. Customizing Your Snack Bombs
One of the best things about cheeseburger snack bombs is how endlessly customizable they are. With a few simple swaps or additions, you can create a version tailored to your preferences—or to whatever ingredients you have on hand. Whether you’re cooking for picky eaters or looking to experiment with bold new flavors, here are some easy ways to mix things up:
Cheese Swaps
-
Try mozzarella for a stretchier texture.
-
Use pepper jack for a spicier, Southwestern twist.
-
Mix cheeses (like cheddar and gouda) for added depth.
Add-Ins
-
Bacon bits add a smoky crunch that pairs beautifully with the creamy beef mixture.
-
Finely chopped jalapeños introduce a spicy edge for heat lovers.
-
Stir in caramelized onions for a richer, sweeter flavor profile.
Dough Alternatives
-
Use crescent dough for a flakier, layered texture.
-
Try pizza dough for a denser, more bready snack.
-
For a gourmet twist, use puff pastry—just adjust baking time to prevent burning.
Seasoning Boosts
-
Add smoked paprika, Worcestershire sauce, or a dash of hot sauce to the beef mixture for added flavor.
-
Top with everything bagel seasoning instead of sesame seeds for an extra flavor hit.
Explore more ideas and visual inspiration on this Pinterest board of DIY frozen snacks, where many versions of cheeseburger bombs are reimagined with creative ingredients.
Customization makes these snack bombs an easy canvas for flavor experiments—perfect for weeknight meals, parties, or meal prep variety.
7. Serving Suggestions and Pairings
Cheeseburger snack bombs are delicious on their own, but the right pairings can turn them into a full meal or elevate them into party showstoppers. Whether you’re feeding a crowd or making lunchboxes, consider these ideas for serving:
Dipping Sauces
-
Classic: Serve with your homemade Big Mac-style sauce.
-
Creamy: Use ranch, garlic aioli, or sour cream mixed with chives.
-
Spicy: Pair with sriracha mayo or a chipotle dipping sauce for a kick.
Sides to Serve With
-
French fries or potato wedges are a natural fit.
-
A crisp green salad adds freshness to balance the richness.
-
Include fruit skewers or grape tomatoes for lunchbox-friendly sides.
Party-Style Presentation
-
Stack on a platter and drizzle with sauce for a bold presentation.
-
Serve in cupcake liners or muffin wrappers for easy grab-and-go portions.
Need more inspiration for party arrangements? Check out this Pinterest game day snack board, which includes cheeseburger bombs as part of an eye-catching spread.
No matter how you serve them, cheeseburger snack bombs are a guaranteed hit—whether you’re hosting a party or packing a lunchbox.
8. Make-Ahead & Freezer Instructions
Cheeseburger snack bombs are ideal for meal prepping. Whether you’re freezing a batch for a future event or planning weekday lunches, the following strategies will help preserve their flavor and texture.
Make Ahead (Unbaked)
-
Assemble the bombs as instructed, but stop before baking.
-
Place them on a lined baking sheet and freeze for 2 hours until solid.
-
Transfer to a freezer-safe bag or container and freeze for up to 2 months.
-
When ready to bake, no need to thaw—just add 3–5 minutes to the baking time.
Storing Leftovers
-
Store baked bombs in an airtight container in the fridge for up to 4 days.
-
Reheat in a 350°F oven for 8–10 minutes, or in the air fryer at 325°F for 4–5 minutes to maintain crispness.
Freezing Baked Bombs
-
Let them cool completely before freezing.
-
Wrap individually in foil or plastic wrap, then place in a freezer bag.
-
Reheat from frozen at 350°F for 12–15 minutes.
Learn more about food safety and long-term storage methods in this Wikipedia article on food preservation. For creative meal-prep layouts, visit this Pinterest lunchbox snack collection, which features bento box-friendly cheeseburger bomb ideas.
Making ahead ensures you’ll always have a batch of warm, delicious snacks ready to go—perfect for busy schedules.
9. Cheeseburger Bombs vs. Traditional Sliders or Buns
While cheeseburger bombs share similar ingredients with traditional sliders, the two couldn’t be more different in terms of experience. Let’s break down why snack bombs offer a uniquely modern upgrade.
Portability
-
Cheeseburger bombs are compact, sealed, and don’t require utensils—ideal for on-the-go snacking.
-
Sliders, while small, can still be messy and require plates or napkins.
No Buns Required
-
Bombs eliminate the need for traditional burger buns, which can go stale or soggy.
-
The dough acts as both crust and container, keeping the inside juicy without falling apart.
Better for Meal Prep
-
Bombs freeze and reheat better than assembled sliders, making them perfect for batch cooking.
-
They retain flavor and texture even after refrigeration or freezing.
For those interested in evolving their burger game, cheeseburger snack bombs are the next step in innovation. Inspired by classics like the Big Mac but designed for today’s fast-paced lifestyle, they’re a smart swap for anyone craving bold flavor with less mess.
10. Healthier and Dietary Variations
Want to enjoy cheeseburger snack bombs without compromising your dietary goals? With a few simple tweaks, this recipe can be adapted for lower calories, fewer carbs, or even plant-based preferences.
Leaner Meats
-
Swap ground beef with ground turkey, chicken, or a vegan meat substitute like lentils or Beyond Meat.
-
Choose a lower-fat cheese or reduce the amount slightly.
Dough Options
-
Use whole wheat biscuit dough for added fiber.
-
Try low-carb doughs (e.g., almond flour-based fathead dough) for keto-friendly versions.
Dairy-Free and Vegan
-
Use plant-based cheese alternatives.
-
Replace the egg wash with a mixture of almond milk and olive oil.
-
Omit the Big Mac-style sauce or use vegan mayo and mustard alternatives.
Explore creative ideas for healthier snacks on this Pinterest board for kid-friendly snack ideas, many of which include modified versions of classic comfort foods.
With these variations, you can enjoy the taste of a cheeseburger while meeting your nutrition goals.
11. Popular Variations from Pinterest & TikTok
Creative cooks have taken cheeseburger snack bombs viral with endless variations that add new textures, flavors, or formats. Here are a few trending versions making the rounds online:
Casserole Style
-
Instead of individual bombs, spread dough in a casserole dish and top with beef mixture, cheese, and more dough.
-
Bake and slice into squares for a Big Mac casserole effect.
Air Fryer Bombs
-
Place bombs in a preheated air fryer at 350°F for 8–10 minutes.
-
Ideal for smaller batches and a crispier texture.
Hawaiian Roll Bombs
-
Use Hawaiian rolls as the base, hollow them out, and stuff with filling.
-
Bake covered in foil and then uncovered for extra browning.
To see these in action, browse Pinterest trends like this DIY frozen snack board for inspiration.
12. Common Mistakes to Avoid
To ensure your cheeseburger snack bombs come out perfect every time, steer clear of these typical pitfalls:
-
Overfilling: Leads to burst seams and leakage during baking.
-
Not sealing dough properly: Causes the bombs to open up in the oven.
-
Skipping the egg wash: Results in a dull, pale finish.
-
Baking at too high a temperature: May burn the outside before the inside is fully cooked.
For a foolproof finish, stick to the recommended 375°F, follow the steps exactly, and review sauteing methods to perfect your beef filling prep.
13. FAQs – Frequently Asked Questions
Can I make cheeseburger bombs in an air fryer?
Yes, cook them at 350°F for 8–10 minutes in the air fryer. Check halfway for browning and rotate as needed.
How do I keep them from getting soggy?
Drain the beef mixture well and allow it to cool before wrapping. This prevents steam buildup inside the dough.
Can I use puff pastry instead of biscuit dough?
Absolutely! Puff pastry gives a lighter, flakier texture. Just reduce the baking time and keep a close eye to avoid burning.
What’s the best way to reheat leftovers?
Use a 350°F oven for 8–10 minutes or an air fryer for 5 minutes to restore crispiness without drying out the filling.
Can I freeze cheeseburger snack bombs?
Yes, both unbaked and baked bombs freeze well. For best results, freeze individually and reheat from frozen using oven or air fryer settings.
PrintThe Ultimate Guide to Cheeseburger Snack Bombs

These cheeseburger snack bombs are packed with juicy ground beef, melty cheddar cheese, tangy pickles, and wrapped in soft, golden biscuit dough. Inspired by the classic Big Mac, they’re the ultimate hand-held comfort food—perfect for parties, lunches, or game day spreads. Optional Big Mac-style sauce takes these savory treats to the next level.
- Author: Clara
Ingredients
For the beef filling:
- 1 lb ground beef
- 1 small yellow onion, finely diced
- 1 tbsp ketchup
- 1 tbsp yellow mustard
- Salt and pepper, to taste
- 1 cup shredded cheddar cheese
- ½ cup chopped dill pickles
For the dough:
- 1 tube refrigerated biscuit dough (8-count)
- 2 tbsp sesame seeds
- 1 egg, beaten (for egg wash)
For the Big Mac-style sauce (optional):
- ½ cup mayonnaise
- 1 tbsp yellow mustard
- 1 tbsp ketchup
- 2 tsp sweet pickle relish
- ½ tsp garlic powder
- ½ tsp onion powder
Instructions
Preheat the oven to 375°F (190°C) and line a baking sheet with parchment paper.
In a skillet over medium heat, cook diced onion until softened. Add the ground beef and cook until browned. Drain excess fat.
Stir in ketchup, mustard, salt, and pepper. Let it simmer for 2–3 minutes, then remove from heat and let it cool slightly.
Add shredded cheddar cheese and chopped pickles to the cooled beef mixture. Stir to combine.
Flatten each biscuit round slightly with your hands or a rolling pin. Place a spoonful of the beef filling in the center of each round.
Fold the dough around the filling, pinching the edges to seal and form a ball. Place seam-side down on the baking sheet.
Brush each dough ball with the beaten egg and sprinkle with sesame seeds.
Bake for 15–18 minutes or until golden brown.
While they bake, mix all sauce ingredients in a small bowl if using.
Serve warm with the Big Mac-style sauce on the side or drizzled on top.
Notes
-
Make ahead: Prepare and freeze before baking for easy, on-demand snacks.
-
Customize: Try adding bacon, jalapeños, or switching up cheeses to suit your taste.
-
Reheat: Best in the oven or air fryer to maintain a crispy exterior.
-
Serve with: Big Mac sauce, ranch dressing, or your favorite dipping sauces.
-
Presentation: Sprinkle sesame seeds for that authentic burger bun look.