There’s something magical about a dessert that comes together effortlessly yet tastes like you spent hours in the kitchen. This Butterfinger Pie is the kind of treat you make on a warm summer afternoon, for a birthday celebration, or when you simply need a sweet pick-me-up after a long week. It’s cool, creamy, crunchy, and packed with peanut butter flavor in every bite.
I first made this pie for a family gathering where oven space was limited and time was short. Inspired by childhood memories of unwrapping crisp, peanut buttery candy bars, I decided to turn that nostalgic flavor into a creamy, no bake dessert. The result was a show-stopping pie that disappeared within minutes—and has been requested at nearly every celebration since.
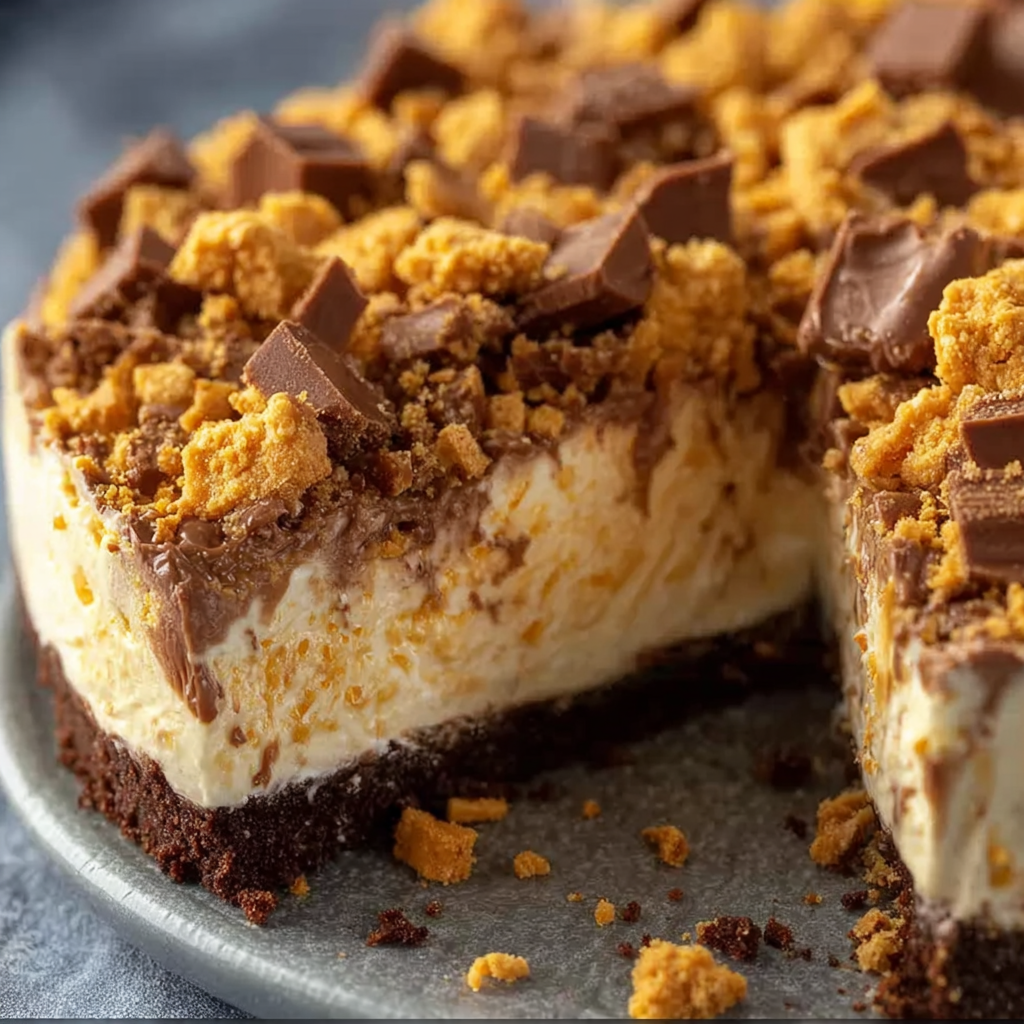
What Makes Butterfinger Pie So Irresistible
The secret to this easy no bake dessert is the unmistakable crunch of Butterfinger candy bars. Their flaky, peanut buttery interior adds texture and bold flavor to a silky smooth peanut butter filling.
Here’s why this recipe works so beautifully:
No baking required – Perfect for hot days or busy schedules.
These measurements ensure the pie sets properly while maintaining a rich, balanced sweetness.
Step-by-Step Instructions
1. Prepare the Crust
In a medium bowl, combine 1 ½ cups chocolate cookie crumbs with 6 tablespoons melted butter. Stir until the mixture resembles wet sand.
Press the crumb mixture firmly into the bottom and sides of a 9-inch pie pan. Use the bottom of a measuring cup to pack it tightly.
Place the crust in the refrigerator for at least 20–30 minutes to firm up.
2. Make the Peanut Butter Filling
In a large mixing bowl, beat together:
1 cup creamy peanut butter
8 ounces softened cream cheese
Mix until smooth and creamy.
Add:
1 cup powdered sugar
1 teaspoon vanilla extract
Beat again until fully combined.
In a separate bowl, whip 1 ½ cups heavy whipping cream until stiff peaks form. Gently fold the whipped cream into the peanut butter mixture, keeping the texture light and airy.
Fold in 6 crushed Butterfinger candy bars, distributing evenly throughout the filling.
3. Assemble the Pie
Spoon the filling into the chilled crust and smooth the top with a spatula.
Refrigerate for at least 4 hours, or until fully set. For best results, chill overnight.
4. Add Toppings
Before serving, spread 1 cup whipped topping over the pie. Sprinkle the remaining crushed Butterfinger candy on top and drizzle with ¼ cup chocolate syrup if desired.
Slice and serve chilled.
Tips for the Perfect No Bake Peanut Butter Pie
Soften the cream cheese fully to avoid lumps.
Whip cream to stiff peaks for the best texture and stability.
Chill thoroughly before slicing for clean cuts.
Use a sharp knife dipped in warm water for picture-perfect slices.
Freeze briefly (30–45 minutes) if you prefer a firmer, icebox-style texture.
Flavor Variations and Substitutions
This Butterfinger Pie recipe is versatile and easy to customize.
Try a Different Crust
Graham cracker crust (1 ½ cups crumbs + 6 tablespoons butter)
Oreo crust for extra chocolate depth
Pretzel crust for a sweet-and-salty twist
Make It Lighter
Substitute whipped topping for heavy cream.
Use reduced-fat cream cheese.
Extra Chocolate Lovers Version
Add ½ cup mini chocolate chips to the filling.
Mix melted chocolate into half the filling and swirl.
Mini Pie Cups
Press crust into cupcake liners and portion the filling into individual servings for parties.
Serving Suggestions
This no bake Butterfinger Pie is perfect for:
Birthday celebrations
Holiday dessert tables
Potlucks
Backyard barbecues
After-school treats
Make-ahead weekend desserts
Pair it with:
Fresh strawberries
A scoop of vanilla ice cream
A hot cup of coffee
A glass of cold milk
Storage Instructions
Store covered in the refrigerator for up to 4 days.
Freeze for up to 1 month. Wrap tightly in plastic wrap and foil.
Thaw in the refrigerator overnight before serving.
Frequently Asked Questions
1. Can I Make Butterfinger Pie Ahead of Time?
Absolutely. In fact, this pie tastes even better when made in advance. Because it’s a no bake dessert, it relies on chilling time to set properly. Preparing the pie at least 4 hours ahead allows the filling to firm up and the flavors to meld together beautifully.
For best results, make it the night before serving. This gives the peanut butter filling enough time to stabilize and ensures clean, smooth slices. If you’re preparing it for a party or holiday gathering, you can even make it up to 24 hours in advance and keep it covered in the refrigerator.
If you’re concerned about the topping, you can add the whipped topping and crushed candy just before serving for the freshest presentation. The pie base itself holds up very well in the refrigerator.
2. Can I Use Crunchy Peanut Butter Instead of Creamy?
Yes, but it will change the texture slightly. Creamy peanut butter provides a smooth, silky filling that contrasts nicely with the crunchy candy pieces. Using crunchy peanut butter will add more texture throughout the pie.
If you enjoy extra crunch and a more pronounced peanut texture, it’s a great substitution. However, keep in mind that the Butterfinger candy already provides crispiness. For the most balanced result, many bakers prefer creamy peanut butter and let the candy deliver the crunch.
You can also use natural peanut butter, but make sure it’s well stirred and not too oily, as excess oil can affect how the pie sets.
3. How Do I Keep the Pie from Being Too Soft?
The most common reason a no bake peanut butter pie turns out soft is insufficient chilling time or under-whipped cream. Make sure to whip the heavy cream until stiff peaks form before folding it into the filling. This gives the pie structure and stability.
Chill the assembled pie for at least 4 hours, though overnight is ideal. If you need it to set faster, you can place it in the freezer for about 45 minutes to an hour before serving.
Also ensure accurate measurements. Too much liquid or not enough powdered sugar can impact the consistency. Following the ingredient amounts precisely will give you the perfect creamy yet firm texture.
4. Can I Freeze Butterfinger Pie?
Yes, this pie freezes beautifully. In fact, some people prefer it slightly frozen because it becomes even more sliceable and takes on an ice cream–like texture.
To freeze, wrap the pie tightly in plastic wrap and then foil. It will keep well for up to 1 month. When ready to serve, thaw in the refrigerator for several hours or overnight.
If you want a firmer dessert, serve it partially frozen straight from the freezer after letting it sit at room temperature for about 10–15 minutes. The texture becomes rich and decadent while still creamy.
Final Thoughts
Butterfinger Pie is one of those desserts that feels both nostalgic and indulgent. The combination of peanut butter, chocolate, and crunchy candy creates layers of flavor and texture that keep every bite exciting. It’s rich without being overwhelming, sweet but balanced, and impressive without requiring advanced baking skills.
What makes this easy no bake dessert truly special is its simplicity. With minimal prep time and no oven required, it’s accessible to beginners while still delivering bakery-quality results. It’s the kind of recipe you’ll find yourself returning to for birthdays, holidays, and casual get-togethers.
The creamy filling, crunchy candy bits, and chocolatey crust come together in perfect harmony. Each slice offers that classic peanut butter and chocolate flavor combination that never goes out of style. Plus, the make-ahead convenience means less stress and more time enjoying the moment.
If you’re looking for a dessert that’s guaranteed to impress guests and satisfy serious sweet cravings, this Butterfinger Pie deserves a spot in your recipe collection. Once you try it, it may just become your new go-to no bake favorite.