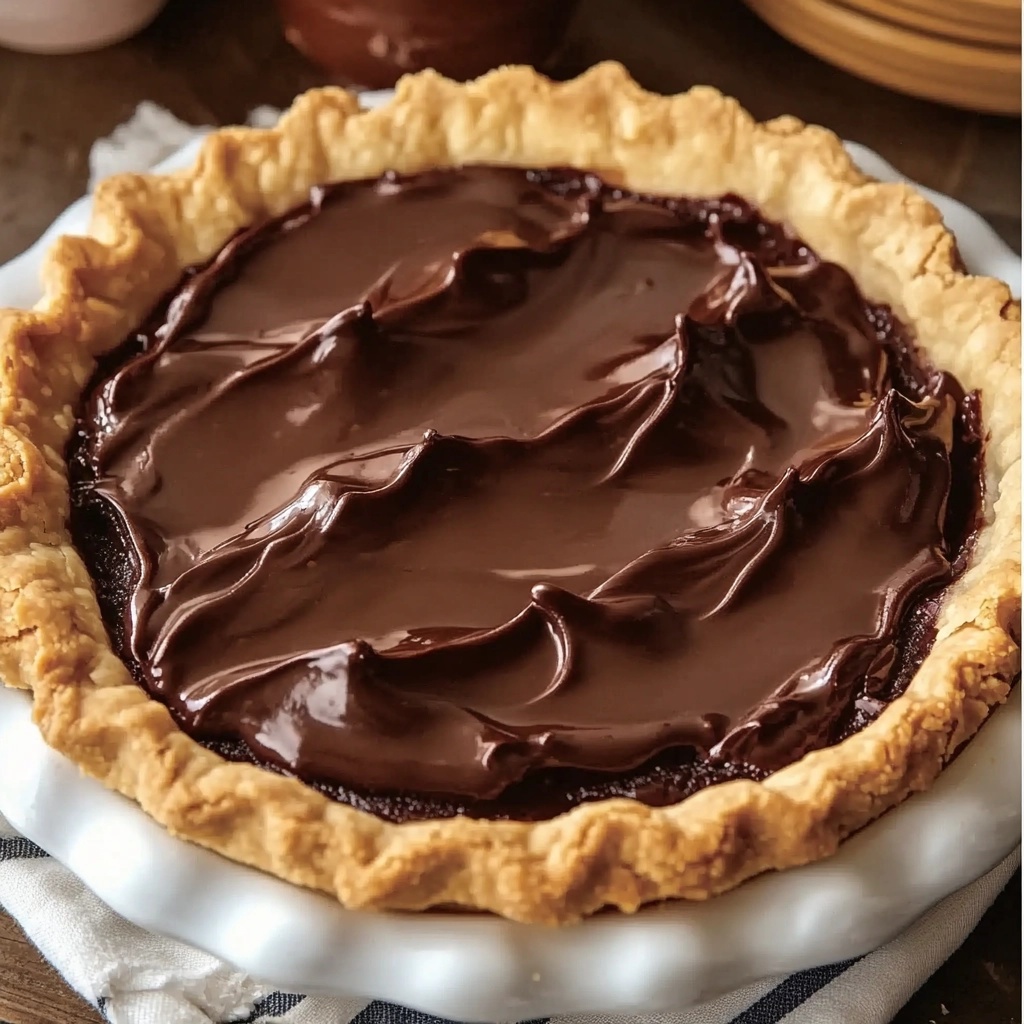
There’s something universally comforting about a slice of homemade chocolate pie. Whether it’s for a special occasion or just a weekend treat, this dessert has a way of making any moment feel like a celebration. The rich chocolate filling paired with a flaky, buttery pie crust is a combination that never goes out of style. When made from scratch, it becomes even more special, allowing you to indulge in an irresistibly creamy texture and deeply satisfying flavor.
If you’ve never baked a chocolate pie before, it’s easier than it seems, and the results are nothing short of heavenly. The smooth chocolate filling, combined with a light, crisp crust and an optional whipped cream topping, elevates the dessert into a luxurious treat. Perfect for impressing guests at a dinner party or enjoying a slice after a long day, this pie is the epitome of comfort food. Not to mention, its versatility allows you to customize it with different chocolate varieties or toppings like shaved chocolate or a dusting of cocoa powder.
Making chocolate pie at home doesn’t just guarantee superior flavor, it also allows you to tailor every element to your preference. Whether you prefer a richer dark chocolate filling or a more subtle milk chocolate experience, the possibilities are endless. And if you’re looking to experiment, try different crust options, like an Oreo crust or a graham cracker crust, which will add an interesting twist to your pie.
By following a simple recipe, anyone can create a chocolate pie that rivals any bakery-made dessert. Below, we’ll explore every step of the process—from the ingredients and preparation to expert tips for making the best homemade chocolate pie.
If you’re curious about other pie variations, you can learn more about the different types of pies and their unique characteristics on Wikipedia. Additionally, exploring tips for achieving the perfect pie crust, including techniques like using cold butter and ice water, can make all the difference in your pie-making success.
Ingredients and Preparation
Detailed Breakdown of Ingredients
To make the perfect homemade chocolate pie, you need just a few basic ingredients. Let’s break them down into categories: the crust, the filling, and the topping.
For the Crust:
-
1 ½ cups all-purpose flour: This forms the base of the crust. It provides structure while keeping it light and flaky.
-
½ tsp salt: Salt balances the sweetness and adds flavor depth to the crust.
-
½ cup unsalted butter, cold and cut into cubes: Cold butter is essential for achieving that flaky texture. It creates pockets of air in the dough that expand during baking.
-
3-4 tbsp ice water: Ice water helps bind the dough without warming up the butter, which is crucial for a flaky texture.
For the Filling:
-
1 ½ cups whole milk: Milk provides the creamy base for the filling.
-
1 cup heavy cream: Heavy cream adds richness and smoothness to the filling, making it decadent.
-
¾ cup granulated sugar: This sweetens the filling. You can adjust the amount to your taste preference.
-
3 tbsp cocoa powder: Cocoa powder is key to the deep, chocolatey flavor of the pie.
-
3 tbsp cornstarch: Cornstarch acts as a thickening agent, helping the filling set properly and achieve a smooth, creamy texture.
-
4 large egg yolks, beaten: Egg yolks add richness and help thicken the filling as it cooks.
-
3 tbsp unsalted butter: Butter enhances the flavor and smoothness of the filling.
-
1 tsp vanilla extract: Vanilla brings out the chocolate flavor and adds a subtle sweetness.
-
Pinch of salt: A small amount of salt intensifies the overall flavor, balancing the sweetness.
For the Topping (Optional):
-
Whipped cream: This light topping complements the richness of the chocolate filling, adding a fluffy texture and a bit of freshness.
-
Shaved chocolate: A garnish of shaved chocolate elevates the presentation and adds an extra chocolatey touch.
These ingredients are simple, but together they create a pie that’s nothing short of magical. You can find all of these ingredients at your local grocery store or check out Pinterest for creative ways to customize your ingredients with fun twists on the classic recipe.
Step-by-Step Instructions for Making the Pie
1. Preparing the Crust:
-
Preheat your oven to 350°F (175°C).
-
In a medium mixing bowl, combine the all-purpose flour and salt. Mix them together until evenly combined.
-
Add the cold, cubed butter to the flour mixture. Using a pastry cutter or a fork, work the butter into the flour until it resembles coarse crumbs.
-
Gradually add ice water, one tablespoon at a time, mixing until the dough begins to come together.
-
Transfer the dough onto a floured surface and roll it into a 12-inch circle. Carefully place it into a 9-inch pie dish, trimming any excess dough around the edges.
-
Fold the edges of the dough under to create a neat edge, and prick the bottom of the crust with a fork to prevent bubbles while baking.
-
Bake the crust for 10-12 minutes, or until it’s lightly golden. Remove it from the oven and set it aside to cool.
2. Preparing the Filling:
-
In a medium saucepan, combine the whole milk, heavy cream, sugar, cocoa powder, and cornstarch. Cook over medium heat, whisking constantly until the mixture thickens and begins to boil.
-
Once the mixture starts to bubble, remove it from the heat and slowly whisk about a cup of the hot mixture into the beaten egg yolks to temper them. This prevents the eggs from scrambling.
-
Return the egg mixture to the saucepan, continue whisking constantly, and bring it back to a boil. Let it boil for another 2 minutes until it thickens even further.
-
Remove the saucepan from the heat and stir in the unsalted butter, vanilla extract, and a pinch of salt until fully incorporated. This step adds extra richness and flavor to the filling.
3. Assembling the Pie:
-
Pour the prepared filling into the cooled pie crust, smoothing the top with a spatula to create an even layer.
-
Allow the pie to cool to room temperature, then refrigerate it for at least 4 hours or until the filling is completely set.
4. Topping the Pie (Optional):
-
Before serving, you can add a dollop of whipped cream on top and sprinkle with shaved chocolate for an extra touch of elegance.
Tips and Tricks for the Best Chocolate Pie
Achieving a Flaky and Perfect Pie Crust
The crust is one of the most important components of your homemade chocolate pie, and achieving that perfect flaky texture can sometimes be tricky. Here are some essential tips to ensure your crust comes out beautifully every time:
-
Use Cold Ingredients: One of the secrets to a flaky pie crust is using cold ingredients. Keep the butter and ice water cold to prevent the butter from melting before baking. This helps the dough stay firm and creates pockets of air during baking, resulting in a flaky texture.
-
Don’t Overwork the Dough: When mixing the dough, work quickly and avoid over-mixing. Overworking the dough can lead to a tough crust rather than a tender, flaky one. When the dough starts to come together, it’s ready to roll out.
-
Roll Out the Dough Evenly: Ensure the dough is rolled out evenly to avoid uneven baking. Aim for about a 12-inch circle to fit a standard 9-inch pie dish. If it cracks while transferring to the dish, simply press the dough back together with your fingers.
-
Chill the Crust Before Baking: After placing the dough in the pie dish, it’s important to chill it for about 30 minutes before baking. This helps prevent the crust from shrinking during baking and allows the butter to firm up again.
-
Prevent Shrinking: To avoid crust shrinkage while baking, place parchment paper over the pie dough and fill it with pie weights or dried beans during the first 10 minutes of baking. This ensures the crust stays in place as it bakes.
For additional tips on perfecting your crust, you can explore more techniques and ideas on Pinterest. You’ll find helpful resources on creating different types of crusts, such as an Oreo crust or graham cracker crust, which would also work well with chocolate pie.

Tips for a Creamy and Smooth Chocolate Filling
Making the perfect chocolate filling is key to a decadent pie. Here are some expert tips to ensure the filling is smooth, creamy, and rich:
-
Whisk Constantly: As you heat the milk, cream, cocoa powder, and cornstarch mixture, it’s essential to whisk constantly to avoid lumps. Stirring ensures that the mixture thickens evenly and prevents any part from burning.
-
Temper the Eggs: When you add the egg yolks to the hot mixture, it’s crucial to temper the eggs. This means gradually adding a small amount of the hot mixture into the egg yolks before returning it to the saucepan. This step helps prevent curdling and ensures a smooth filling.
-
Don’t Overcook the Filling: Once the filling has thickened, don’t overcook it. You only need to bring the mixture to a gentle boil and cook for an additional 2 minutes to fully thicken. Overheating can lead to a grainy or split filling.
-
Add Butter and Vanilla at the Right Time: Stir the butter and vanilla extract into the hot filling after removing it from the heat. This helps the butter melt perfectly and adds a glossy finish to the filling.
-
Let the Filling Cool Properly: Allow the filling to cool to room temperature before refrigerating. This ensures that the filling sets without becoming too soft or runny. Refrigerating it for at least 4 hours helps it achieve the perfect texture.
By following these tips, you’ll have a smooth and creamy chocolate filling that will wow your guests.
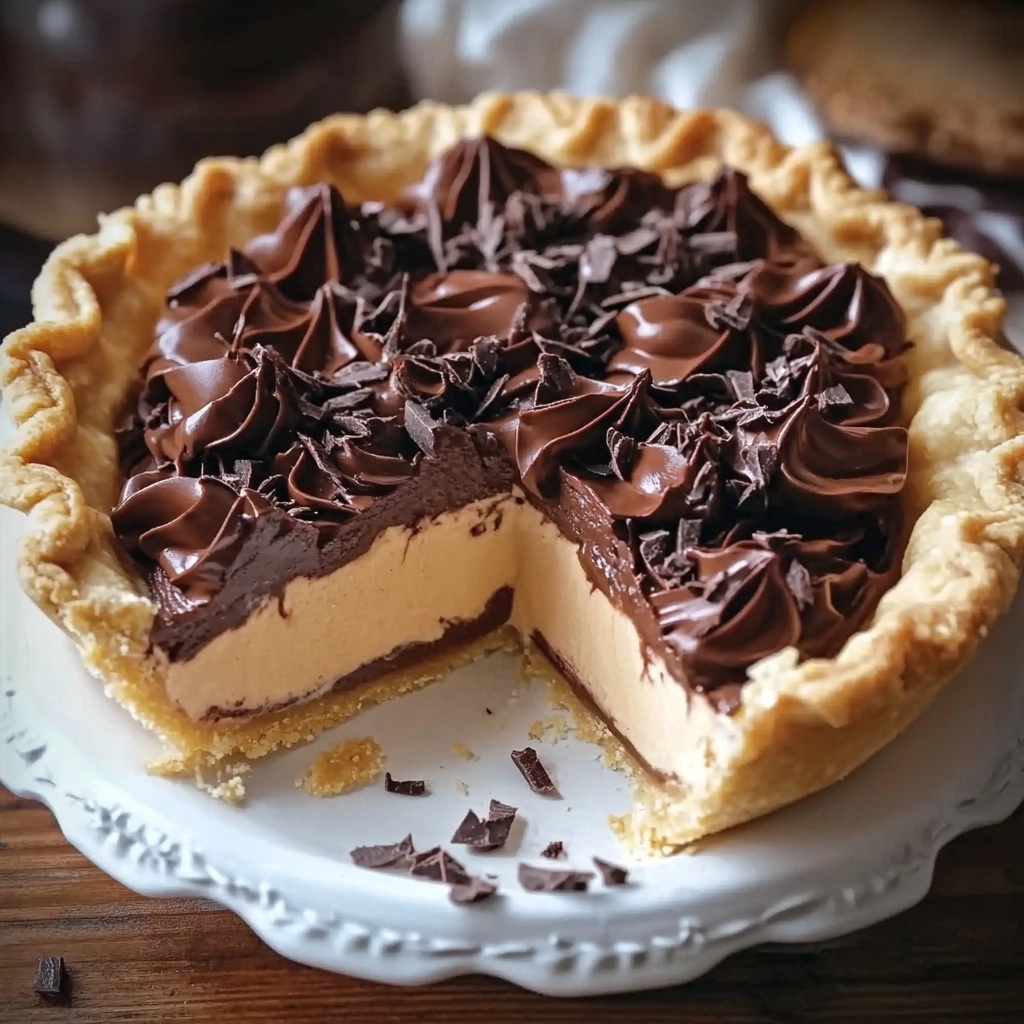
How to Perfectly Garnish the Pie
The finishing touches on your pie, such as the whipped cream and shaved chocolate, are not just for decoration—they also enhance the flavor and make the pie look even more enticing. Here’s how to make sure your pie is beautifully garnished:
-
Whipped Cream: To make a fluffy, stable whipped cream, use cold heavy cream and beat it at a high speed until soft peaks form. Be careful not to overwhip it, or it could turn into butter. Add a little vanilla extract or powdered sugar for sweetness.
-
Shaved Chocolate: Use a vegetable peeler to shave pieces of your favorite chocolate bar. You can either use dark chocolate, milk chocolate, or even white chocolate for a unique presentation. Lightly sprinkle the chocolate shavings over the whipped cream to create a visually appealing contrast.
-
Other Garnishes: If you want to add a personal touch, you can top your chocolate pie with crushed nuts, such as pecans or almonds, or even a light dusting of cocoa powder for extra richness.
For additional inspiration, you can visit Pinterest for creative garnishing ideas or to find more pie recipes that feature unique toppings and fillings.
Variations and Customization
Different Crust Options
While a classic pie crust is always delicious, there are several other crust variations you can try to enhance your chocolate pie experience. Some options include:
-
Graham Cracker Crust: This crust adds a slight sweet and buttery flavor that complements the rich chocolate filling. It’s simple to make by mixing crushed graham crackers with melted butter and a little sugar, then pressing the mixture into the pie dish.
-
Oreo Crust: For an even more indulgent twist, you can make an Oreo crust. Simply crush Oreo cookies and combine them with melted butter. This crust brings an extra layer of chocolate flavor and is perfect for chocolate lovers.
-
Gluten-Free Crust: If you’re catering to gluten-free diets, you can easily swap out traditional flour for a gluten-free flour blend or use a pre-made gluten-free pie crust. Ensure that the rest of the ingredients are also gluten-free for a fully inclusive dessert.
Each of these crusts brings its own unique twist to the pie, so feel free to experiment and find the combination that suits your taste best.
Flavor Variations for the Filling
One of the best parts of making your own chocolate pie is the ability to experiment with flavors. Here are a few variations you might want to try:
-
Espresso-Infused Chocolate Pie: Add a tablespoon of espresso powder or strong brewed coffee to the filling to enhance the chocolate flavor. This gives the pie a rich, coffee-chocolate profile that pairs wonderfully with the creamy filling.
-
Spiced Chocolate Pie: For a little warmth, you can add spices like cinnamon, nutmeg, or even a touch of chili powder to the filling. These spices complement the chocolate and give the pie a cozy, festive feel.
-
Mint Chocolate Pie: Incorporate a little mint extract into the filling or top the pie with mint-flavored whipped cream. This version is perfect for those who love the combination of chocolate and mint.
-
White Chocolate Pie: For a completely different flavor, you can substitute some or all of the dark chocolate with white chocolate. The filling will be sweeter and lighter, but still creamy and indulgent.
These variations allow you to put your own spin on the classic recipe and make it a special treat for different occasions.
Vegan or Dairy-Free Options
If you’re following a vegan or dairy-free diet, it’s easy to modify this recipe:
-
Dairy-Free Milk: Substitute the whole milk and heavy cream with coconut milk, almond milk, or oat milk. These alternatives still provide the creaminess needed for the filling.
-
Egg-Free Filling: To make the filling egg-free, you can replace the egg yolks with cornstarch or arrowroot powder, which will still thicken the mixture without using animal products.
-
Vegan Butter: Use vegan butter in place of regular butter. This helps to maintain the smooth texture and flavor of the filling.
By making these simple swaps, you can create a delicious vegan chocolate pie that everyone can enjoy.
Troubleshooting and Common Mistakes to Avoid
Common Mistakes and How to Fix Them
Making a homemade chocolate pie can sometimes come with a few hiccups. Here are some common mistakes and tips for avoiding or fixing them:
-
Soggy Pie Crust: If your crust is soggy, it might not have been baked long enough or properly pre-baked. To prevent this, always pre-bake your crust before adding the filling. If it’s already soggy, try baking it for a few more minutes or consider using a thicker crust like a graham cracker base.
-
Runny Filling: If your filling doesn’t set properly and remains too runny, it may not have been cooked long enough to thicken. Make sure the mixture comes to a full boil and cook for a couple of extra minutes before removing it from the heat. If this happens after refrigeration, adding a bit more cornstarch next time can help ensure it firms up.
-
Cracked Filling: Cracks can form in the filling if it’s overcooked or cooled too quickly. Allow the pie to cool gradually to room temperature before refrigerating. You can also cover the pie while it’s cooling to keep the top from drying out.
-
Too Sweet or Too Bitter: Adjust the sweetness level by adding more sugar if needed. Alternatively, you can add a pinch of salt or a bit of vanilla extract to balance out any overly bitter chocolate.
These tips will help you troubleshoot common problems and ensure your chocolate pie turns out perfectly every time.
How to Store Leftover Chocolate Pie
-
Refrigeration: If you have leftover pie, cover it tightly with plastic wrap or store it in an airtight container. Refrigerate it for up to 3-4 days to keep it fresh.
-
Freezing: Chocolate pie can be frozen if you want to enjoy it at a later date. After it’s fully set, cover the pie with plastic wrap, followed by a layer of aluminum foil, and freeze for up to 3 months. Thaw in the fridge before serving.

FAQs
-
Can I make the chocolate pie ahead of time?
-
Yes, this pie is perfect for making ahead of time. Prepare the entire pie, then refrigerate it for at least 4 hours to let it set. You can make it a day or two before your event to save time.
-
-
Why is my chocolate filling runny?
-
A runny filling can be due to undercooking or not using enough cornstarch. Ensure you bring the mixture to a boil and cook for 2 minutes after the egg yolks are added. Add a little more cornstarch next time to help the filling set.
-
-
Can I freeze the chocolate pie?
-
Yes, you can freeze the chocolate pie. Just be sure to cover it tightly before freezing to avoid freezer burn. Let it thaw in the fridge for a few hours before serving.
-
-
Can I use dark chocolate instead of cocoa powder in the filling?
-
Yes, you can substitute dark chocolate for cocoa powder. Melt the chocolate before adding it to the filling mixture, and adjust the amount of sugar to balance the bitterness of the dark chocolate.
-
-
What can I use if I don’t have cornstarch for the filling?
-
If you don’t have cornstarch, you can use arrowroot powder, flour, or even instant pudding mix as a thickening agent. Just make sure to adjust the quantity according to the replacement.
-
How to Make the Perfect Homemade Chocolate Pie

This decadent homemade chocolate pie combines a buttery, flaky crust with a rich, creamy chocolate filling that is sure to satisfy any dessert lover. The filling is made with a mixture of whole milk, heavy cream, cocoa powder, and cornstarch, ensuring the perfect texture. Topped with whipped cream and shaved chocolate, this pie is a true indulgence. Whether you’re preparing it for a holiday celebration, a family gathering, or just because, this pie is a crowd-pleaser that never goes out of style.
- Author: Clara
Ingredients
For the crust:
- 1 ½ cups all-purpose flour
- ½ tsp salt
- ½ cup unsalted butter, cold and cut into cubes
- 3–4 tbsp ice water
For the filling:
- 1 ½ cups whole milk
- 1 cup heavy cream
- ¾ cup granulated sugar
- 3 tbsp cocoa powder
- 3 tbsp cornstarch
- 4 large egg yolks, beaten
- 3 tbsp unsalted butter
- 1 tsp vanilla extract
- Pinch of salt
For the topping:
- Whipped cream (optional)
- Shaved chocolate (optional)
Instructions
Preheat your oven to 350°F (175°C).
To make the crust, combine the flour and salt in a mixing bowl. Cut in the cold butter using a pastry cutter or fork until the mixture resembles coarse crumbs. Slowly add the ice water, one tablespoon at a time, mixing until the dough comes together.
Turn the dough out onto a floured surface and roll it into a 12-inch circle. Carefully transfer it to a 9-inch pie dish and trim any excess dough, folding the edges under to create a neat crust. Prick the bottom with a fork to prevent bubbling during baking.
Bake the crust for 10-12 minutes until lightly golden. Remove from the oven and set aside to cool.
For the filling, in a medium saucepan, combine the milk, heavy cream, sugar, cocoa powder, and cornstarch. Cook over medium heat, whisking constantly, until the mixture thickens and begins to boil.
Once the mixture starts to bubble, remove it from the heat and gradually whisk about a cup of the hot mixture into the beaten egg yolks. Return the egg mixture to the saucepan, continuing to whisk constantly. Bring the mixture to a boil again and cook for 2 more minutes until thickened.
Remove from the heat and stir in the butter, vanilla extract, and a pinch of salt until fully incorporated.
Pour the filling into the cooled pie crust and smooth the top with a spatula. Let the pie cool to room temperature, then refrigerate for at least 4 hours or until set.
Before serving, top with whipped cream and shaved chocolate, if desired.
Notes
-
Prep Time: 20 minutes (plus cooling/refrigeration time)
-
Cook Time: 20-25 minutes for filling and crust
-
Serving Size: Makes about 8 servings
-
Customization: You can easily modify this recipe by adding your favorite flavor variations such as espresso, mint, or cinnamon. For a vegan version, substitute the dairy ingredients with coconut milk and vegan butter.
-
Storage: Store any leftovers in the refrigerator for up to 3-4 days or freeze for up to 3 months. Thaw in the fridge before serving.