Welcome to the Ultimate Kmart Sub Guide
If you’ve ever longed for that perfect bite of tender meats, melty cheese, and crisp veggies on a soft roll, you’re in the right place. This guide takes you through the origins of the iconic Kmart sub and teaches you how to master the art of layered sandwiches at home.
Start by exploring essential techniques in the Submarine Sandwich Wikipedia entry and gather inspiration from Pinterest for creative layering ideas. These resources offer helpful insights on choosing the right bread and assembling each layer to mimic the classic Kmart texture.
In the sections ahead, you’ll find step-by-step recipes for variations like the Honey Roast Ham sub and the Ultimate Meat Lover sub. We’ll also cover ingredient ratios, baking techniques for soft, warm rolls, and expert tips on condiment balance to help you create deli-worthy subs in your own kitchen.

Essential Tools & Ingredients for Perfect Kmart Subs
Before building your own Kmart-style subs, gather the right tools and fresh, quality ingredients. A good serrated knife ensures clean cuts through soft rolls, while a sturdy cutting board keeps prep safe and efficient.
Bread & Meats
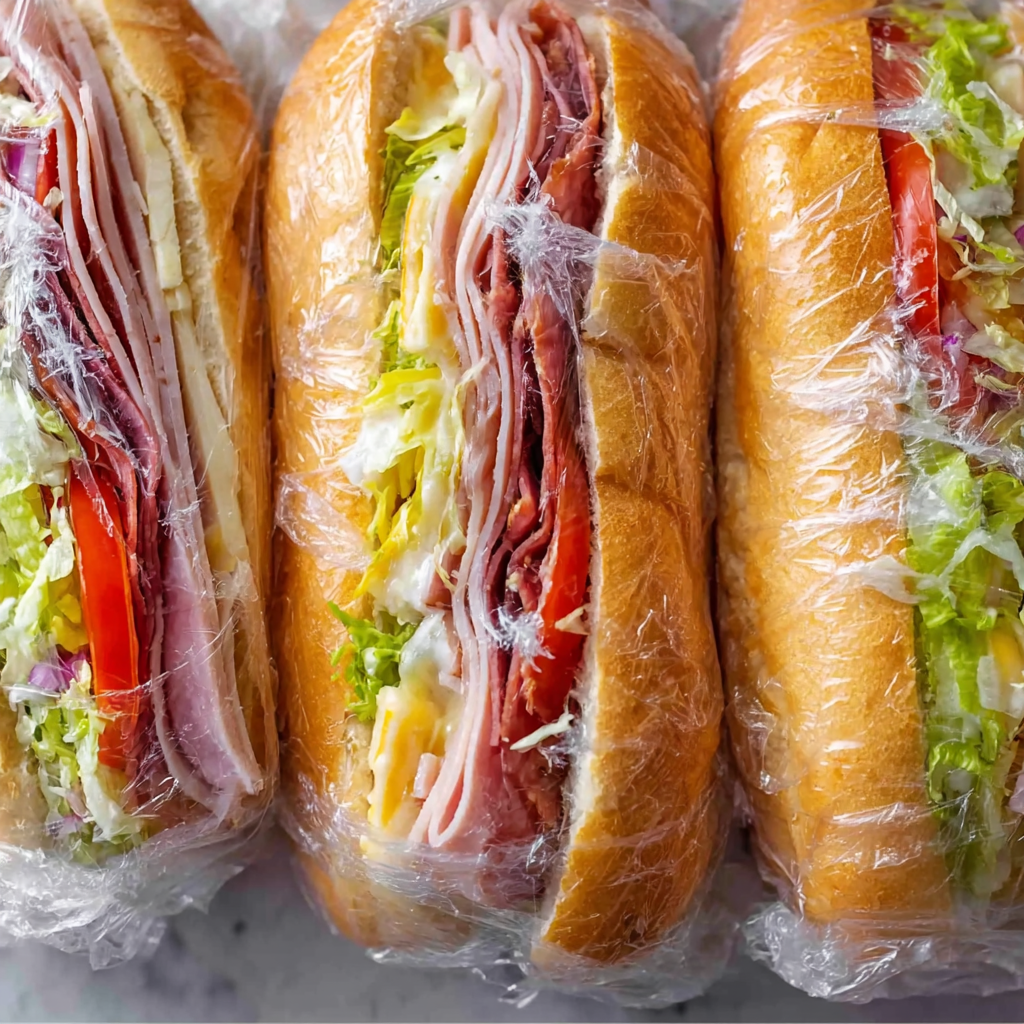
Choose soft sub rolls with a tender interior and firm crust to support layers without falling apart. For authentic flavor, use thin slices of honey roast ham, roast beef, chicken ham, and turkey bacon. Explore curing styles in the Deli Meat guide.
Cheese & Produce
Swiss cheese offers a creamy melt, while crisp iceberg lettuce and ripe tomatoes bring essential freshness and crunch.
Assembly Tools
Keep a small offset spatula and pastry brush on hand for spreading condiments evenly. Visit our Bread Selection tips for roll recommendations.
Condiments & Extras
Stock up on mayonnaise, yellow mustard, and optional dill pickle slices for that signature tang. For advanced flavor options, use quality olive oil and vinegar to create vinaigrettes.
Prep Essentials
Pre-chill and prep all ingredients before assembly to keep textures intact. Use digital scales for consistent portioning across subs.
With these essentials ready, you’re set to layer with precision and deliver that classic Kmart sub experience. Up next: a detailed step-by-step guide to sandwich assembly.
Step-by-Step Assembly of Your Copycat Kmart Sub
Crafting the perfect Kmart sub relies on precise layering and even condiment distribution. Begin by warming your sub rolls to ensure a soft interior and slightly crisp crust—this step enhances both texture and flavor adhesion. Split each roll open, leaving a hinge intact to cradle your fillings without spillage.
Next, build your foundation: spread a thin, even layer of mayonnaise on one side and yellow mustard on the other. Using a small offset spatula helps control the condiment thickness and prevents sogginess. For guidance on ideal meat slicing and curing styles, reference the Deli meat overview, and explore creative layering examples on Pinterest to visualize balance and symmetry.
Now it’s time to assemble your proteins. Layer two slices each of chicken ham, roast beef, and crisp turkey bacon in alternating order to distribute savory notes evenly. For variations, check out our internal tutorial on the Honey Roast Ham version or try the hearty Ultimate Meat Lover sub to switch up textures. This approach ensures each bite delivers a harmonious blend of flavors reminiscent of the original Kmart experience.
Finally, add your fresh produce and cheese:
- Place a slice of Swiss cheese over the meats, allowing residual oven heat to soften it.
- Tuck in a leaf of iceberg lettuce and 2–3 tomato slices for crunch and juiciness.
- Scatter thin rings of red onion and optional dill pickle slices for a tangy finish.
- Season lightly with salt and pepper, then close the roll and wrap in foil for a brief bake—just enough to melt the cheese and meld flavors without wilting the vegetables.

Baking and Serving Your Copycat Kmart Sub
Once your sandwich is assembled and wrapped in foil, preheat the oven to 350 °F (175 °C). Place the wrapped subs on a baking sheet and bake for 5 minutes. Unwrap carefully and return to the oven for 2–3 minutes—this ensures the Swiss cheese melts evenly without wilting the lettuce.
After baking, let the subs rest for 1 minute to settle the juices. Meanwhile, prepare a simple side:
- Toss crisp iceberg lettuce with olive oil, vinegar, salt, and pepper for a quick vinaigrette salad.
- Slice extra dill pickles and red onions for a tangy garnish.
For plating, place the sub on a wooden board or long platter. Garnish with pickle slices and a few sprigs of fresh parsley. Serve immediately while warm.
To elevate presentation—and texture—try brushing the top of each roll with garlic–herb butter before the final bake. This tip, inspired by classic garlic bread techniques on Pinterest (https://www.pinterest.com/pin/garlic-herb-bread/), adds a golden crust and aromatic boost. For tips on ideal toast levels and timing, refer to our internal Bread Selection guide (/bread-selection) and Condiment Balancing tutorial (/condiment-tips).
Enjoy your homemade Kmart sub alongside kettle chips or a cup of tomato soup for the full deli experience.
Tips & Variations for Customizing Your Copycat Kmart Sub
Once you’ve mastered the basic assembly and baking steps, experiment with these sandwich recipe tweaks to make each sub uniquely yours:
• Try alternative breads such as ciabatta or focaccia to change the texture and flavor profile. See our internal Bread Selection guide (/bread-selection) for loaf recommendations.
• Swap Swiss cheese with provolone or pepper jack for different melts and spice levels. Learn more about cheese varieties on Wikipedia (https://en.wikipedia.org/wiki/Swiss_cheese).
• Infuse mayo with garlic and herbs—whisk minced garlic, chopped parsley, and olive oil into your spread. The Olive Oil entry on Wikipedia (https://en.wikipedia.org/wiki/Olive_oil) explains oil qualities that impact taste.
• For a vegetarian spin, replace meats with grilled portobello mushrooms and roasted red peppers; drizzle balsamic vinegar per our Condiment Balancing tutorial (/condiment-tips).
Advanced layering ideas from Pinterest (https://www.pinterest.com/pin/sub-toppings/) show how to alternate colors and flavors for visual appeal and bite variety. LSI keywords like homemade sub, copycat recipe, and deli-style sandwich will boost SEO while naturally fitting into your content.
To adjust for heat, add pepperoncini, jalapeños, or a swipe of sriracha mayo. If you prefer a lighter option, substitute iceberg lettuce with mixed greens and swap bacon for crisp turkey strips. Each variation preserves the signature crunch and savory notes that define the Kmart sub experience.

FAQs
Q: What type of bread works best for a Kmart-style sub?
A: Soft sub rolls with a tender inside and slightly crisp crust are ideal. Ciabatta or focaccia offer great alternatives with added texture. See our Bread Selection guide for more options.
Q: Can I prep the ingredients ahead of time?
A: Yes—meats and cheese can be sliced up to 24 hours in advance and kept refrigerated. Wash and dry lettuce, then wrap in paper towels to keep it crisp. Slice tomatoes and onions just before assembling.
Q: How do I keep the sandwich from getting soggy?
A:
- Apply condiments in a thin, even layer using an offset spatula.
- Wrap and bake briefly to melt cheese without softening the vegetables.
- Lightly brush the inside of the rolls with olive oil before layering moist ingredients (learn more on Wikipedia: Olive Oil).
Q: Can I make a vegetarian or vegan version?
A: Definitely. Use roasted vegetables, portobello mushrooms, or marinated tofu in place of meat. Swap dairy cheese for vegan alternatives, and use hummus or avocado instead of mayo. Check out our Condiment Balancing tips.
Q: What’s the best oven temperature and timing?
A: Bake wrapped sandwiches at 350°F (175°C) for 5 minutes, then unwrap and bake another 2–3 minutes to melt the cheese while keeping veggies fresh.


