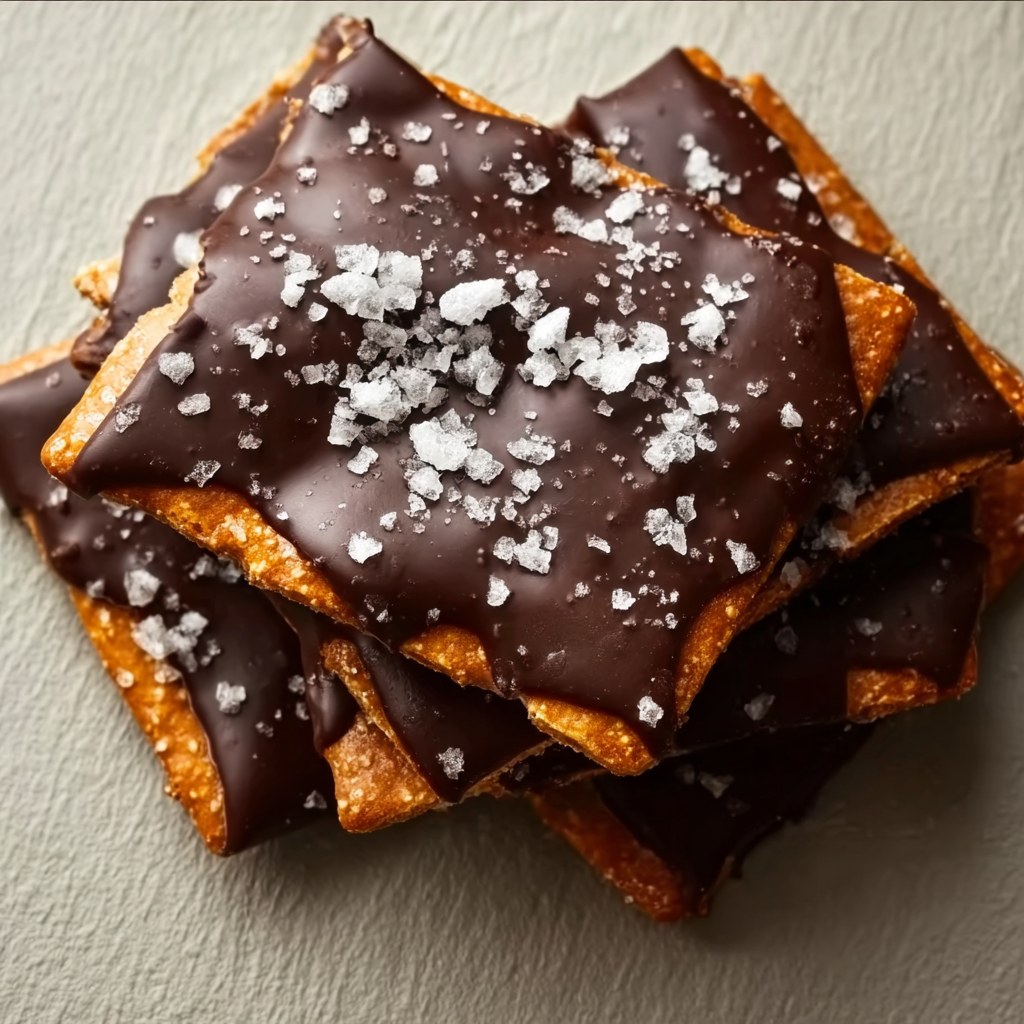
1.Looking for a fast, delicious treat you can make with just a few ingredients? Chocolate covered graham crackers are the answer. These crunchy, sweet snacks are dipped in silky melted chocolate and topped with your favorite extras—making them perfect for gifting, sharing, or just snacking on the go. Whether you’re prepping for the holidays, need a quick dessert platter idea, or want a fun weekend project, this recipe is ideal for all ages and occasions.
One of the best things about chocolate graham cracker treats is how customizable they are. You can use different types of chocolate, toppings, or even cracker flavors to create endless variations. Plus, they take just minutes to prepare and don’t require any baking at all. For added fun, try pairing them with other no-bake desserts like marshmallow pops or chocolate-dipped pretzels for a full DIY sweets spread.
Graham crackers have a long culinary history, dating back to the 19th century as a health food. You can learn more about the origin of graham crackers and their evolution into today’s sweet treat. Pairing them with chocolate, whether dark, milk, or white, gives them a delightful twist that everyone—from kids to adults—will enjoy. For creative presentation ideas, you can explore DIY food gift inspiration on Pinterest, which shows how to package these treats beautifully for holidays, birthdays, or school events.
If you’re in the mood for a quick homemade dessert, chocolate covered graham crackers offer the perfect mix of crunchy texture, smooth chocolate coating, and just enough room for creativity. Whether you’re a beginner or an experienced home cook, you’ll love making—and sharing—this classic treat.

2. Why You’ll Love This Recipe
There’s a reason chocolate covered graham crackers have become a go-to snack and gift idea: they’re simple, quick, and endlessly customizable. If you’ve never made them before, you’ll be amazed at how easy it is to get delicious results without turning on the oven. Here’s why this recipe stands out:
-
Minimal ingredients: You only need graham crackers, chocolate chips, and optional toppings like sprinkles or nuts.
-
No baking required: Perfect for hot days, busy schedules, or quick last-minute treats.
-
Kid-friendly activity: This is a great recipe for kids to help with—especially when it comes to dipping and decorating.
-
Holiday and seasonal flexibility: Use themed toppings like red and green sprinkles for Christmas or heart-shaped candies for Valentine’s Day.
-
Budget-friendly: You can make a large batch without spending much, especially if you’re using store-brand ingredients.
One standout feature of this recipe is how well it fits into DIY dessert platters or homemade gift boxes. For inspiration, check out these ideas for chocolate treat gift wrapping that elevate simple snacks into thoughtful presents. When you’re creating a dessert board or snack spread, adding these along with other easy no-bake recipes brings color and variety.
Plus, this is a great treat for learning the basics of working with chocolate. Want to explore your chocolate options? This guide to types of chocolate can help you choose between dark, milk, and white varieties, depending on your preference or dietary needs. Add sea salt or drizzle contrasting chocolate on top to create visual appeal and balanced flavors.
Whether you’re packing lunchboxes or prepping a snack for movie night, these easy chocolate graham cracker treats are guaranteed to be a hit. They’re the perfect intersection of fast, fun, and flavorful.
3. Ingredients Breakdown
Making chocolate covered graham crackers is incredibly easy, and part of that is thanks to the short list of accessible ingredients. Here’s a closer look at what you’ll need and how each component plays a role in flavor, texture, and appearance.
Graham Crackers
-
Use 12 full sheets, broken into halves for easy dipping.
-
Honey graham crackers add a touch of sweetness, while cinnamon versions give a warmer flavor.
-
Choose a sturdy brand to prevent crumbling when dipped.
Chocolate Chips
-
Use about 2 cups of chocolate chips. Semisweet and milk chocolate are most popular, but you can use white or dark depending on your taste.
-
For an in-depth understanding, this Wikipedia guide to types of chocolate breaks down flavor profiles and melting points.
Coconut Oil or Vegetable Oil (1 tbsp, optional)
-
Stirring in a small amount of oil while melting your chocolate can make the coating smoother and shinier.
-
Coconut oil, in particular, enhances the chocolate’s texture. Learn more about coconut oil’s use in cooking here.
Toppings (Optional)
-
Sprinkles, crushed nuts, sea salt, or crushed candy canes can be added before the chocolate sets.
-
Pick toppings based on theme or flavor—holiday sprinkles for festive looks, sea salt for contrast, or chopped pistachios for crunch.
Using minimal ingredients makes this recipe not only quick to prepare but also budget-friendly and easy to customize for any occasion or dietary preference.
4. Tools and Equipment Needed
You don’t need any fancy baking equipment to make chocolate graham cracker treats. Just a few basic tools will do the trick:
-
Microwave-safe bowl – To melt your chocolate. Glass bowls work well and allow you to monitor the melting process.
-
Fork or dipping tool – Helps to dip the crackers evenly and lift them without mess.
-
Parchment or wax paper – Prevents sticking and makes cleanup easier.
-
Baking tray – Acts as a surface for your dipped crackers to cool and harden.
For even more precise melting, you might want to try the double boiler method, especially if you’re using baking chocolate bars instead of chips.
These tools are likely already in your kitchen, which makes this recipe approachable for beginners and a great activity for kids and families.
5. Prepping Your Station
Before you begin melting and dipping, set yourself up for success by prepping your workstation. A little organization will save you time and prevent messy mistakes.
-
Line a baking sheet with parchment or wax paper. This will be where the dipped crackers go to cool.
-
Break your graham crackers into halves and set them within reach.
-
Prepare your toppings in small bowls so you can sprinkle them quickly before the chocolate sets.
-
Clear space in your fridge or on your countertop for the tray of dipped crackers to set.
Having everything ready ensures your chocolate won’t harden before you’ve finished decorating. For food storage after prep, here’s a helpful overview of safe storage practices to keep treats fresh.
This setup stage is also perfect for involving kids, who can be in charge of toppings while you handle the melted chocolate.
6. Melting the Chocolate Properly
Properly melted chocolate is key to achieving a smooth, even coating on your crackers. There are two methods to choose from, and each has its benefits.
Microwave Method
-
Place chocolate chips in a microwave-safe bowl.
-
Heat in 30-second intervals, stirring between each, until fully melted.
-
Stir in 1 tablespoon of oil (optional) for extra shine and smooth texture.
Double Boiler Method
-
Place a heatproof bowl over a pot of simmering water.
-
Stir chocolate constantly as it melts from the steam below.
-
Remove from heat once smooth.
The microwave method is quicker and more common, but the double boiler gives you more control—especially if you’re using a blend of chocolates. Be careful not to overheat, as burned chocolate becomes lumpy and unusable.
For a more detailed guide, refer to the Wikipedia article on double boilers, which explains how indirect heat helps avoid scorching.
Whichever method you use, keep the chocolate warm and stir frequently to maintain its dipping consistency.

7. Dipping and Coating the Crackers
Now comes the fun part—dipping your graham crackers into the melted chocolate. Whether you choose a full or half dip depends on your style and the look you’re going for.
-
Hold each cracker with tongs or a fork, dip into the chocolate, and let excess drip off.
-
Lay each dipped cracker on your lined baking tray.
-
For a neat look, gently tap the cracker edge against the bowl to remove excess chocolate.
Use one hand for dipping and another for placing the crackers to minimize mess. If the chocolate begins to harden in the bowl, reheat it for 15 seconds in the microwave and stir well.
Want to get extra fancy? Drizzle a contrasting chocolate over the top (white on dark or dark on milk chocolate) for added flair. Browse Pinterest boards on no-bake desserts for presentation inspiration.
8. Topping Before Chocolate Sets
Timing is everything when it comes to adding toppings. You need to sprinkle them on immediately after dipping, before the chocolate begins to firm up.
Here are a few ideas to try:
-
Festive sprinkles – Great for holidays and birthdays.
-
Sea salt flakes – Adds a gourmet twist and balances sweetness.
-
Crushed nuts – Try almonds, pistachios, or peanuts.
-
Mini marshmallows or crushed candy canes – Perfect for winter themes.
Be careful not to overload the cracker, as too many toppings can cause uneven setting or cracking later. For kid-friendly options, you can explore fun kids cooking activities that include candy toppings and colored sugars.
Topping your crackers is a chance to personalize each one—making the process just as enjoyable as the final product.
9. Letting the Chocolate Set
Once your crackers are dipped and topped, it’s time to let the chocolate harden.
You have two main options:
-
Refrigerate the tray for 15–20 minutes for a faster set.
-
Leave at room temperature for about 1 hour if you prefer not to chill chocolate.
Refrigeration is the quickest and cleanest option, especially if your kitchen is warm. Once the chocolate is firm to the touch, the crackers are ready to serve or store.
For best results, avoid stacking crackers before they are fully set, or you may smudge the chocolate or crush the toppings.
10. How to Store Them
Proper storage keeps your chocolate covered graham crackers fresh and crunchy for longer. Here’s how:
-
Place in an airtight container with parchment paper between layers.
-
Store at room temperature for up to a week.
-
Refrigerate for longer shelf life, up to 2 weeks.
Avoid humid environments as moisture can cause the crackers to soften. If you’re planning to make these ahead for parties or gifts, wrap them securely and store them in a cool place.
For ideas on how to keep your treats looking sharp and fresh, explore this Pinterest guide to dessert packaging.
11. Best Ways to Serve or Gift Them
These treats shine on dessert tables but are also ideal for thoughtful gifts or party favors. Here are a few ideas:
-
Stack and tie in clear bags with ribbon for gifting.
-
Add to a dessert tray with cookies, brownies, and truffles.
-
Pair with hot cocoa for a cozy winter treat.
-
Include in lunchboxes as a sweet surprise.
-
Serve with ice cream for an elevated dessert.
Browse this Pinterest board on DIY food gifts for creative ways to present and personalize your crackers for holidays or birthdays.
12. Expert Tips for Perfect Crackers
Even a simple recipe can be elevated with a few expert tricks:
-
Use high-quality chocolate for better flavor and smoother melting.
-
Dry crackers completely before dipping to avoid sogginess.
-
Add oil only if your chocolate needs extra shine—don’t overdo it.
-
Let chocolate set fully before storing to prevent smudging.
-
Avoid overheating by stirring chocolate consistently.
If you’re new to candy-making or chocolate work, this recipe is a great starting point. It teaches essential techniques like tempering and coating without complicated steps.
13. Flavor Variations and Fun Twists
One of the best things about this recipe is how easily you can change it up. Try these variations:
-
Peanut butter layer – Spread a thin layer on the cracker before dipping in chocolate.
-
White chocolate drizzle – Use melted white chocolate to create elegant swirls.
-
Crushed cookies – Sprinkle Oreo bits or graham crumbs on top.
-
Holiday themes – Use colored candy melts or seasonal sprinkles.
Combining different chocolates or layering textures adds depth to the flavor. For more ideas, explore no-bake treat inspiration on Pinterest boards like this.
14. Common Mistakes to Avoid
Even a simple treat like this can go wrong without the right approach. Watch out for these common mistakes:
-
Burning the chocolate – Always melt in short intervals.
-
Dipping warm crackers – Make sure they’re cool and dry.
-
Not letting chocolate set – Be patient for the best results.
With a little attention to detail, you’ll avoid these pitfalls and create perfect crackers every time.
15. Related Easy No-Bake Treats
If you loved these, here are some other simple, no-bake ideas:
-
Chocolate-dipped pretzel rods
-
Rice Krispie treats
-
No-bake cookie balls
-
Marshmallow pops
-
Candy bark with crushed graham crackers
These pair well with graham cracker treats on dessert trays and also make fun party projects.
16. Pairing Ideas
Want to turn this into a complete dessert experience? Here’s how to serve them in style:
-
With hot cocoa or coffee – A cozy winter combo.
-
Next to a fruit platter – The perfect sweet-crunchy contrast.
-
On top of ice cream – Crushed or whole, they add crunch and flavor.
Explore how others serve theirs on Pinterest for creative plating and party ideas.
17. FAQ Section (People Also Ask)
What kind of chocolate works best for dipping?
Semisweet and milk chocolate chips are the most common choices. Use high-quality brands for smoother melting and better flavor. You can also mix in a little coconut oil for easier coating.
How long do chocolate covered graham crackers last?
When stored in an airtight container, they stay fresh at room temperature for about a week or in the fridge for up to two weeks.
Can I use white chocolate or flavored chocolate chips?
Absolutely! White chocolate, caramel chips, or even mint chocolate chips can be used for flavor variations. Just be sure to melt them gently.
How do I keep the chocolate from cracking after it sets?
Let the chocolate set at room temperature when possible and avoid rapid temperature changes that can cause cracks.
Can I make these ahead of time for a party or gift?
Yes, they’re ideal for make-ahead prep. Just store them properly and package them right before gifting or serving.
Are chocolate covered graham crackers gluten-free?
Standard graham crackers contain wheat, but you can use a gluten-free version to make this recipe gluten-free.
What are some topping alternatives for kids with nut allergies?
Use sprinkles, mini marshmallows, or crushed pretzels instead of nuts to keep it allergen-friendly.
How to Make Chocolate Covered Graham Crackers in Minutes
Sweet, crunchy, and dipped in rich chocolate, these chocolate covered graham crackers are the perfect no-bake treat. Quick to prepare and fully customizable, they’re great for gifts, parties, or everyday snacks. Coat them fully or halfway, top with sprinkles, nuts, or candy, and chill to set—easy enough for kids and satisfying enough for adults.
- Author: Clara
Ingredients
- 12 full sheets graham crackers, broken in halves
- 2 cups semisweet or milk chocolate chips
- 1 tbsp coconut oil or vegetable oil (optional, for smoother coating)
- Sprinkles, crushed nuts, or sea salt for topping (optional)
Instructions
Line a baking sheet with parchment or wax paper.
In a microwave-safe bowl, melt the chocolate chips in 30-second intervals, stirring between each, until smooth. Stir in the oil if using.
Dip each graham cracker half into the melted chocolate, covering it fully or halfway, depending on your preference.
Let the excess chocolate drip off, then place the coated cracker onto the prepared baking sheet.
Add sprinkles, nuts, or sea salt on top if desired, before the chocolate sets.
Repeat with the remaining crackers.
Refrigerate the tray for about 15–20 minutes or until the chocolate hardens.
Store in an airtight container at room temperature or in the fridge.
Notes
-
Use high-quality chocolate for the best flavor and texture.
-
Add toppings immediately after dipping to ensure they stick.
-
Let the chocolate set fully before storing to avoid smudging.
-
Keep them in an airtight container to maintain crispness.
-
Customize the recipe with flavored graham crackers or seasonal toppings for a fun twist.