
Why Making Bread in 10 Minutes is a Game Changer
If you’ve ever found yourself craving fresh bread but didn’t have the time or energy to follow a complex recipe, this quick 10-minute bread recipe will change the way you think about homemade bread. Many people avoid making bread at home because they assume it’s a time-consuming process. However, with this easy bread recipe, you can enjoy warm, freshly baked bread in just a few minutes. This recipe is especially appealing for busy families, last-minute gatherings, or anyone who doesn’t want to wait hours for their bread to rise.
Making bread at home doesn’t have to be complicated. Forget about the yeast, kneading, and long waiting times. In just 10 minutes, you’ll have a delicious loaf ready to serve with your favorite meals. Not only is it incredibly fast, but it’s also much more satisfying than store-bought bread. You get full control over the ingredients, and you can avoid preservatives and artificial flavors that are often present in mass-produced options.
Who Can Benefit from a 10-Minute Bread Recipe?
This quick and easy bread recipe is perfect for anyone looking for a simple, no-fuss way to make homemade bread. Here are some groups that will find this recipe particularly beneficial:
-
Busy parents: If you have children at home and need to whip up something fast for breakfast or a snack, this is an excellent solution.
-
Working professionals: Coming home from a long day of work and craving something warm and homemade? This recipe doesn’t require much prep time.
-
Kitchen beginners: If you’re new to baking and want to start with something simple, this easy bread recipe is a great way to get started. You don’t need any advanced skills to make it.
For more detailed steps on why this is a beginner-friendly recipe, visit Easy Bread Recipes on Pinterest.
What Makes This Recipe So Easy and Fast?
The simplicity of this recipe lies in its use of basic ingredients and minimal steps. Unlike traditional bread recipes that require yeast for rising or long proofing times, this one uses baking powder, which acts as a leavening agent, allowing the dough to rise quickly without waiting. You only need flour, baking powder, milk, butter, salt, and sugar — all of which are common kitchen staples.
One of the key elements that make this recipe so quick is the lack of need for active yeast. In traditional bread-making, yeast must be activated, allowed to rise, and then shaped and baked. This recipe eliminates those steps, allowing you to go straight from mixing the ingredients to baking in the oven. Plus, the entire baking process takes no more than 10-12 minutes.
If you’re curious about the science behind leavening agents, check out Baking Powder on Wikipedia for an in-depth explanation.

The Step-by-Step Guide to Making Bread in 10 Minutes
Ingredients You’ll Need
Before you get started, gather these simple ingredients:
-
2 cups all-purpose flour: The foundation of your bread dough.
-
2 teaspoons baking powder: This helps the bread rise without yeast.
-
½ teaspoon salt: To enhance the flavor of your bread.
-
1 tablespoon sugar: A little sweetness to balance the flavors.
-
1 cup milk: Moisture for the dough and a softer texture.
-
2 tablespoons melted butter: Adds richness and flavor.
These ingredients come together quickly to create a simple dough, and you likely already have them in your kitchen. This is one of the reasons this recipe is so quick and easy — no special or hard-to-find ingredients required!
Note: While you can use all-purpose flour for this recipe, you could substitute it with whole wheat flour for a healthier option, though it may affect the texture slightly. If you’re curious about how to make whole wheat bread, check out more information on Whole Wheat Flour on Wikipedia.
Step 1: Preheat the Oven
The first step in making your quick bread is preheating your oven to 400°F (200°C). This high temperature ensures that the bread bakes quickly and achieves that perfect golden brown color in just a few minutes. Since the bread doesn’t need to rise like yeast-based breads, the oven must be hot when you place the dough inside to ensure it bakes through evenly and quickly.
By preheating the oven at the start, you also avoid delays, and your bread can go straight into the oven once the dough is ready.
If you’re interested in learning more about oven temperatures and how they affect baking, you can read more about oven temperatures on Wikipedia.
Step 2: Combine Dry Ingredients
In a large mixing bowl, start by combining your dry ingredients:
-
2 cups of all-purpose flour
-
2 teaspoons of baking powder
-
½ teaspoon of salt
-
1 tablespoon of sugar
Use a whisk or spoon to mix these ingredients together. It’s important to ensure that the baking powder and salt are evenly distributed throughout the flour, as this will help the bread rise evenly and create a balanced flavor.
When mixing dry ingredients for quick bread, the goal is to avoid lumps and to incorporate the ingredients as evenly as possible. You don’t need to sift the flour for this recipe, but giving it a good stir helps ensure a consistent texture.
If you’re looking for tips on mixing dry ingredients, consider browsing through various bread baking tips on Pinterest.
Step 3: Add Wet Ingredients (Milk and Butter)
Now that your dry ingredients are mixed, it’s time to add the wet ingredients:
-
1 cup of milk
-
2 tablespoons of melted butter
Add the milk and melted butter to the dry ingredients and stir until the dough forms. The mixture will be slightly sticky, which is exactly what you want for this recipe. Don’t worry if the dough seems a bit soft, as this will result in a lighter, fluffier bread once baked.
It’s important to melt the butter before adding it to the dough to ensure it blends evenly. If you don’t have butter on hand, you can substitute it with vegetable oil or margarine. However, butter tends to give the bread a richer, more flavorful taste.
For more information about using butter in baking, visit Butter on Wikipedia.
The Step-by-Step Guide to Making Bread in 10 Minutes
Step 4: Shape the Dough and Transfer to a Baking Pan
Once your dough is well mixed, it’s time to transfer it into a baking pan. Here’s how you can do it:
-
Prepare your baking pan: Grease a standard 9×5-inch loaf pan with a little butter or oil to prevent the bread from sticking. You can also line the pan with parchment paper for easier removal.
-
Shape the dough: Use a spatula or your hands to gently shape the dough and transfer it into the greased pan. Smooth out the top of the dough to ensure even baking. The dough won’t rise much before baking, so how it looks in the pan is almost how it will come out, making shaping important for a neat loaf.
-
Even out the dough: Try to spread the dough out evenly to ensure it cooks uniformly. Since this bread doesn’t require kneading or rising, it’s important to ensure the dough is level in the pan.
The shaping step is simple but essential. If you want to experiment, you can even shape the dough into smaller rolls instead of one large loaf. If you opt for this variation, adjust the baking time accordingly, and check for doneness by using a toothpick inserted into the center of a roll.
For more bread shaping ideas, take a look at some creative bread-making tips on Pinterest.
Step 5: Bake the Bread
Now that your dough is ready in the pan, it’s time to bake it. Place the pan in the oven, which should already be preheated to 400°F (200°C).
-
Baking time: Bake the bread for 10-12 minutes. The exact time will depend on your oven, so it’s important to keep an eye on it after about 8 minutes.
-
Check for doneness: To test if the bread is ready, insert a toothpick into the center of the loaf. If it comes out clean (without any dough sticking to it), your bread is done. If not, let it bake for a few more minutes, and test again.
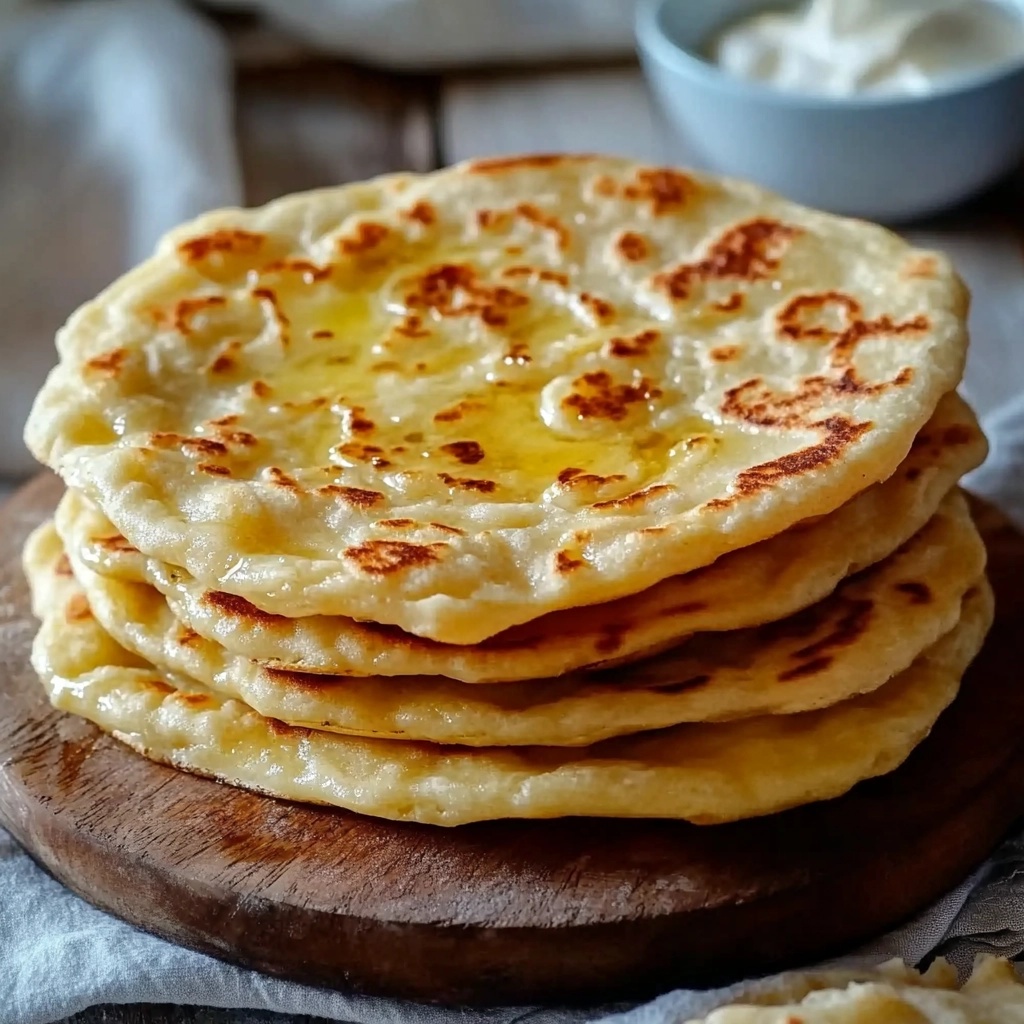
The bread should be golden brown on top, and the texture should be light and airy when you cut into it. Because this is a quick bread recipe with no yeast, it’s ready to eat almost immediately after baking.
It’s also a great idea to check out Quick Bread Recipes on Pinterest for inspiration on other fast bread options.
Step 6: Cooling and Serving
After your bread has finished baking, allow it to cool for a few minutes in the pan. This brief resting time helps the bread set, making it easier to slice.
-
Cooling: Let the bread cool for about 5 minutes before removing it from the pan. If you try to remove it too soon, it may fall apart.
-
Slicing: Once cooled, use a serrated knife to slice the bread. The bread should be soft on the inside with a golden, slightly crisp exterior.
This quick bread is perfect when served warm with your favorite spreads like butter, jam, or honey. It’s also versatile enough to pair with soups, stews, or salads for a full meal.
For creative ways to serve bread, check out some bread pairing ideas on Pinterest by following this link.

Tips and Variations for Your 10-Minute Bread
Tips for Perfecting Your Bread
While this recipe is simple and quick, there are a few tips to ensure you get the best results every time. Here are some pointers for perfecting your 10-minute bread:
-
Don’t overmix the dough: It’s important to mix the ingredients just enough to combine them. Overmixing can lead to dense bread because it develops the gluten too much. Stir until everything is just incorporated for a light, fluffy loaf.
-
Check the oven temperature: Ensure your oven is preheated properly to 400°F (200°C). If your oven runs hot or cold, the baking time might need slight adjustments. Using an oven thermometer can help ensure accurate temperature.
-
Grease the pan well: Greasing your pan is crucial for easy removal. You can use butter, cooking spray, or even a parchment paper lining to ensure the bread slides out smoothly.
-
Avoid opening the oven door: While baking, avoid opening the oven door too often. This can cause the temperature to fluctuate and impact the bread’s rising. Only check it toward the end of the baking time to test with a toothpick.
If you’re still unsure about baking, there are a lot of resources available on bread baking tips on Pinterest that can help guide you.
How to Customize Your Bread (Flavors and Add-ins)
Once you’ve mastered the basic 10-minute bread recipe, it’s time to get creative. Here are some ways to add your own spin to the bread:
-
Add herbs and garlic: You can mix in dried herbs like rosemary, thyme, or basil into the dough to infuse the bread with aromatic flavors. A clove of crushed garlic can also be added for a savory touch.
-
Cheese: If you love cheesy bread, try adding shredded cheese like cheddar or mozzarella into the dough. This will give the bread a cheesy interior and add richness.
-
Sweet variations: For a sweet twist, you can add a teaspoon of cinnamon or a handful of chocolate chips. This makes the bread perfect for breakfast or as a snack.
-
Nuts and dried fruit: Adding nuts like walnuts or dried fruit like raisins can give your bread a hearty texture and extra flavor.
The possibilities are endless when it comes to customizations. Whether you prefer something savory or sweet, this bread recipe can be easily adapted to your taste. If you’re looking for more inspiration for customizing quick breads, check out some ideas on Pinterest.
How to Store and Reheat Leftover Bread
If you happen to have any leftover bread, don’t worry—it stores and reheats well. Here’s how you can keep it fresh:
-
Storing: Store your bread in an airtight container at room temperature for up to 2-3 days. If you want to keep it for longer, wrap it tightly in plastic wrap and then place it in a resealable bag before storing it in the refrigerator.
-
Freezing: For longer storage, freeze the bread. Wrap it tightly in plastic wrap, then place it in a freezer bag. It will stay fresh in the freezer for up to 3 months.
-
Reheating: To reheat the bread, simply place slices in the toaster or heat them in the microwave for a few seconds. If you prefer a crispier texture, you can reheat the whole loaf in the oven at 350°F (175°C) for about 5 minutes.
By following these simple steps, you’ll be able to enjoy your quick bread even after the initial bake. If you want to see other storage and reheating tips, take a look at some helpful ideas on Pinterest.
Serving Ideas for 10-Minute Bread
This quick bread is versatile and pairs well with many different dishes. Here are a few ideas on how to serve your 10-minute bread:
-
With soups and stews: Serve it alongside your favorite soups, stews, or chili for a hearty meal. The bread soaks up liquids beautifully, making it the perfect accompaniment.
-
As a breakfast bread: Slice the bread and spread some butter or your favorite jam. You can even add a drizzle of honey for extra sweetness.
-
With cheese and meats: The soft, quick bread can serve as a side for cheese and deli meats, making it perfect for a casual snack or lunch.
Whether you’re pairing it with a savory main dish or enjoying it as a snack, this 10-minute bread will be a hit in your kitchen.
FAQs
Can I Use Whole Wheat Flour Instead of All-Purpose Flour?
Yes, you can use whole wheat flour in place of all-purpose flour for a healthier, fiber-rich alternative. However, keep in mind that whole wheat flour will make the bread denser and may slightly change the texture. To maintain a light, fluffy result, consider mixing whole wheat flour with some all-purpose flour (about 50/50) to achieve a balance between texture and nutrition.
For more information on whole wheat flour and its benefits, you can explore Whole Wheat Flour on Wikipedia.
Can I Make This Recipe Without Butter?
Absolutely! If you don’t have butter on hand or prefer a dairy-free option, you can substitute the butter with oil (vegetable or olive oil work well) or margarine. Keep in mind that butter adds flavor, so using oil might slightly alter the taste, but the bread will still be delicious.
To learn more about butter and its role in baking, visit Butter on Wikipedia.
Can I Freeze This Bread for Later?
Yes, you can freeze this quick bread. After baking and allowing it to cool completely, wrap the bread tightly in plastic wrap or aluminum foil, then place it in a freezer-safe bag. This will help preserve its freshness for up to 3 months. To reheat, simply thaw the bread at room temperature or pop individual slices into the microwave or toaster.
For additional tips on storing baked goods, see Bread Storage Tips on Pinterest.
Why Does My Bread Not Rise?
If your bread doesn’t rise properly, it could be due to a few common reasons:
-
Incorrect oven temperature: Make sure your oven is properly preheated to 400°F (200°C) before placing the dough inside. An oven that is too cold can prevent the bread from rising.
-
Old baking powder: Baking powder loses its potency over time, so ensure your baking powder is fresh.
-
Under-mixing: While overmixing can result in dense bread, under-mixing can lead to an uneven rise. Ensure the ingredients are mixed just enough to combine.
To learn more about the baking process and how temperature affects bread, check out this article on Baking Powder.
Can I Add Yeast to Make This Bread Fluffier?
This particular recipe is designed as a quick bread that doesn’t require yeast, making it ideal for fast results. Adding yeast would change the nature of the recipe, requiring additional rise time and altering the texture. If you prefer a fluffier, yeast-based bread, you might want to look for traditional bread recipes that specifically use yeast.


