
Why You’ll Love This No Bake Mint Chocolate Slice This dessert checks all the right boxes:
- No oven required
- Simple pantry ingredients
- Easy-to-follow steps
- Beautiful layered presentation
- Perfect balance of cool mint and rich chocolate
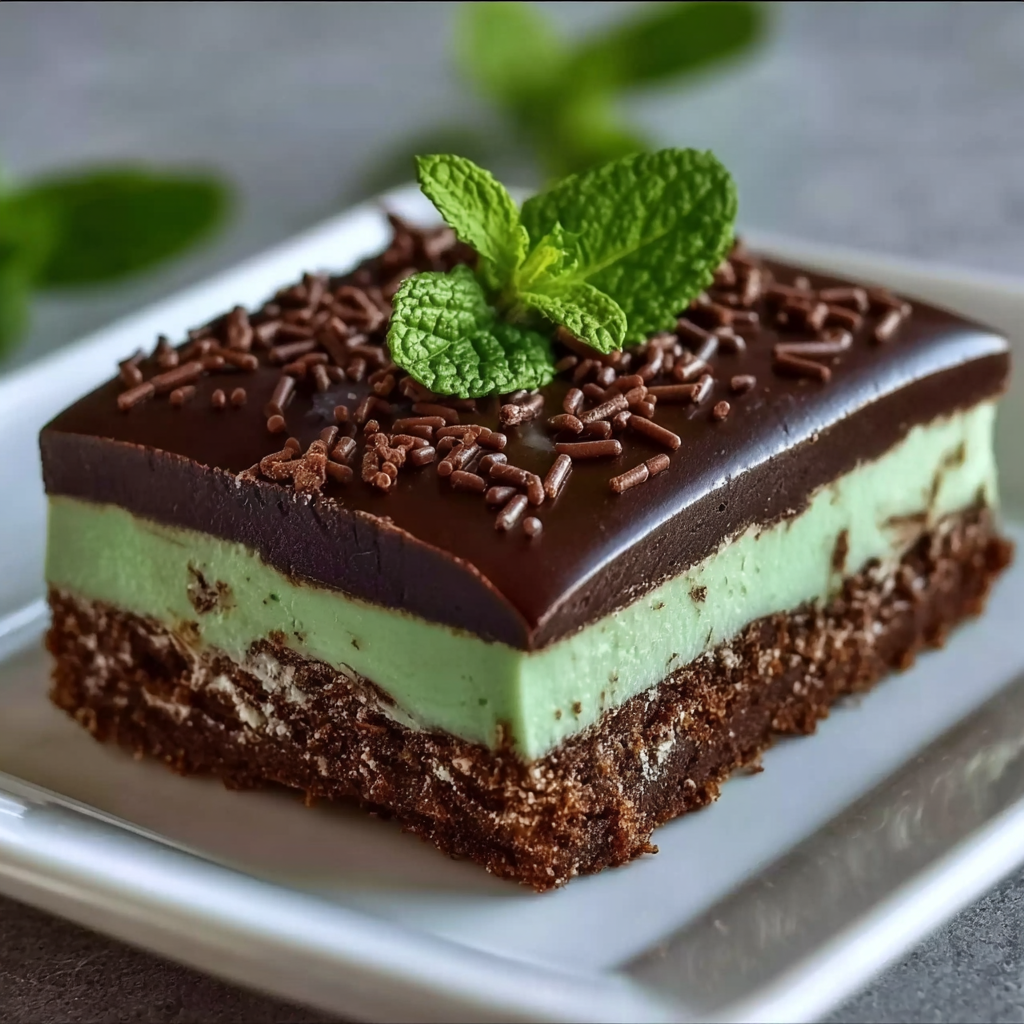
What Makes Mint and Chocolate So Perfect Together Mint and chocolate are a timeless pairing because they balance each other beautifully. Chocolate brings deep, smooth richness, while mint adds a refreshing brightness that cuts through the sweetness. In this recipe, the mint layer sits between a chocolate biscuit base and a glossy chocolate topping, creating contrast in both flavor and texture. The base is slightly chewy and chocolatey. The middle layer is creamy and smooth with a refreshing mint flavor. The top layer is silky and firm once chilled, offering a satisfying snap when sliced.
Ingredients for No Bake Mint Chocolate Slice Here’s everything you’ll need, with precise measurements for consistent results. For the Chocolate Biscuit Base:
- 2 cups (200 g) chocolate cookie crumbs (about 18–20 chocolate sandwich cookies, filling removed)
- 1 cup (120 g) graham cracker crumbs
- 1/2 cup (50 g) unsweetened cocoa powder
- 1 cup (240 ml) sweetened condensed milk
- 1/2 cup (115 g) unsalted butter, melted
- 2 cups (240 g) powdered sugar
- 1/4 cup (30 g) unsalted butter, softened
- 2 tablespoons (30 ml) milk
- 1 teaspoon peppermint extract
- 2–3 drops green food coloring (optional)
- 1 1/2 cups (260 g) semi-sweet chocolate chips
- 2 tablespoons (30 g) unsalted butter
Kitchen Tools You’ll Need
- 9×9-inch (23×23 cm) square baking pan
- Parchment paper
- Mixing bowls
- Rubber spatula
- Microwave-safe bowl or double boiler
- Offset spatula (optional, for smoothing layers)
Step-by-Step Instructions 1. Prepare the Pan Line a 9×9-inch (23×23 cm) square baking pan with parchment paper, leaving some overhang on the sides. This makes lifting and slicing the dessert much easier later. 2. Make the Chocolate Biscuit Base In a large mixing bowl, combine:
- 2 cups (200 g) chocolate cookie crumbs
- 1 cup (120 g) graham cracker crumbs
- 1/2 cup (50 g) unsweetened cocoa powder
- 1 cup (240 ml) sweetened condensed milk
- 1/2 cup (115 g) melted unsalted butter
- 1/4 cup (30 g) softened unsalted butter
- 2 cups (240 g) powdered sugar
- 2 tablespoons (30 ml) milk
- 1 teaspoon peppermint extract
- 2–3 drops green food coloring (optional)
- 1 1/2 cups (260 g) semi-sweet chocolate chips
- 2 tablespoons (30 g) unsalted butter

Tips for Perfect Layers Every Time
- Always chill between layers to prevent mixing.
- Don’t overheat the chocolate topping—slightly cooled chocolate spreads more evenly.
- Press the base firmly to avoid crumbling when slicing.
- Allow the finished slice to sit briefly before cutting.
Flavor Variations You can easily customize this recipe:
- Add 1/4 cup (30 g) mini chocolate chips to the mint layer for texture.
- Use dark chocolate chips instead of semi-sweet for a richer finish.
- Add crushed peppermint candy (2 tablespoons / 20 g) on top before the chocolate sets for festive flair.
- Swap chocolate cookie crumbs for digestive biscuits or vanilla wafers.
Storage and Make-Ahead Instructions This dessert is ideal for preparing in advance.
- Store in an airtight container in the refrigerator for up to 5 days.
- Freeze for up to 2 months, tightly wrapped.
- Thaw overnight in the refrigerator before serving.
Serving Suggestions Serve this slice:
- After dinner with coffee or tea
- As part of a dessert platter
- Cut into smaller squares for parties
- With a scoop of vanilla ice cream
Frequently Asked Questions 1. Can I make this without food coloring? Absolutely. The green food coloring is purely optional and used only for visual appeal. The mint flavor comes entirely from the 1 teaspoon of peppermint extract, so omitting the coloring will not affect taste. Your mint layer will be off-white instead of green, but it will still be delicious. If you prefer natural coloring, you could experiment with a tiny amount of matcha powder for a pale green hue, though this may slightly alter the flavor. For most home bakers, skipping the coloring keeps the recipe simple and just as satisfying. 2. Can I use mint extract instead of peppermint extract? Yes, but use it carefully. Peppermint extract provides a classic cool mint flavor that pairs beautifully with chocolate. Mint extract can sometimes taste more herbal or less intense. If substituting, start with 3/4 teaspoon mint extract instead of the full 1 teaspoon, taste the mixture, and adjust gradually. Mint flavoring can quickly become overpowering, so adding it slowly is the safest approach. The key is balance—your mint layer should taste refreshing, not sharp or medicinal. 3. Why is my chocolate topping cracking when I slice it? Chocolate can crack if it’s too cold or if it was poured over a very cold layer and set too firmly. To prevent cracking, allow the slice to sit at room temperature for 5–10 minutes before cutting. Also, make sure to mix 2 tablespoons (30 g) butter into the 1 1/2 cups (260 g) chocolate chips. The butter softens the chocolate slightly, making it easier to slice. Using a warm knife—run under hot water and wiped dry—also helps achieve clean, smooth cuts without breaking the top layer. 4. Can I make this gluten-free? Yes, this recipe can easily be adapted. Simply use gluten-free chocolate sandwich cookies and gluten-free graham crackers in the base. Double-check that your cocoa powder, chocolate chips, and peppermint extract are labeled gluten-free as well. Since the recipe doesn’t rely on flour or baking structure, substituting gluten-free crumbs works seamlessly. The texture remains chewy and firm, and the flavor stays rich and balanced. This makes the No Bake Mint Chocolate Slice a great option for serving guests with dietary restrictions without sacrificing taste or texture.

Final Thoughts No Bake Mint Chocolate Slice is the kind of dessert that quietly becomes a staple in your kitchen. It requires no complicated techniques, no oven time, and no specialty equipment—just simple ingredients layered thoughtfully to create something memorable. The contrast between the chewy chocolate base, creamy mint center, and glossy chocolate topping makes every bite satisfying and balanced. One of the best parts of this recipe is its versatility. You can dress it up for holidays, slice it into elegant bars for a dinner party, or keep it simple for an everyday sweet treat. Because it stores beautifully and can even be frozen, it’s ideal for planning ahead. Busy schedules become easier when you have a reliable dessert ready in the refrigerator. Beyond convenience, this slice offers a nostalgic charm. Mint and chocolate together feel both refreshing and indulgent. It’s a flavor combination that appeals to both adults and kids, making it perfect for family gatherings. If you’re looking for a dessert that looks impressive but is truly effortless, this is it. Once you try it, you may find yourself returning to it again and again—not just for its flavor, but for the ease and joy it brings to your kitchen.


