There is something especially comforting about a chilled dessert waiting in the fridge, ready to be sliced and shared after dinner, at holiday gatherings, or during a weekend baking session with family. These Mint Chocolate Chip Dessert Bars bring together everything people love about classic mint chocolate chip treats: cool mint flavor, rich chocolate, creamy layers, and a soft yet sturdy base that makes every bite satisfying.
This recipe was inspired by the familiar appeal of mint chocolate chip ice cream, reimagined as an easy make-ahead dessert bar that feels a little more special. It has that nostalgic combination of refreshing mint and deep chocolate flavor, but in a form that is easy to serve at parties, potlucks, birthdays, or quiet evenings when you want something sweet and memorable. If you enjoy layered desserts that look impressive and taste even better, this recipe belongs on your baking list.

Why You’ll Love These Mint Chocolate Chip Dessert Bars
Mint chocolate desserts have a way of standing out on any dessert table. They feel festive, refreshing, and rich at the same time. These bars are especially appealing because they balance flavor and texture beautifully. The base is soft and chocolatey, the middle layer is creamy and cool with mint flavor, and the top adds a finishing touch of chocolate that ties everything together.
You will love this recipe because it is:
-
Easy to make ahead
-
Perfect for slicing and serving to a crowd
-
Rich without being overly heavy
-
Refreshing thanks to the mint layer
-
Ideal for holidays, celebrations, and family desserts
-
Beautiful enough for sharing, gifting, or bringing to a gathering
These dessert bars also store well, which means you can prepare them in advance and enjoy them over several days. That makes them a practical dessert for busy weeks, entertaining, or special occasions when you want something reliable and delicious.
What Makes This Creamy Chocolate Mint Dessert Special
The magic of this recipe is in the layers. Each one plays an important role, and together they create a dessert that feels bakery-worthy without requiring complicated steps.
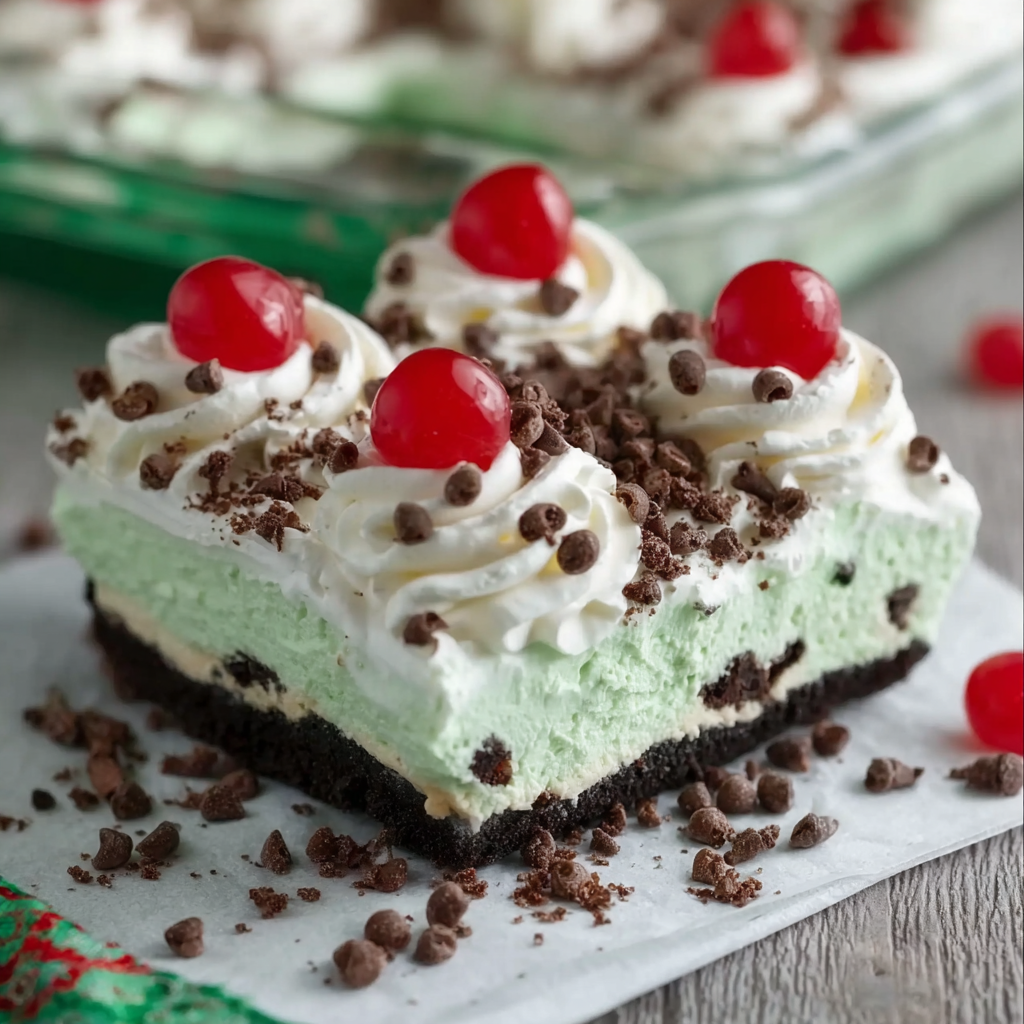
The chocolate base gives the bars structure and a rich foundation. It tastes like a cross between a soft brownie and a cookie bar, making it substantial enough to support the creamy filling. The mint layer is smooth, fluffy, and cool, with just the right amount of peppermint flavor so it tastes refreshing rather than overpowering. Mini chocolate chips folded into the filling give the bars their signature mint chocolate chip identity. Finally, a glossy chocolate topping creates an elegant finish and makes each square look polished and irresistible.
The result is a dessert that feels layered in flavor as well as texture. You get softness, creaminess, and little bites of chocolate in every forkful.
Ingredients for Mint Chocolate Chip Dessert Bars
Below is everything you need to make this creamy chocolate mint dessert. Using measured ingredients carefully will help you get clean layers and the best texture.
For the Chocolate Base
-
1 cup unsalted butter, softened
-
3/4 cup granulated sugar
-
1/2 cup light brown sugar, packed
-
2 large eggs
-
2 teaspoons vanilla extract
-
1 3/4 cups all-purpose flour
-
1/2 cup unsweetened cocoa powder
-
1 teaspoon baking powder
-
1/4 teaspoon salt
For the Mint Cream Layer
-
8 ounces cream cheese, softened
-
1/2 cup unsalted butter, softened
-
2 1/2 cups powdered sugar
-
1 1/2 teaspoons peppermint extract
-
2 tablespoons heavy cream or whole milk
-
2 to 3 drops green food coloring, optional
-
3/4 cup mini chocolate chips
For the Chocolate Topping
-
1 1/4 cups semisweet chocolate chips
-
1/3 cup heavy cream
-
1 tablespoon unsalted butter
Ingredient Notes and Helpful Tips
A few ingredient choices can make a big difference in the final dessert.
Peppermint extract: Be careful not to confuse peppermint extract with mint flavoring blends that may taste more like spearmint. Peppermint gives the clean, cool flavor that pairs best with chocolate.
Cream cheese: Full-fat cream cheese creates the smoothest, richest filling. Let it soften fully so it blends without lumps.
Mini chocolate chips: These are better than regular chips in the mint layer because they distribute evenly and do not make slicing difficult.
Cocoa powder: Use unsweetened cocoa powder for a deep chocolate flavor in the base. Dutch-process cocoa can also work if that is what you have on hand, though the flavor may be slightly smoother and darker.
Green food coloring: This is optional, but it gives the middle layer the classic mint chocolate chip look. You only need a little.
Kitchen Tools You’ll Need
This recipe does not require anything fancy, which is another reason it is so approachable.
-
9×13-inch baking pan
-
Parchment paper
-
Mixing bowls
-
Hand mixer or stand mixer
-
Rubber spatula
-
Measuring cups and spoons
-
Offset spatula or spoon for smoothing layers
-
Small saucepan or microwave-safe bowl for melting chocolate
Lining the pan with parchment paper is especially helpful because it allows you to lift the bars out cleanly before slicing.
How to Make Mint Chocolate Chip Dessert Bars
Step 1: Prepare the Pan and Oven
Preheat your oven to 350°F. Line a 9×13-inch baking pan with parchment paper, leaving a little overhang on the sides. Lightly grease the parchment and exposed sides of the pan.
This extra preparation makes the bars much easier to remove and slice neatly later.
Step 2: Make the Chocolate Base
In a large bowl, beat 1 cup softened unsalted butter, 3/4 cup granulated sugar, and 1/2 cup packed light brown sugar until light and fluffy, about 2 to 3 minutes. Add 2 large eggs one at a time, mixing well after each addition. Stir in 2 teaspoons vanilla extract.
In a separate bowl, whisk together 1 3/4 cups all-purpose flour, 1/2 cup unsweetened cocoa powder, 1 teaspoon baking powder, and 1/4 teaspoon salt.
Gradually add the dry ingredients to the wet mixture and mix just until combined. Do not overmix.
Press the dough evenly into the prepared pan. An offset spatula or lightly damp fingers can help smooth it into an even layer.
Bake for 16 to 20 minutes, or until the center is set and a toothpick inserted into the middle comes out with a few moist crumbs but no wet batter. Let the base cool completely in the pan.
Step 3: Prepare the Mint Cream Layer
In a large bowl, beat 8 ounces softened cream cheese and 1/2 cup softened unsalted butter until smooth and creamy. Add 2 1/2 cups powdered sugar gradually, mixing on low speed at first so it does not fly everywhere. Blend in 1 1/2 teaspoons peppermint extract and 2 tablespoons heavy cream or whole milk. If using, add 2 to 3 drops green food coloring and mix until evenly tinted.
Fold in 3/4 cup mini chocolate chips with a spatula.
Spread the mint cream layer over the cooled chocolate base in an even layer. Chill the pan in the refrigerator for about 20 to 30 minutes so the filling firms up slightly before adding the topping.
Step 4: Make the Chocolate Topping
In a small saucepan over low heat, combine 1 1/4 cups semisweet chocolate chips, 1/3 cup heavy cream, and 1 tablespoon unsalted butter. Stir gently until smooth and glossy. You can also melt this mixture in the microwave in short bursts, stirring between each one.
Let the topping cool for 5 to 10 minutes so it is still pourable but not hot. Spread it gently over the chilled mint layer.
Return the pan to the refrigerator and chill for at least 2 hours, or until the bars are fully set.
Step 5: Slice and Serve
Once chilled, lift the dessert out of the pan using the parchment paper. Place it on a cutting board and use a sharp knife to cut into bars or squares. For the cleanest slices, wipe the knife between cuts.
Serve chilled for the best flavor and texture.

Best Occasions to Serve Mint Chocolate Chip Dessert Bars
This dessert works for so many moments throughout the year. Because it is cool, creamy, and sliceable, it fits both casual and festive occasions.
These bars are especially wonderful for:
-
Holiday dessert platters
-
Birthday parties
-
Family movie nights
-
Spring and summer gatherings
-
Bake sales
-
Potlucks and community events
-
Dinner parties where you want a make-ahead dessert
The minty green center also gives the bars a seasonal look that works beautifully for winter celebrations and spring events alike.
Tips for Perfect Dessert Bars Every Time
A few simple techniques will help your bars turn out beautifully.
Cool the base completely before adding the filling. If the base is warm, the mint layer can soften too much and become messy.
Do not overdo the peppermint extract. Mint can quickly become overpowering. Measure carefully for a balanced flavor.
Chill between layers when needed. This helps create distinct, clean layers rather than a blended or sliding dessert.
Use parchment paper. It makes removing the bars from the pan much easier.
Slice when cold. These bars cut more neatly when they are thoroughly chilled.
Wipe the knife between slices. This small step makes a big visual difference, especially if you plan to serve the bars for guests.
Flavor Variations to Try
One of the best things about this recipe is how easy it is to adapt while keeping the same creamy chocolate mint appeal.
For a darker chocolate finish, use bittersweet chocolate chips instead of semisweet in the topping.
For extra crunch, sprinkle 1/4 cup finely chopped chocolate sandwich cookies over the mint layer before adding the topping.
For a softer mint flavor, reduce the peppermint extract to 1 teaspoon.
For a more decorative finish, drizzle a little melted white chocolate over the top after the bars have chilled.
You can also cut them into smaller squares for bite-size dessert tray portions or larger rectangles for a more generous plated dessert.
How to Store Mint Chocolate Chip Dessert Bars
Because of the cream cheese filling, these bars should be stored in the refrigerator. Place them in an airtight container, separating layers with parchment paper if stacking.
They keep well in the fridge for up to 5 days. In fact, many people find the flavor even better on the second day after the layers have had time to settle and chill fully.
For longer storage, freeze the bars in a single layer until firm, then transfer them to a freezer-safe container with parchment between layers. They can be frozen for up to 2 months. Thaw overnight in the refrigerator before serving.
Serving Suggestions
These bars are rich and creamy, so they pair well with simple accompaniments that let the dessert shine.
Serve them with:
-
Hot coffee
-
Fresh mint leaves for garnish
-
A glass of cold milk
-
Warm tea after dinner
-
Fresh berries on the side for contrast
If serving at a party, arrange them on a tray with a few extra mini chocolate chips sprinkled around the edges for a polished presentation.
Frequently Asked Questions
1. Can I make Mint Chocolate Chip Dessert Bars ahead of time?
Yes, this is an excellent make-ahead dessert, and that is one of the main reasons it is so useful for entertaining. You can prepare the bars a full day in advance and keep them chilled in the refrigerator until you are ready to serve them. In fact, making them ahead often improves the final texture because the layers have more time to firm up properly. The mint cream becomes more stable, and the chocolate topping sets into a neat sliceable finish.
If you are planning for a party or gathering, make the bars the night before, leave them in the pan, and cover them tightly. Slice them the next day once they are fully cold. This keeps them looking cleaner and fresher. You can also freeze them ahead, though the texture is best when enjoyed from the refrigerator within a few days. A make-ahead dessert like this can reduce stress and give you one less thing to worry about on the day you are hosting.
2. Can I use a different type of chocolate in this recipe?
Absolutely. Semisweet chocolate is a great all-purpose choice because it balances the sweetness of the mint filling, but you can adjust the chocolate to suit your taste. Dark chocolate or bittersweet chocolate creates a more intense contrast with the cool mint layer and gives the bars a slightly more grown-up flavor. Milk chocolate will make the dessert sweeter and softer in flavor, which some families may prefer.
You can also experiment with the chocolate chips folded into the filling. Mini dark chocolate chips add a stronger cocoa note, while mini milk chocolate chips create a creamier overall taste. The key is to keep the measurements the same so the texture remains balanced. Whether you go with semisweet, dark, or milk chocolate, the layered structure of the bars remains delicious and dependable. Choosing your preferred chocolate is a simple way to personalize the recipe without changing the method.
3. How do I keep the mint flavor from being too strong?
The easiest way to control the mint flavor is to measure the peppermint extract carefully and start modestly. This recipe uses 1 1/2 teaspoons, which gives a classic mint chocolate chip taste without becoming overwhelming. If you prefer a gentler mint note, you can reduce it to 1 teaspoon. That will still give the filling a refreshing flavor while keeping the chocolate more prominent.
It is also important to use peppermint extract rather than adding extra mint flavoring randomly, because some products can taste artificial or overly sharp. Once peppermint is added, it is very hard to balance it out, so careful measuring matters. Tasting the filling before spreading it into the pan can also help. Keep in mind that the mint flavor may become slightly more pronounced after chilling, so it is better to aim for balanced rather than bold. A smooth, cool mint layer should complement the chocolate, not overpower it.
4. Can I make these bars without food coloring?
Yes, you can leave out the green food coloring completely and still have a beautiful and delicious dessert. The food coloring is only there for appearance, giving the bars that classic mint chocolate chip look people often expect. Without it, the filling will remain a pale cream color with mini chocolate chips scattered throughout, and the flavor will stay exactly the same.
Many home bakers prefer to skip food coloring, especially when they want a more natural presentation. The bars still look elegant once sliced because the creamy middle contrasts nicely with the dark chocolate base and glossy topping. If you want a hint of color without a bright green tone, you can use just one small drop or leave it out entirely. The recipe does not rely on color for success. What matters most is the balance of mint, chocolate, and creamy texture, and those qualities remain fully intact even without any coloring added.

Final Thoughts
Mint Chocolate Chip Dessert Bars are the kind of dessert that instantly feels familiar yet still manages to stand out. They combine the nostalgic flavor of mint chocolate chip with the satisfying structure of a layered dessert bar, making them ideal for everything from family gatherings to festive dessert tables. The contrast between the rich chocolate base, the cool creamy center, and the smooth chocolate topping creates a dessert that feels thoughtful and indulgent without being complicated to make.
One of the best parts of this recipe is its versatility. It is easy enough for a casual weekend bake, but polished enough to serve when guests come over. Because the bars need time to chill, they naturally fit into a make-ahead routine, which makes them practical as well as appealing. That combination of convenience and presentation is hard to beat. When a dessert looks beautiful, slices cleanly, stores well, and tastes wonderful, it quickly becomes a favorite recipe to return to again and again.
These bars also offer a great balance in flavor. Mint brings freshness, chocolate brings richness, and the creamy center keeps every bite smooth and satisfying. They feel cool and refreshing after a meal, yet still decadent enough to satisfy a serious dessert craving. Whether you serve them during the holidays, at birthdays, for spring celebrations, or simply because you love mint and chocolate together, they always feel welcome.
If you are looking for a dessert that is easy to share, easy to make ahead, and memorable from the first bite to the last, Mint Chocolate Chip Dessert Bars are a wonderful choice. Keep this recipe nearby for the times you want a dessert that is both comforting and impressive. Once you make them, there is a good chance they will become one of those dependable favorites that friends and family request again and again.


