Butterfinger Pie is the kind of dessert that feels right at home at just about any gathering, from a laid-back weekend dinner to a birthday celebration or holiday dessert table. It is cool, creamy, rich, and packed with the irresistible flavor combination of peanut butter and chocolate, which makes it especially perfect when you want something impressive without turning on the oven. On warm days, it is a lifesaver. During busy seasons, it is the dessert you can make ahead and pull from the fridge when you need something dependable and crowd-pleasing.
This recipe is inspired by those nostalgic dessert traditions where crushed candy bars, silky pudding, and fluffy whipped topping come together in one chilled pie. It brings that old-fashioned comfort with a modern easy-prep twist. Every bite has creamy filling, crunchy candy pieces, and a chocolate cookie crust that makes it impossible to stop at one slice.
Why You Will Love This Butterfinger Pie
There is a reason no bake pies stay popular year after year: they are simple, reliable, and always satisfying. This Butterfinger Pie checks every box for an easy dessert recipe that still feels special enough for guests.
First, it is incredibly easy to prepare. You do not need advanced baking skills, special equipment, or complicated techniques. A mixing bowl, a hand mixer, and a pie dish are enough to create a dessert that looks bakery-worthy.
Second, the texture is everything a good chilled pie should be. The filling is creamy and fluffy, the crust is crisp and chocolaty, and the crushed Butterfinger pieces add the perfect crunch throughout. That contrast in texture is what makes each bite memorable.
Third, this recipe is ideal for make-ahead entertaining. Since the pie needs time to chill anyway, it fits beautifully into party planning. You can prepare it the night before and have one less thing to think about the next day.
Finally, this easy no bake peanut butter chocolate pie is just plain delicious. If your family loves peanut butter cups, chocolate cream pie, candy bar desserts, or frozen peanut butter treats, this recipe will quickly become a favorite.
What Makes This No Bake Pie So Good
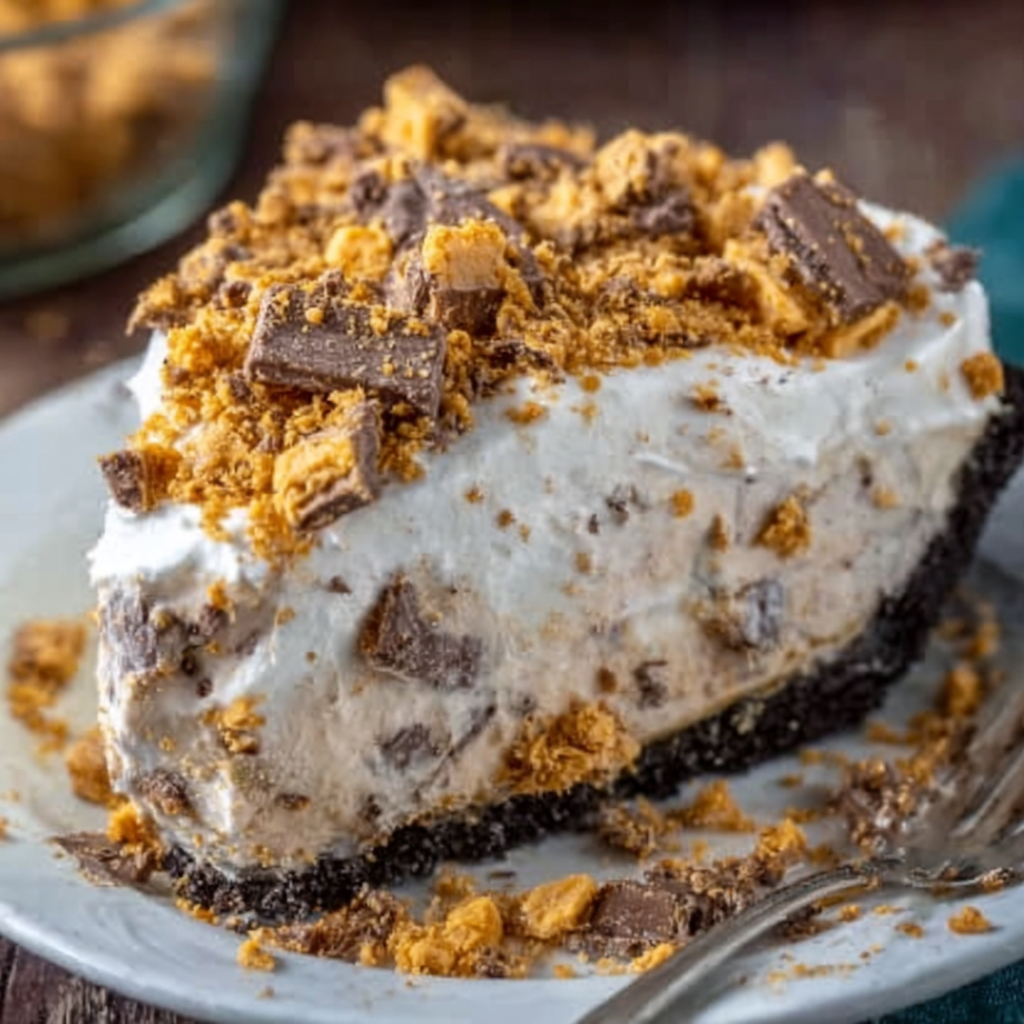
The beauty of Butterfinger Pie is how a few familiar ingredients create layers of flavor. Cream cheese gives the filling structure and a slight tang that balances sweetness. Peanut butter brings richness and depth. Instant vanilla pudding helps stabilize the filling while adding creamy body. Whipped topping keeps everything light and fluffy rather than dense. And then there are the Butterfinger bars, crushed into small golden-orange bits that melt slightly into the filling while still keeping their signature crisp texture.
The chocolate cookie crust is more than just a base. It gives the pie a deep cocoa flavor that works perfectly with the peanut butter filling. Together, the crust and filling create a classic peanut butter chocolate dessert combination that always works.
This pie also has a nostalgic charm. It tastes like something you might have found at a family reunion, church supper, or holiday buffet, but it is polished enough to serve for birthdays, game nights, and celebrations. It has that familiar comfort-food feeling while still looking fun and festive.
Ingredients You Need
Here is everything you need to make this Butterfinger Pie.
6 fun-size Butterfinger bars or 2 standard Butterfinger bars, crushed
1/2 cup mini chocolate chips
1/4 cup chopped peanuts, optional
Extra whipped topping, for garnish
Extra crushed Butterfinger pieces, for garnish
Chocolate syrup, optional for drizzling
These ingredients are easy to find and come together quickly, which is one reason this no bake dessert recipe is so popular.
How to Make Butterfinger Pie
1. Prepare the crust
In a medium bowl, mix 24 finely crushed chocolate sandwich cookies with 5 tablespoons melted unsalted butter until the crumbs look evenly moistened. Press the mixture firmly into the bottom and up the sides of a 9-inch pie dish. Place the crust in the refrigerator for 15 to 20 minutes so it can firm up.
2. Make the creamy peanut butter base
In a large mixing bowl, beat 8 ounces softened cream cheese until smooth. Add 1 cup creamy peanut butter and 1 cup powdered sugar. Beat until the mixture is thick, smooth, and fully combined.
3. Mix the pudding
In a separate bowl, whisk together 1 package (3.4 ounces) instant vanilla pudding mix and 1 cup cold milk for about 2 minutes, until it begins to thicken. Let it sit for 2 to 3 minutes.
4. Combine the filling
Add the prepared pudding to the peanut butter mixture and beat until smooth. Fold in 8 ounces thawed whipped topping gently to keep the filling light and airy. Then fold in most of the crushed Butterfinger bars and 1/2 cup mini chocolate chips, reserving some for topping.
5. Fill the pie
Spread the filling evenly into the chilled crust. Smooth the top with a spatula. Sprinkle with the reserved crushed Butterfinger pieces, extra whipped topping, mini chocolate chips, and chopped peanuts if using.
6. Chill
Refrigerate the pie for at least 4 hours, or until well set. For even cleaner slices, chill it overnight.
7. Serve
Slice and serve cold. For extra indulgence, drizzle each slice lightly with chocolate syrup just before serving.
Tips for the Best Butterfinger Pie
A few smart tips can take this pie from good to unforgettable.
Use softened cream cheese. This is one of the most important steps for a smooth filling. Cold cream cheese can leave lumps that are difficult to beat out later.
Choose creamy peanut butter for the smoothest texture. Natural peanut butter can separate and may make the filling less stable, so standard creamy peanut butter works best here.
Crush the Butterfinger bars in small pieces rather than turning them into powder. You want little crunchy bits throughout the pie for texture and flavor.
Do not rush the chilling time. A fully chilled pie slices more cleanly and tastes even better because the flavors have had time to settle together.
For neat slices, dip a sharp knife in warm water and wipe it clean between cuts. This helps you get those pretty bakery-style slices.
Ingredient Swaps and Easy Variations
One of the best things about this recipe is how flexible it can be. You can adapt it to suit different preferences while keeping the same creamy peanut butter chocolate theme.
If you want a slightly richer base, use a chocolate graham cracker crust instead of chocolate sandwich cookies. It will still give you that deep cocoa flavor with a little more homemade character.
For extra peanut butter flavor, add 2 tablespoons peanut butter to the crust mixture or drizzle melted peanut butter over the finished pie before serving.
If you like more crunch, stir in 1/4 cup chopped roasted peanuts with the Butterfinger pieces. That adds a saltier contrast that balances the sweetness.
For a more frozen-dessert feel, place the pie in the freezer for 1 to 2 hours before serving. This gives it a firmer texture that tastes amazing on hot days.
You can also make mini Butterfinger pies by dividing the crust and filling among small tart pans or dessert cups. They make a great choice for parties because guests can grab individual portions.
When to Serve Butterfinger Pie
This pie fits almost any occasion. It is excellent for summer cookouts because it is served cold and does not require baking. It is equally good during the holiday season, when oven space is limited and make-ahead desserts are especially helpful.
It is also a strong option for birthday parties, potlucks, family dinners, and game-day spreads. Since the ingredients are familiar and the flavors are widely loved, it tends to appeal to both kids and adults. If you need a dessert that feels fun, easy, and guaranteed to disappear quickly, Butterfinger Pie is a smart choice.
Because it can be made the day before, it is especially useful when you want a stress-free dessert. Just keep it chilled, garnish before serving, and it is ready to impress.
How to Store This Pie
Store Butterfinger Pie covered in the refrigerator for up to 4 days. A pie keeper, plastic wrap, or foil all work well. The crust stays best during the first couple of days, but the pie will still taste delicious after that.
You can also freeze it. Wrap the pie tightly in plastic wrap and then a layer of foil. Freeze for up to 1 month. Thaw in the refrigerator before serving, or serve slightly frozen for a firmer, ice-cream-like texture.
If you know you will be making it ahead for an event, it is a good idea to wait and add the final garnish of crushed Butterfinger and whipped topping closer to serving time. That way the topping looks fresh and crisp.
Serving Ideas
Butterfinger Pie is rich, so a small slice goes a long way. Serve it plain if you want the candy bar flavor to shine, or dress it up with a few extras if you are making it for guests.
A dollop of whipped topping on each slice makes it look polished and adds a lighter finish. A drizzle of chocolate syrup creates a dessert-shop feel. You can also scatter a few extra candy pieces over the pie plate just before setting it out.
This pie pairs wonderfully with hot coffee, iced coffee, or a glass of cold milk. If you are putting together a dessert table, it also complements simple treats like brownies, chocolate chip cookies, or vanilla cupcakes.
Frequently Asked Questions
1. Can I make Butterfinger Pie ahead of time?
Yes, and in fact this is one of the best make-ahead desserts you can prepare. Butterfinger Pie actually benefits from being made in advance because the filling needs several hours to firm up in the refrigerator. Making it the night before gives the crust time to settle and the filling time to become sliceable and creamy without being too soft. If you are preparing it for a holiday, birthday, or family gathering, assembling it a day early is a great strategy. Just keep the pie covered in the refrigerator so it stays fresh. For the prettiest presentation, add the final whipped topping and extra crushed candy pieces shortly before serving. That way the garnish looks crisp and appealing rather than soft from moisture.
2. Can I use a store-bought crust instead of making one?
Absolutely. A store-bought chocolate cookie crust is a great shortcut when you want this recipe to be even easier. It works especially well for busy days when you need a fast dessert without extra prep. The homemade crust does have a slightly richer flavor and a firmer texture, but the store-bought version still tastes great and saves time. If you use a ready-made crust, keep in mind that some are a little smaller than a standard 9-inch pie dish, so you may have a bit of extra filling. You can spoon any extra into small dessert cups and chill them separately. This is also a nice option if you want a couple of individual servings on the side.
3. What if I cannot find Butterfinger bars?
If Butterfinger bars are unavailable, you can still make a delicious version of this pie. The goal is to keep the peanut butter and chocolate flavor profile along with a little crunch. Peanut butter cups chopped into small pieces work well, though the texture will be softer and creamier. Chocolate-covered toffee candy can also add a crisp bite, even though the flavor will be a little different. If you want to stay closest to the original texture, add chopped roasted peanuts and extra mini chocolate chips to the filling. The result will not be identical, but it will still give you a satisfying no bake peanut butter chocolate pie with plenty of flavor and texture.
4. How do I keep the pie from being too soft?
The key is using the right ingredients and allowing enough chill time. Make sure the cream cheese is softened, but not warm, and use instant pudding mix rather than cook-and-serve. Measure the milk carefully because too much liquid can loosen the filling. Fold in the whipped topping gently so the mixture stays fluffy but stable. Most importantly, refrigerate the pie for at least 4 hours, though overnight is even better. If your kitchen is especially warm or you want cleaner slices, place the pie in the freezer for 20 to 30 minutes before slicing. This helps firm the filling without turning it fully frozen. A cold pie will always hold its shape better and deliver the creamy, dreamy texture that makes this dessert so appealing.
Final Thoughts
Butterfinger Pie is the kind of dessert recipe that earns a permanent spot in your collection because it delivers everything people want from a homemade treat without demanding too much time or effort. It is easy enough for a casual weeknight craving, yet it has enough visual appeal and rich flavor to hold its own on a holiday dessert table. That balance is what makes it so dependable. You get the satisfaction of serving something homemade, but the process is simple, approachable, and stress-free.
What really sets this easy no bake peanut butter chocolate pie apart is the combination of textures and flavors. The creamy peanut butter filling feels smooth and luscious, the chocolate crust grounds everything with a deep cocoa base, and the Butterfinger pieces add that signature crunchy sweetness that makes each bite more interesting than the last. It is not just sweet for the sake of sweetness. It has contrast, richness, and that nostalgic candy-bar flavor that keeps people coming back for another slice.
This is also a recipe that invites sharing. It is the kind of pie people ask about after the first bite. Whether you bring it to a family dinner, serve it after a weekend meal, or make it as a treat just because, it has a way of turning an ordinary moment into something memorable. Because it is made ahead and chilled, it is practical as well as delicious, which is always a winning combination in a home kitchen.
If you have been looking for a dessert that feels fun, familiar, and completely crowd-pleasing, Butterfinger Pie is a wonderful choice. It is creamy, crunchy, chocolatey, and packed with peanut butter flavor in every cold and satisfying bite. Once you make it, do not be surprised if it becomes one of the most requested desserts in your home.