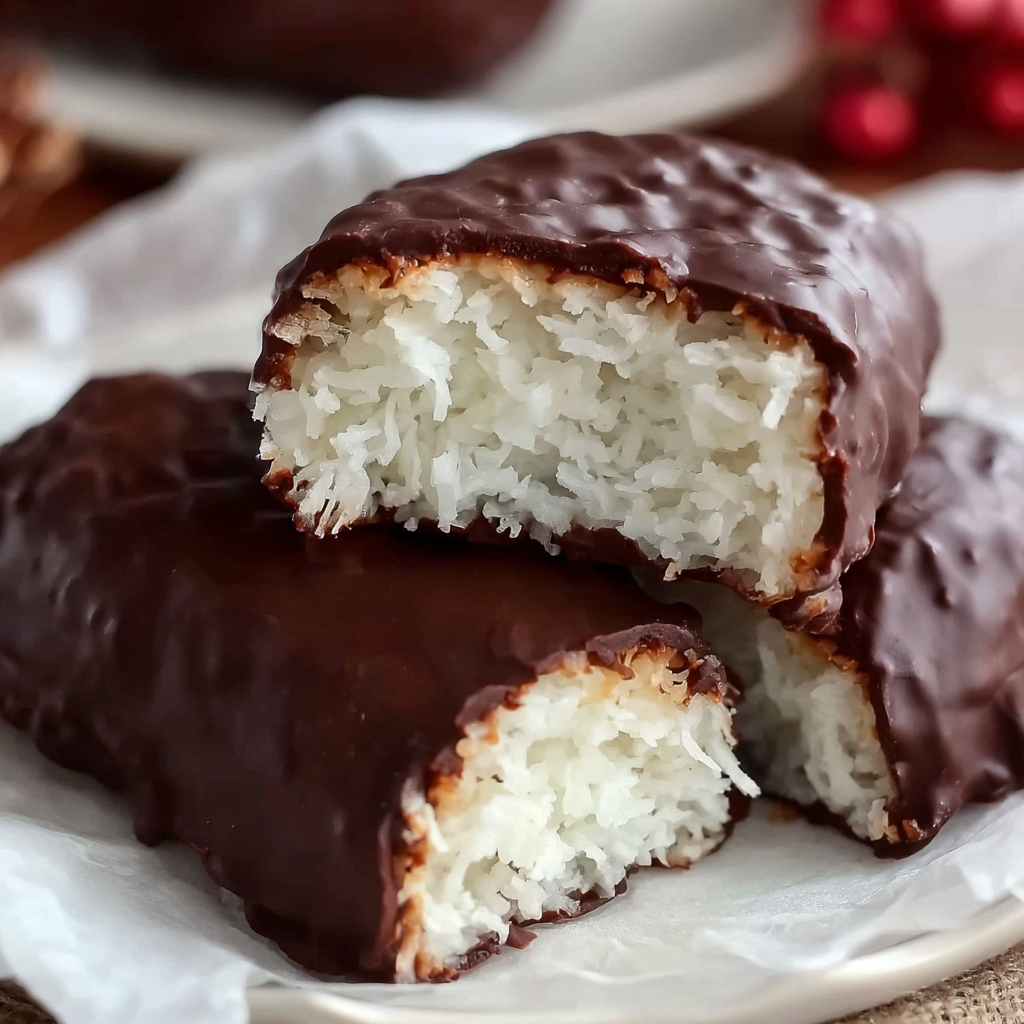
There’s something undeniably comforting about homemade candy, especially when it requires just three simple ingredients and no oven time at all. These 3 Ingredient Homemade Mounds Bars are perfect for cozy weekends, holiday cookie trays, after-school treats, or anytime you crave a sweet bite without the fuss. They’re the kind of recipe you can whip up in minutes yet feel proud to share with friends and family.
This recipe was inspired by childhood memories of unwrapping coconut-filled chocolate bars and savoring that perfect balance of creamy coconut and smooth chocolate. Recreating that nostalgic flavor at home with wholesome ingredients feels both satisfying and special. Best of all, you don’t need complicated techniques or fancy equipment—just a bowl, a spoon, and a little patience while they chill.
Why You’ll Love These 3 Ingredient Homemade Mounds Bars
There are countless dessert recipes out there, but few are as simple and rewarding as this one. Here’s why these no bake coconut candy bars deserve a permanent place in your recipe collection:
Only 3 ingredients
No baking required
Naturally gluten-free
Easy to customize
Perfect for meal prep and gifting
Kid-friendly and beginner-friendly
The magic of this recipe lies in its simplicity. Sweet shredded coconut combines with creamy sweetened condensed milk to form a soft, chewy filling. Once coated in melted chocolate, the bars firm up into a decadent treat that tastes just like a store-bought favorite—only fresher.
Ingredients You’ll Need
One of the most appealing parts of this recipe is its short ingredient list. Each component plays a crucial role in texture and flavor.
For the Coconut Filling
3 cups (240 grams) sweetened shredded coconut
1 can (14 ounces / 396 grams) sweetened condensed milk
That’s it. Three ingredients, each easy to find at any grocery store.
Ingredient Breakdown and Tips
Sweetened Shredded Coconut
Using sweetened shredded coconut gives these bars their classic chewy texture and sweetness. Unsweetened coconut can be used, but the flavor will be less sweet and slightly drier. If using unsweetened coconut, you may need an additional tablespoon or two of sweetened condensed milk to achieve the right consistency.
Sweetened Condensed Milk
Sweetened condensed milk acts as both a sweetener and binder. Its thick, creamy texture holds the coconut together and gives the filling a smooth richness. Be sure to use sweetened condensed milk—not evaporated milk—as they are not interchangeable.
Semi-Sweet Chocolate
Semi-sweet chocolate balances the sweetness of the coconut filling. You can also use dark chocolate for a richer flavor or milk chocolate for a sweeter finish. Choose high-quality chocolate for the best melting consistency and taste.
Step-by-Step Instructions
Step 1: Mix the Coconut Filling
In a large mixing bowl, combine:
3 cups (240 grams) sweetened shredded coconut
1 can (14 ounces / 396 grams) sweetened condensed milk
Stir thoroughly until the coconut is evenly coated and the mixture becomes thick and sticky. It should hold together when pressed between your fingers.
Step 2: Shape the Bars
Line a baking sheet with parchment paper.
Scoop about 2 tablespoons (approximately 30 grams) of the coconut mixture and shape it into a small rectangle or oval bar using your hands. Place it on the prepared baking sheet. Repeat until all the mixture is used.
You should get about 18–20 bars, depending on size.
Step 3: Chill
Place the tray in the refrigerator for at least 1–2 hours, or until the bars are firm. Chilling is essential so they don’t fall apart when dipped in chocolate.
Step 4: Melt the Chocolate
Add 2 cups (340 grams) semi-sweet chocolate chips to a microwave-safe bowl.
Microwave in 30-second intervals, stirring between each interval, until fully melted and smooth. Alternatively, melt the chocolate using a double boiler.
Step 5: Dip the Bars
Using a fork, dip each chilled coconut bar into the melted chocolate. Ensure it is fully coated, then lift it out and allow excess chocolate to drip off.
Place the coated bar back onto the parchment-lined sheet.
Step 6: Chill Again
Refrigerate for another 20–30 minutes, or until the chocolate has completely set.
Once firm, your homemade Mounds bars are ready to enjoy.
Storage Tips
These no bake coconut bars store beautifully, making them perfect for prepping ahead.
Refrigerator: Store in an airtight container for up to 1 week.
Freezer: Freeze in a sealed container for up to 3 months. Thaw in the refrigerator before serving.
For best texture, keep them chilled. The coconut filling softens at room temperature.
Customization Ideas
Even though this is a 3 ingredient recipe, you can easily adapt it:
Dark Chocolate Version
Use 70% dark chocolate instead of semi-sweet for a deeper cocoa flavor.
Coconut Clusters
Skip shaping into bars and form small mounds for bite-sized treats.
Chocolate Drizzle
After dipping, drizzle extra melted chocolate on top for a decorative finish.
Sea Salt Finish
Sprinkle a tiny pinch of flaky sea salt over the chocolate before it sets for a sweet-salty contrast.
Perfect Occasions for Homemade Mounds Bars
These bars are versatile enough for nearly any event:
Holiday dessert trays
Potluck gatherings
After-school snacks
Edible gifts
Summer no-bake desserts
Movie nights
They’re also a wonderful beginner recipe for kids learning to cook, since there’s no oven involved.
Frequently Asked Questions
1. Can I use unsweetened coconut instead of sweetened?
Yes, you can substitute unsweetened shredded coconut for sweetened coconut, but the texture and sweetness will change. Sweetened coconut already contains added sugar and tends to be slightly more moist, which helps bind the bars together. If you use unsweetened coconut, the filling may be less sweet and slightly drier. To compensate, you can add 1–2 extra tablespoons (15–30 ml) of sweetened condensed milk until the mixture holds together well. Keep in mind that the overall flavor will be more coconut-forward and less candy-like. If you prefer a less sweet treat, unsweetened coconut is a great option.
2. Why are my bars falling apart when dipping in chocolate?
This usually happens if the bars were not chilled long enough. The coconut mixture must be firm before dipping. Make sure to refrigerate them for at least 1–2 hours. If your kitchen is warm, you may even want to freeze them for 20–30 minutes before dipping. Another factor could be too little condensed milk. The mixture should feel sticky and compact when shaped. If it crumbles, mix in an additional tablespoon (15 ml) of condensed milk and reshape before chilling again.
3. Can I make these dairy-free?
Traditional sweetened condensed milk contains dairy, but you can find dairy-free sweetened condensed coconut milk alternatives in many stores. Substitute the same amount—14 ounces (396 grams). Be aware that flavor may vary slightly, and the filling might be a bit softer. Make sure to use dairy-free chocolate as well. Chill thoroughly to help them set properly.
4. Do these taste like store-bought Mounds bars?
They taste very similar, but many people find homemade versions even better. The coconut filling is fresher and more flavorful, and you can control the chocolate quality. Store-bought versions often contain preservatives and stabilizers, while this homemade recipe uses just three simple ingredients. The texture is slightly softer and more natural, which many prefer. If you’re aiming for an authentic flavor, use semi-sweet chocolate and shape the bars into classic rounded rectangles.
Final Thoughts
There’s something deeply satisfying about transforming just three pantry staples into a candy that tastes like it came from a specialty shop. These 3 Ingredient Homemade Mounds Bars prove that you don’t need complicated techniques, expensive tools, or long ingredient lists to create something truly delicious.
What makes this recipe so special is its accessibility. Whether you’re a beginner in the kitchen or someone who simply doesn’t want to turn on the oven, this no bake coconut candy delivers consistent, impressive results. The chewy coconut center paired with a smooth chocolate shell creates that classic contrast people love. It’s nostalgic, comforting, and universally appealing.
These bars also invite creativity. You can adjust the chocolate intensity, experiment with textures, or even shape them differently for holidays and celebrations. They’re easy enough for everyday snacking yet elegant enough to gift during the holidays.
Most importantly, this recipe reminds us that homemade treats don’t have to be complicated to be meaningful. Sharing a plate of these coconut bars with family or friends instantly creates connection. Food has a way of turning simple ingredients into shared memories.
So the next time a chocolate craving strikes, skip the candy aisle and head to your kitchen. With just three ingredients and a little chilling time, you’ll have a batch of irresistible homemade coconut bars ready to enjoy.