Easter Poke Cake is a fun, colorful, and delicious dessert that’s perfect for spring gatherings. This festive cake is not only easy to make, but also visually stunning, thanks to its brightly colored pudding filling that seeps into the cake, creating a beautiful marbled effect. Whether you’re hosting an Easter brunch or simply looking for a cheerful dessert, this cake is sure to impress both kids and adults alike.
Poke cakes have been a favorite in American households for decades, thanks to their moist texture and flavorful fillings. Unlike traditional cakes, a poke cake allows the filling—whether it’s pudding, Jell-O, or fruit puree—to infuse every bite with sweetness. According to Wikipedia, these cakes became especially popular in the 1970s when boxed cake mixes became widely available. Today, Easter-themed poke cakes have become a staple during spring, often decorated with pastel colors, sprinkles, and mini chocolate eggs for a festive touch.
A key reason this cake is loved by many is its versatility. You can customize the cake base, filling, and toppings to match your personal preferences or dietary needs. Whether you prefer vanilla, chocolate, or lemon flavors, you can easily adapt this recipe. If you’re interested in exploring different ways to decorate your cake, check out these Easter Poke Cake ideas on Pinterest, where you’ll find endless inspiration!
What is a Poke Cake?
A poke cake is a unique type of dessert where holes are deliberately poked into the baked cake, allowing a liquid or creamy filling to seep inside. This technique not only adds extra flavor but also enhances the cake’s moisture, making it incredibly soft and delicious.
The concept of poke cakes became widely popular in the 1970s, particularly after boxed cake mixes started gaining traction. According to Wikipedia, the convenience of these pre-packaged mixes made baking accessible to more households, leading to creative adaptations like the poke cake. Traditionally, fillings such as Jell-O, pudding, fruit purees, or sweetened condensed milk are used to infuse flavor into the cake.
Why Are Poke Cakes So Popular?
- Moist and Flavorful: The filling adds an extra level of softness, making every bite rich and delicious.
- Easy to Make: Using a boxed cake mix and instant pudding makes the process simple and foolproof.
- Customizable: You can experiment with different cake flavors, fillings, and toppings.
- Visually Stunning: The vibrant colors make it an eye-catching dessert, especially for festive occasions like Easter.
A poke cake differs from traditional cakes because the filling isn’t just a layer—it’s absorbed into the cake itself. This creates a layered taste experience where every bite offers a combination of cake and filling. For a visual reference, explore some of these DIY cake decorating ideas on Pinterest, which showcase different ways to enhance the cake’s appearance.
Poke cakes have become a seasonal favorite for many holidays, including Christmas, Halloween, and Thanksgiving, but Easter Poke Cake stands out for its pastel-colored filling and fun toppings like mini chocolate eggs and sprinkles. This makes it an exciting addition to any Easter dessert table!

Ingredients Needed
Making a delicious Easter Poke Cake is easy, and you only need a few simple ingredients. The best part? You can customize it with different flavors and colors to match your Easter theme. Below is a breakdown of what you’ll need for the cake, filling, and topping.
Cake Base
- 1 box white cake mix – A classic choice that allows the vibrant pudding colors to stand out. You can also use a homemade white cake if you prefer.
- 1 cup water – Essential for mixing the cake batter.
- ⅓ cup vegetable oil – Keeps the cake soft and moist.
- 3 large eggs – Helps the cake rise and adds richness.
💡 Tip: If you want to switch up the flavor, you can use yellow cake mix for a richer taste or funfetti cake mix for extra color!
Filling
- 1 box (3.4 oz) instant vanilla pudding mix – The key to creating a creamy and flavorful filling.
- 2 cups cold milk – Helps the pudding set properly while keeping it smooth.
- Food coloring (pink, yellow, blue, green) – Pastel shades create the rainbow effect inside the cake.
You can also experiment with different pudding flavors like chocolate, lemon, or cheesecake to add variety. If you want more inspiration on creative pudding flavors, check out these fun pudding recipes on Pinterest.
Topping
- 8 oz whipped topping, thawed – A light and fluffy topping that complements the creamy pudding filling. You can use Cool Whip or homemade whipped cream.
- Easter sprinkles – Adds a festive touch with pastel-colored decorations.
- Mini chocolate eggs (optional) – Perfect for enhancing the Easter theme.
💡 Alternative Toppings: You can also use shredded coconut, crushed cookies, or even a drizzle of chocolate syrup for extra flair. For more ideas, check out these spring-themed desserts on Pinterest.
By using a combination of these ingredients, you’ll achieve the perfect Easter Poke Cake—one that’s moist, colorful, and packed with flavor!
Tools & Equipment Needed
Before you start making your Easter Poke Cake, it’s essential to gather the right tools and equipment. Having everything ready will make the process smoother and more enjoyable.
Baking Essentials
- 9×13-inch baking dish – The standard size for a poke cake, ensuring even baking and enough space for the filling.
- Mixing bowls – You’ll need a few bowls for mixing the cake batter, pudding, and whipped topping.
- Whisk or electric mixer – Helps ensure a smooth batter and lump-free pudding.
For Poking the Cake
- Wooden spoon handle – The easiest tool for making evenly spaced holes in the cake.
- Straw or skewer – A good alternative if you want smaller holes for a more delicate pudding distribution.
For Spreading & Decorating
- Spatula – Helps evenly spread the pudding and whipped topping without mixing the colors.
- Piping bag (optional) – If you want to create decorative swirls with whipped topping.
- Sprinkle shaker – Makes it easier to distribute sprinkles evenly across the cake.
Having the right tools ensures that your poke cake turns out perfect—moist, colorful, and beautifully decorated. If you love cake decorating, check out these DIY cake decorating ideas on Pinterest for more inspiration!
Step-by-Step Instructions
Making an Easter Poke Cake is a fun and simple process. Follow these step-by-step instructions to ensure your cake turns out moist, flavorful, and beautifully decorated.
1. Baking the Cake
- Preheat your oven to 350°F (175°C).
- Grease a 9×13-inch baking dish with cooking spray or butter to prevent sticking.
- In a large mixing bowl, combine the white cake mix, water, vegetable oil, and eggs. Mix until smooth. If using a cake mix, follow the package instructions for best results.
- Pour the batter into the prepared baking dish and spread evenly.
- Bake according to the cake mix instructions (typically 25–30 minutes). The cake is done when a toothpick inserted in the center comes out clean.
💡 Tip: For a homemade version, use a classic white cake recipe to avoid artificial ingredients.
2. Poking the Holes
- Let the cake cool for 10 minutes before poking holes.
- Using the handle of a wooden spoon, poke holes 1 inch apart all over the cake. Make sure the holes are deep enough to allow the pudding to seep in.
- Avoid making the holes too close together, as this can cause the cake to become too soft.
💡 Alternative tools: You can also use a straw, skewer, or chopstick for smaller holes, depending on how much filling you want to absorb.
3. Making the Pudding Filling
- In a medium bowl, whisk together 1 box of instant vanilla pudding mix and 2 cups of cold milk until smooth.
- Divide the pudding evenly into four small bowls.
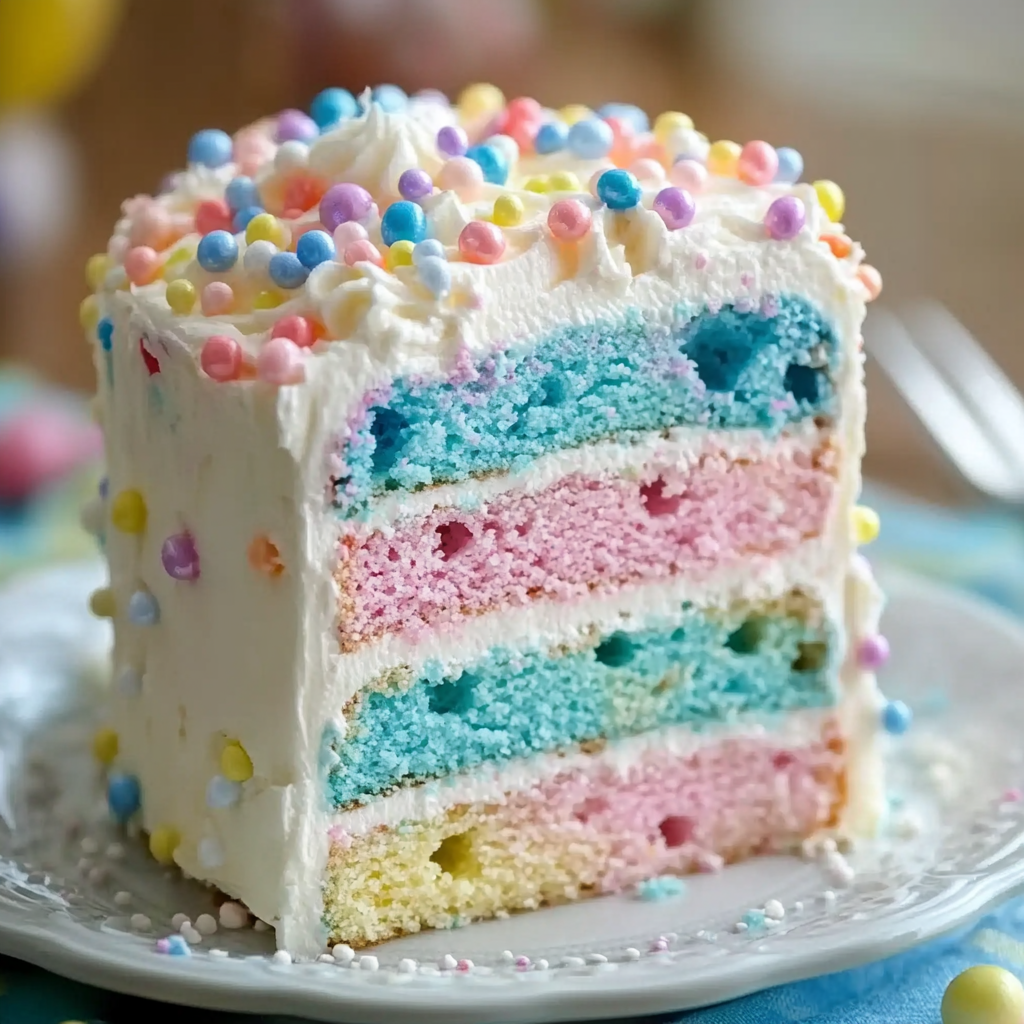
- Add a few drops of food coloring (pink, yellow, blue, and green) to each bowl and mix until the colors are vibrant.
💡 Want to experiment? Try different pudding flavors like chocolate or lemon for a unique twist.
4. Filling the Cake
- Carefully spoon the colored pudding into the holes of the cake, alternating colors to create a rainbow effect.
- Once all the holes are filled, use a spatula to gently smooth out the top, being careful not to mix the colors.
💡 For an extra pop of flavor, add a few drops of vanilla or almond extract to the pudding before adding it to the cake.
5. Chilling the Cake
- Cover the cake with plastic wrap and refrigerate for at least 1 hour to allow the pudding to set.
- Chilling helps the flavors meld together and keeps the cake firm for easier slicing.
💡 Short on time? Place the cake in the freezer for 20–30 minutes instead of refrigerating for a full hour.

Adding the Topping & Decorations
Now that the Easter Poke Cake has been chilled and the pudding has set, it’s time to add the final touches! The topping and decorations will enhance both the flavor and visual appeal of your cake, making it the perfect Easter dessert.
1. Spreading the Whipped Topping
- Remove the cake from the refrigerator.
- Use a spatula to evenly spread 8 oz of thawed whipped topping (Cool Whip or homemade whipped cream) over the entire cake.
- Smooth out the top for a clean and polished look.
💡 Alternative topping: If you prefer a homemade whipped cream, simply beat 1 cup of heavy whipping cream with 2 tbsp of powdered sugar until soft peaks form.
2. Decorating with Sprinkles & Mini Eggs
- Sprinkle Easter-themed sprinkles over the whipped topping for a colorful touch.
- Arrange mini chocolate eggs on top for a festive Easter look. You can group them in small clusters or create a fun pattern.
- If you love coconut, consider adding shredded coconut for a “grass-like” effect. For more creative ideas, explore these Easter poke cake decorating ideas on Pinterest.
💡 Extra flair: Add a light drizzle of white chocolate or pastel-colored icing to give your cake a bakery-style finish!
3. Chilling Before Serving
- Place the decorated cake back in the refrigerator for at least 30 minutes to let the flavors blend together.
- Serve chilled for the best texture and taste.
With the whipped topping and festive decorations, your Easter Poke Cake is now ready to impress your guests! 🎉
Tips & Tricks for the Perfect Easter Poke Cake
Making a poke cake is simple, but a few expert tips can take it to the next level. Follow these tricks to ensure your cake is moist, flavorful, and beautifully presented.
1. How to Make the Cake Extra Moist
- Use whole milk instead of water when preparing the cake mix for a richer texture.
- Add one extra egg to the batter to create a softer, fluffier cake.
- Swap out vegetable oil for melted butter for a more homemade taste.
2. Choosing the Best Pudding for Filling
- Vanilla pudding works best for bright pastel colors.
- Lemon pudding adds a fresh citrus twist.
- Chocolate pudding creates a rich and decadent version.
💡 Want more variety? Explore these fun pudding recipes on Pinterest for unique flavor ideas!
3. Preventing the Colors from Mixing
- When adding the pudding to the holes, use separate spoons for each color to keep them distinct.
- Spoon the pudding in gently and avoid spreading it too much.
- If the colors blend slightly, don’t worry—it will still look beautifully marbled!
4. Making a Dairy-Free or Gluten-Free Version
- Use almond or coconut milk instead of dairy milk for the pudding.
- Opt for a gluten-free cake mix to make the dessert allergy-friendly.
- Choose dairy-free whipped topping for the frosting.
5. Storing & Freezing the Cake
- Store leftovers in an airtight container in the fridge for up to 3 days.
- You can freeze individual slices for up to 1 month, but note that whipped topping may lose its texture after thawing.
With these tips, your Easter Poke Cake will turn out perfectly every
Storage & Serving Suggestions
To enjoy your Easter Poke Cake at its best, it’s important to store and serve it properly. Whether you’re making it ahead of time or saving leftovers, follow these guidelines to keep your cake fresh and delicious.
1. How to Store the Cake
- Keep the cake covered and refrigerated to maintain its moisture. The pudding filling needs to stay chilled.
- Use an airtight container or cover the baking dish with plastic wrap to prevent the cake from drying out.
- Store in the refrigerator for up to 3 days.
💡 Want more storage tips? Check out this Wikipedia guide on whipped cream to understand how different toppings hold up over time.
2. Can You Freeze Easter Poke Cake?
- Yes, but the texture may change slightly.
- Freeze without the whipped topping for best results. Add the topping after thawing.
- Wrap individual slices in plastic wrap and aluminum foil, then place them in a zip-top freezer bag.
- Freeze for up to 1 month. Thaw in the refrigerator before serving.
3. Best Ways to Serve the Cake
- Serve chilled for the best texture and taste.
- Pair with a scoop of vanilla ice cream for an extra indulgent treat.
- Garnish with extra sprinkles or mini eggs before serving for a festive touch.
💡 Need more serving ideas? Check out these spring-themed desserts on Pinterest for inspiration!
By following these storage and serving tips, you’ll ensure that your Easter Poke Cake stays fresh and delicious for as long as possible.
Variations & Customizations
One of the best things about Easter Poke Cake is how easy it is to customize! Whether you want a different flavor, a new topping, or a fun design, there are countless ways to make this cake your own.
1. Flavor Variations
- Chocolate Easter Poke Cake – Use chocolate cake mix and chocolate pudding for a richer, more indulgent version.
- Lemon Easter Poke Cake – Swap out the white cake mix for lemon cake mix and use lemon pudding for a fresh citrus twist.
- Strawberry Cream Poke Cake – Use strawberry cake mix and fill it with vanilla or cheesecake pudding for a fruity, creamy combination.
💡 For even more creative ideas, check out these Easter poke cake variations on Pinterest.
2. Fun Topping Ideas
- Coconut Easter Grass – Dye shredded coconut green and sprinkle it on top to create an Easter grass effect.
- Crushed Cookies – Sprinkle crushed Oreos or graham crackers for added crunch.
- Drizzled Chocolate or Caramel – Add a drizzle of white chocolate, caramel, or pastel-colored icing for extra sweetness.
3. Easter-Themed Designs
- Easter Bunny Cake – Shape the cake into a bunny face using a stencil and decorate with icing and candy eyes.
- Speckled Egg Cake – Add a dusting of cocoa powder over the whipped topping for a speckled egg effect.
- Rainbow Layer Cake – Instead of mixing the pudding colors, layer each one separately for a rainbow look inside the cake.
With so many ways to customize, your Easter Poke Cake can be as simple or as elaborate as you’d like. Have fun experimenting and creating a cake that’s perfect for your Easter celebration!

FAQs (Frequently Asked Questions)
Here are some common questions about making the perfect Easter Poke Cake.
1. Can I make Easter Poke Cake ahead of time?
Yes! In fact, making it a day in advance allows the pudding to fully set, making the cake even more flavorful. Simply store it in the refrigerator, covered, until you’re ready to serve.
2. Can I use a homemade cake instead of a boxed mix?
Absolutely! You can replace the cake mix with your favorite homemade white cake recipe. Just ensure that the texture remains light and fluffy so the pudding can soak in properly. Learn more about cake mix alternatives on Wikipedia.
3. What’s the best way to add pudding without mixing the colors?
- Use separate spoons for each color.
- Drop the pudding directly into the holes instead of spreading it.
- Smooth the top gently without pressing too hard.
4. Can I make a dairy-free version of this cake?
Yes! Use almond, soy, or coconut milk for the pudding and a dairy-free whipped topping. Also, check the cake mix ingredients to ensure it’s dairy-free.
5. Can I use different pudding flavors?
Definitely! While vanilla pudding is traditional, flavors like chocolate, cheesecake, lemon, or coconut can add a unique twist. If you’re looking for inspiration, check out these fun pudding recipes on Pinterest.
These FAQs should help you troubleshoot any issues and customize your cake to your liking.


