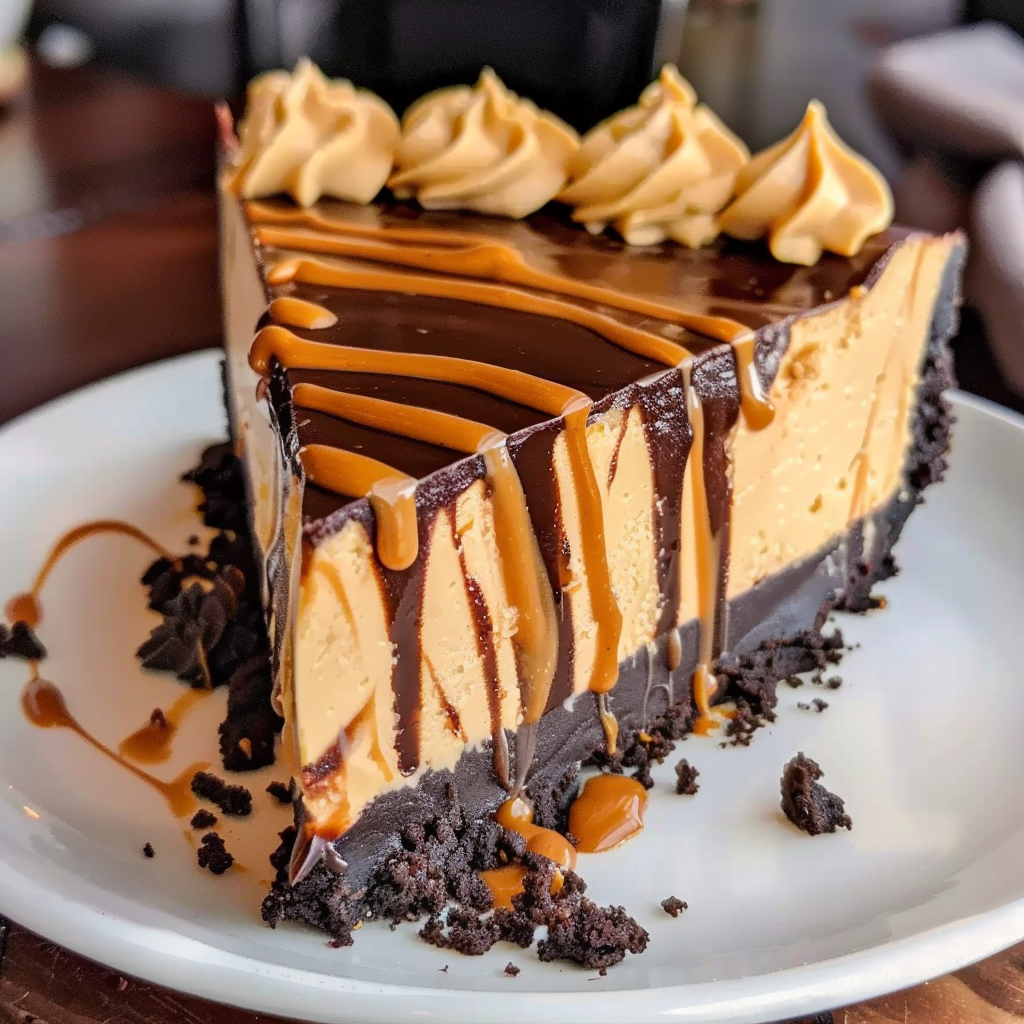
Peanut Butter Cheesecake
A peanut butter cheesecake is the ultimate combination of two beloved desserts—classic creamy cheesecake and rich, nutty peanut butter. This indulgent treat offers a velvety, melt-in-your-mouth texture that’s both sweet and slightly salty, delivering a perfect balance in every bite. What makes this version truly standout is its chocolate cookie crumb crust, which adds depth, crunch, and contrast to the silky filling. Whether you’re baking for a birthday, potluck, or just craving a weekend dessert, this step-by-step peanut butter cheesecake recipe ensures a flawless result every time.
While many cheesecakes can be finicky—prone to cracking or drying out—this recipe is designed to stay stable and creamy from bake to chill. The use of full-fat cream cheese, smooth shelf-stable peanut butter, and a gentle bake method helps maintain its luscious consistency. Inspired by the structure of a classic New York-style cheesecake, it uses familiar ingredients but takes the flavor profile in a more decadent, nutty direction.
As you prepare, you’ll want to use a springform pan to achieve that iconic cheesecake shape and height. This kitchen essential allows the sides to release easily without damaging the crust or the creamy surface. You’ll also be working with cream cheese and peanut butter, two ingredients that bring richness and body to the filling. They combine beautifully with vanilla, sour cream, and eggs to create a structure that’s dense yet delicate, making it a highlight on any dessert table.
Beyond the baking, what sets this peanut butter cheesecake apart is the topping. A glossy chocolate ganache poured over the chilled cake not only elevates its presentation but enhances the taste with a bittersweet counterpoint to the filling. You can also sprinkle chopped roasted peanuts on top for an added crunch. For more creative presentation ideas, check out this cheesecake inspiration board to explore different decorating styles and flavor pairings.
If you’re interested in more than just the traditional version, browse this collection of peanut butter dessert ideas for variations you can incorporate—such as adding a peanut butter swirl or turning this into mini cheesecakes. No matter how you serve it, this cheesecake will deliver a rich and creamy bite that leaves a lasting impression.

Why You’ll Love This Recipe
This peanut butter cheesecake recipe stands out not just for its flavor, but also for its simplicity and reliability. It’s designed to be approachable for beginners while still producing professional-quality results. The creamy texture, rich peanut butter flavor, and contrast of a crunchy chocolate cookie crust create a dessert that’s as satisfying as it is beautiful.
-
Flavor Perfection: The filling is intensely peanut buttery, yet balanced with a touch of vanilla and tang from sour cream. Each bite is both sweet and salty, with a richness that satisfies dessert lovers of all kinds.
-
Creamy & Stable Texture: Thanks to proper mixing techniques and ingredient ratios, this cheesecake bakes up smooth and stable—without cracks or sinking. It holds its shape beautifully after chilling.
-
Crunchy Cookie Base: The crust is made from crushed chocolate cookie crumbs, giving the base a sweet, chocolatey bite that complements the dense filling. If you enjoy contrasts in texture, this crust delivers.
-
Beginner Friendly: Whether this is your first cheesecake or your fiftieth, the step-by-step method makes it easy to follow and hard to mess up. With a bit of patience and a few basic tools, you’ll get a stunning result.
-
Versatile for Occasions: From birthdays to holidays to weekly meal-prep desserts, this cake fits the bill. Slice it in advance, serve with ice cream, or package it as individual servings for potlucks.
If you’re curious about creative versions of this dessert, explore this Pinterest board full of no-bake peanut butter cheesecake variations. While this recipe is baked, you can gain ideas on flavor combinations and presentation that may inspire your next dessert project.
Additionally, many bakers find that peanut butter cheesecakes offer more flexibility than fruit-based ones. The density and fat content from the peanut butter help it maintain its structure better during baking and cooling. For more insight into ingredient stability, check out the Wikipedia article on ganache, which you’ll use later in this recipe for an optional topping that adds even more decadence.
Ready to get baking? Let’s walk through the simple tools you’ll need to bring this rich dessert to life.
Tools & Equipment You’ll Need
To ensure your peanut butter cheesecake turns out smooth, stable, and visually appealing, having the right tools is essential. While the ingredients do the flavor work, these tools help you execute each step with precision and ease. Most are kitchen basics, and if you bake even occasionally, you likely already own many of them.
-
9-inch Springform Pan: A must-have for cheesecakes. Its removable sides make unmolding the cake simple, preserving the delicate cookie crumb crust and smooth top. Learn more about this tool here.
-
Mixing Bowls (various sizes): Use separate bowls for the crust, filling, and ganache. Stainless steel or glass bowls work best for even mixing.
-
Electric Mixer: A stand mixer or hand mixer helps ensure your cream cheese is perfectly smooth before adding other ingredients. This prevents lumps and ensures a creamy, even filling.
-
Rubber Spatula: Ideal for scraping down the sides of your bowl and gently folding ingredients like sour cream into the filling.
-
Measuring Cups and Spoons: Precise measurements are crucial in cheesecake recipes, especially for ingredients like peanut butter, sugar, and eggs.
-
Saucepan (for ganache): Used to gently heat heavy cream before combining with chocolate chips to create a glossy topping.
-
Baking Sheet (optional): Placing your springform pan on a baking sheet makes transferring it in and out of the oven easier and catches any butter drips from the crust.
-
Cooling Rack: Helps the cheesecake cool evenly before chilling it in the fridge.
-
Plastic Wrap or Foil: Needed for covering the cheesecake during refrigeration to prevent it from absorbing other fridge odors.
Using these tools ensures each component—from crust to topping—comes together seamlessly. While you can technically bake a cheesecake without some of them, items like the springform pan and mixer make the process significantly easier and more reliable. For visual inspiration on kitchen setup or to see how other bakers present their cheesecakes, take a look at this Pinterest board.
Now that your tools are ready, let’s break down every ingredient you’ll be using and what role it plays in creating this creamy, rich dessert.
Ingredients Breakdown
Understanding each ingredient’s role in your peanut butter cheesecake ensures not only a better bake but also opens the door to thoughtful substitutions and flavor enhancements. Every component—from the crust to the topping—plays a key part in delivering that smooth, rich texture and indulgent flavor.
For the Crust:
-
1 ½ cups chocolate cookie crumbs: These form the crunchy base of the cheesecake. Use finely crushed chocolate sandwich cookies for the best flavor and texture. You can keep the filling in or remove it depending on how sweet you want the crust.
-
¼ cup granulated sugar: Adds a touch of sweetness and helps bind the crust.
-
⅓ cup melted butter: Holds the crumbs together and creates a firm texture when chilled. Use unsalted butter for more control over the overall flavor.
This crust is rich, chocolatey, and slightly salty—a perfect contrast to the creamy peanut butter filling. It also mimics the texture of a cookie base, giving you a satisfying crunch with every bite.
For the Filling:
-
24 oz (680g) cream cheese, softened: The foundation of any cheesecake, cream cheese gives the dessert its signature richness and creamy texture. Make sure it’s fully softened to prevent lumps.
-
1 cup creamy peanut butter: Choose a shelf-stable, no-stir peanut butter for consistency. Natural varieties with oil separation can cause the filling to break or become greasy. Explore more about peanut butter and how it interacts in desserts.
-
1 cup granulated sugar: Sweetens the filling while balancing the saltiness of the peanut butter.
-
1 tsp vanilla extract: Enhances all the other flavors and adds depth to the filling.
-
3 large eggs: Provide structure and stability. Eggs also help the cheesecake set into a firm yet creamy consistency.
-
½ cup sour cream: Adds a subtle tang and smooth texture. It helps lighten the density of the filling while keeping it moist and rich.
These ingredients work together to create a dense, peanut-butter-infused cheesecake that doesn’t dry out or crack during baking. The sour cream especially helps keep the texture luscious even after refrigeration.
Looking for ways to personalize your cheesecake? Take a look at these homemade peanut butter variations. You can experiment with flavors like honey-roasted or chocolate peanut butter blends for a unique twist on the classic recipe.
For the Topping (Optional):
-
½ cup heavy cream: Used to create a smooth, pourable ganache. It should be just hot enough to melt the chocolate without boiling.
-
½ cup chocolate chips: Choose semi-sweet or dark chocolate for balance. These melt into the cream to form a rich ganache topping—learn more about this process here.
-
Chopped roasted peanuts (optional): Adds a crunchy texture and a decorative finish to your cheesecake. Toast them lightly for enhanced flavor.
While the topping is optional, it’s highly recommended. The ganache adds a glossy finish and a deeper chocolate flavor, making this cheesecake not just taste amazing but look bakery-worthy. Need inspiration on how to present your ganache-topped cheesecake? Browse this Pinterest gallery filled with creative visuals.
With your ingredients now ready and measured, you’re set to start assembling this rich and creamy dessert. Let’s begin with making the crust.
Making the Cookie Crumb Crust
The cookie crumb crust serves as the foundation of your peanut butter cheesecake. It provides that essential contrast—both in texture and flavor—to the creamy filling. This step is simple but important: the crust must be compact and even to support the weight of the dense filling without crumbling.
Step-by-Step Instructions:
-
Preheat your oven to 325°F (165°C) and lightly grease a 9-inch springform pan.
-
Crush the cookies finely using a food processor or place them in a zip-top bag and crush with a rolling pin.
-
Combine 1½ cups of chocolate cookie crumbs, ¼ cup granulated sugar, and ⅓ cup melted unsalted butter in a bowl.
-
Mix thoroughly until the texture resembles wet sand.
-
Press the mixture firmly into the bottom of the springform pan using the bottom of a flat glass or measuring cup. This ensures an even, compact crust.
-
For extra crispness and to prevent sogginess, pre-bake the crust for 8–10 minutes. Let it cool completely before adding the filling.
Helpful Tips:
-
Don’t press the crust up the sides of the pan unless you prefer that look.
-
Make sure it’s fully cooled before pouring in the filling to avoid steam softening the base.
Need ideas for other crust styles? Consider mixing in crushed pretzels or graham crackers for texture variation.

Preparing the Peanut Butter Cheesecake Filling
This is the heart of your dessert—the part where the magic happens. A well-mixed filling is key to achieving that signature smooth, rich texture and consistent bake throughout. Here’s how to do it step by step:
Step-by-Step Instructions:
-
In a large mixing bowl, beat 24 oz softened cream cheese on medium speed until smooth and lump-free. Scrape the bowl to ensure even mixing.
-
Add 1 cup creamy peanut butter, 1 cup granulated sugar, and 1 tsp vanilla extract. Mix until well combined and smooth.
-
Add the eggs one at a time, mixing on low speed just until each is incorporated. Avoid overbeating, which can introduce air and lead to cracking.
-
Fold in ½ cup sour cream using a rubber spatula. This will lighten the texture and add a subtle tang.
Key Tips:
-
Use room-temperature ingredients to avoid lumps and ensure a uniform mixture.
-
Avoid incorporating too much air into the batter, which could cause your cheesecake to puff and collapse.
-
If you’re curious about ingredient behavior in baked fillings, check out how cream cheese and peanut butter interact in baking.
Want to add flair? Try swirling in jelly or chocolate before baking, or explore peanut butter dessert ideas for creative mix-in inspiration.
Assembling and Baking the Cheesecake
Once your crust and filling are ready, it’s time to bring everything together and bake. Baking cheesecake can seem intimidating, but this method is forgiving and designed to help you get perfect results.
Assembly and Baking:
-
Pour the peanut butter filling over the cooled crust and smooth the top using a spatula.
-
Tap the pan gently on the counter to release any air bubbles trapped inside the filling.
-
Bake at 325°F (165°C) for 50–60 minutes. The edges should be set while the center remains slightly jiggly—this is a good sign.
-
After baking, turn off the oven and leave the cheesecake inside with the door slightly open for 1 hour. This gradual cooling prevents cracks.
No Water Bath Needed:
While many cheesecakes call for a water bath, this recipe’s filling structure makes it stable enough without one. Still, if you prefer a perfectly smooth texture, you can wrap the pan in foil and bake in a water bath.
Extra Tip:
If you’re baking often and want to explore alternative crusts or fillings, browse this Pinterest search for ideas beyond the traditional method.
Cooling and Chilling for the Perfect Texture
The cooling and chilling process is just as important as baking when it comes to achieving a smooth, creamy, and sliceable texture in your cheesecake.
Post-Bake Cooling:
-
After the hour-long oven rest, remove the cheesecake and let it continue cooling at room temperature for another 30–60 minutes.
-
Transfer to the refrigerator and chill for at least 4 hours, but ideally overnight. This step allows the filling to firm up and the flavors to develop fully.
Why It Matters:
-
Chilling is critical for structure. Slicing too early can result in a runny or collapsing cheesecake.
-
Wrapping the pan in foil or plastic wrap prevents it from absorbing fridge odors.
Need tips for serving or decorating after chilling? Check out chocolate ganache topping ideas for inspiration.
Making the Chocolate Ganache Topping (Optional but Recommended)
While the cheesecake is delicious on its own, a silky ganache topping takes it to the next level. This optional step adds a glossy, elegant finish and a hit of bittersweet chocolate to balance the peanut butter.
Ganache Instructions:
-
In a small saucepan, heat ½ cup heavy cream until just simmering (do not boil).
-
Pour the hot cream over ½ cup chocolate chips in a heatproof bowl.
-
Let sit for 1 minute, then stir until smooth and glossy. You’ve just made ganache—read more about it here.
-
Allow the ganache to cool slightly, then pour over the chilled cheesecake.
-
Smooth the top with a spatula and garnish with chopped roasted peanuts if desired.
Presentation Tip:
This step not only adds flavor but makes your cheesecake bakery-worthy. For decorating ideas, see this curated collection of Pinterest ganache cheesecakes.
Serving Suggestions
This peanut butter cheesecake is rich, so a small slice goes a long way. Here’s how to get clean cuts and pair it perfectly:
-
Use a sharp knife dipped in hot water, wiping between slices.
-
Serve cold or slightly softened at room temperature.
-
Pairs well with whipped cream, fresh berries, or vanilla ice cream.
Explore more creative pairings and serving styles in this cheesecake presentation guide.
Storage Tips
Proper storage ensures your cheesecake tastes as good days later as it does fresh:
-
Refrigerate covered for up to 5 days.
-
Freeze slices individually by wrapping in plastic and storing in an airtight container. Freeze up to 3 months.
-
Thaw in the refrigerator overnight before serving.
For more tips on how peanut-based desserts hold up over time, check out this helpful board on peanut butter dessert storage.
Customization Ideas & Variations
Want to put your own spin on this peanut butter cheesecake? Try one of these easy variations:
-
PB&J Swirl: Add spoonfuls of raspberry or strawberry jam and swirl before baking.
-
Pretzel Crust: Swap the cookie base for crushed pretzels for a salty twist.
-
White Chocolate Ganache: Use white chips instead of semi-sweet for a lighter topping.
-
Mini Cheesecakes: Use muffin tins and liners to create individual servings.
-
Candy Toppings: Sprinkle chopped Reese’s, toffee bits, or homemade peanut butter over the ganache.
Cheesecake is one of the most customizable desserts—use this recipe as your base and explore endless possibilities.
Common Mistakes to Avoid
Even the best recipes can go sideways without proper technique. Here are the most common mistakes to watch for:
-
Overmixing the batter: Leads to too much air, causing cracks or sinking.
-
Undercooking the crust: Makes it soggy, especially if not pre-baked.
-
Skipping chill time: Results in a soft or unstable cheesecake.
-
Opening the oven too early: Causes sudden drops in temperature and cracks.
Stay patient, follow the method, and use the right tools (especially the springform pan) for best results.

FAQs – Peanut Butter Cheesecake
Can I use natural peanut butter in this recipe?
It’s not recommended. Natural peanut butter often separates, making the filling greasy or unstable. Stick to shelf-stable, creamy versions for best results.
How do I know when the cheesecake is done?
The edges should look firm, while the center jiggles slightly. It will continue setting as it cools, so avoid overbaking.
Do I need a water bath for this cheesecake?
No. This recipe is stable enough without one. However, you can use one if you prefer a slightly denser, smoother texture.
Can I make this cheesecake gluten-free?
Yes. Just use gluten-free chocolate cookies for the crust and double-check that all your ingredients are certified gluten-free.
Can I skip the ganache topping?
Absolutely. The cheesecake is delicious on its own. The ganache adds richness and aesthetic appeal, but it’s not required.
Creamy Cheesecake Peanut Butter Cheesecake Step By Step With Cookie Crumbs Crust

This peanut butter cheesecake is a rich, creamy baked dessert with a chocolate cookie crumb crust and optional silky ganache topping. The filling is made with full-fat cream cheese and creamy peanut butter, delivering an indulgent bite with a perfectly balanced flavor profile. Ideal for holidays, birthdays, or whenever a decadent treat is needed, this recipe holds its shape beautifully and is easy to prepare with detailed step-by-step instructions.
- Author: Clara
Ingredients
For the crust:
- 1 ½ cups chocolate cookie crumbs
- ¼ cup granulated sugar
- ⅓ cup melted butter
For the filling:
- 24 oz (680g) cream cheese, softened
- 1 cup creamy peanut butter
- 1 cup granulated sugar
- 1 tsp vanilla extract
- 3 large eggs
- ½ cup sour cream
For the topping (optional):
- ½ cup heavy cream
- ½ cup chocolate chips
- Chopped roasted peanuts for garnish
Instructions
Preheat the oven to 325°F (165°C). Grease a 9-inch springform pan.
In a medium bowl, mix chocolate cookie crumbs, sugar, and melted butter. Press the mixture into the bottom of the pan to form the crust.
In a large bowl, beat the cream cheese until smooth. Add peanut butter, sugar, and vanilla extract, and mix until fully combined.
Add the eggs one at a time, mixing well after each addition.
Stir in the sour cream until smooth.
Pour the filling over the crust and smooth the top.
Bake for 50–60 minutes or until the center is set but slightly jiggly.
Turn off the oven and let the cheesecake cool inside for 1 hour with the door slightly open.
Remove from the oven and refrigerate for at least 4 hours or overnight.
For the topping, heat the heavy cream until just simmering, then pour it over the chocolate chips. Let sit for a minute, then stir until smooth.
Pour the chocolate ganache over the chilled cheesecake and spread evenly. Garnish with chopped peanuts if desired before serving.
Notes
-
Make sure all filling ingredients are at room temperature to prevent lumps.
-
Pre-baking the crust is optional but recommended for extra firmness.
-
For a nut-free version, replace peanut butter with sunflower seed butter and omit peanut garnish.
-
Let the cheesecake cool gradually and chill overnight for best results.
-
Decorate with whipped cream, fruit, or chocolate curls for added flair.