Baked Italian Subs
If you’re craving something warm, savory, and effortlessly satisfying, baked Italian subs are your next go-to meal. These toasted sub sandwiches bring together classic deli meats, melted cheese, and crisp toppings, all wrapped in a warm, oven-toasted roll. What sets these subs apart isn’t just the flavor—it’s the ease and flexibility of making them at home.
Whether you’re feeding a hungry family on a weeknight or prepping food for game day, sheet pan sandwiches like these are a crowd-pleasing solution. Instead of making one sandwich at a time, you can load several onto a single tray, bake them at once, and serve them hot and fresh. This streamlined method offers the comforting flavor of a classic Italian sandwich, but without the hassle of assembly-line cooking.
The origins of the submarine sandwich date back to early 20th-century Italian-American communities. Today, the Italian sub has evolved into countless regional variations. From hoagies to grinders, one thing remains constant: the perfect balance of salty cured meats, creamy cheese, and fresh veggies. For those interested in the full history, this article on submarine sandwiches provides fascinating insight into their culinary background.
When making these baked Italian subs, ingredients like salami, turkey bacon, and provolone cheese come together in perfect harmony. You can learn more about why provolone is a popular choice for melting and flavor by checking out this guide on provolone cheese. Layer it all on hearty sub rolls, bake until golden and crisp, and top with fresh vegetables and zesty banana peppers for that satisfying finish. For visual inspiration, Pinterest is a great source for sheet pan recipe ideas to make variations of this dish.
Once you discover how simple and delicious these are to make, you’ll want to add them to your weekly rotation. They’re more than a sandwich—they’re a mealtime solution.
What Are Baked Italian Subs?
Baked Italian subs are a hearty, flavor-packed version of the traditional Italian sandwich, but with one crucial twist—they’re assembled and then baked in the oven until the bread is perfectly toasted and the cheese melts into the layers of deli meat. This method not only intensifies the flavor but also adds a satisfying crunch and warmth that’s missing from cold sandwiches.
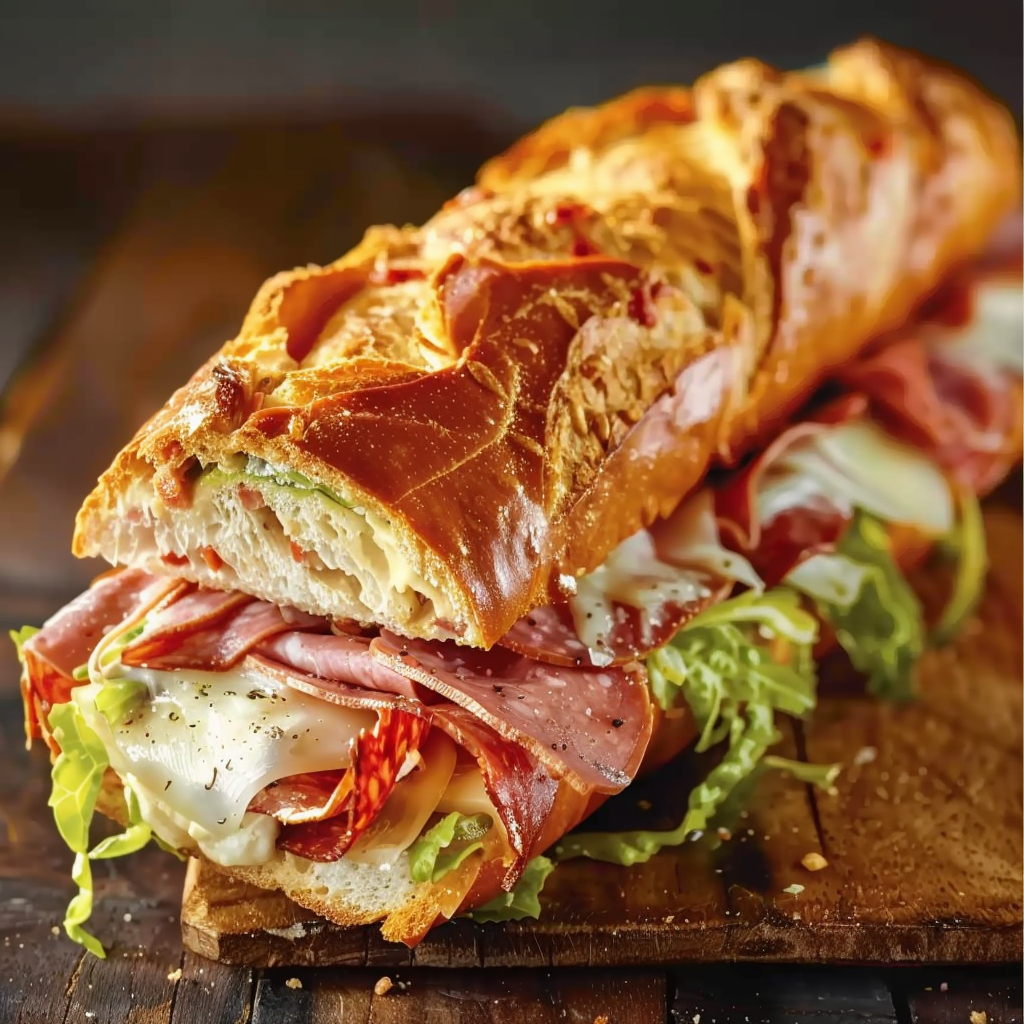
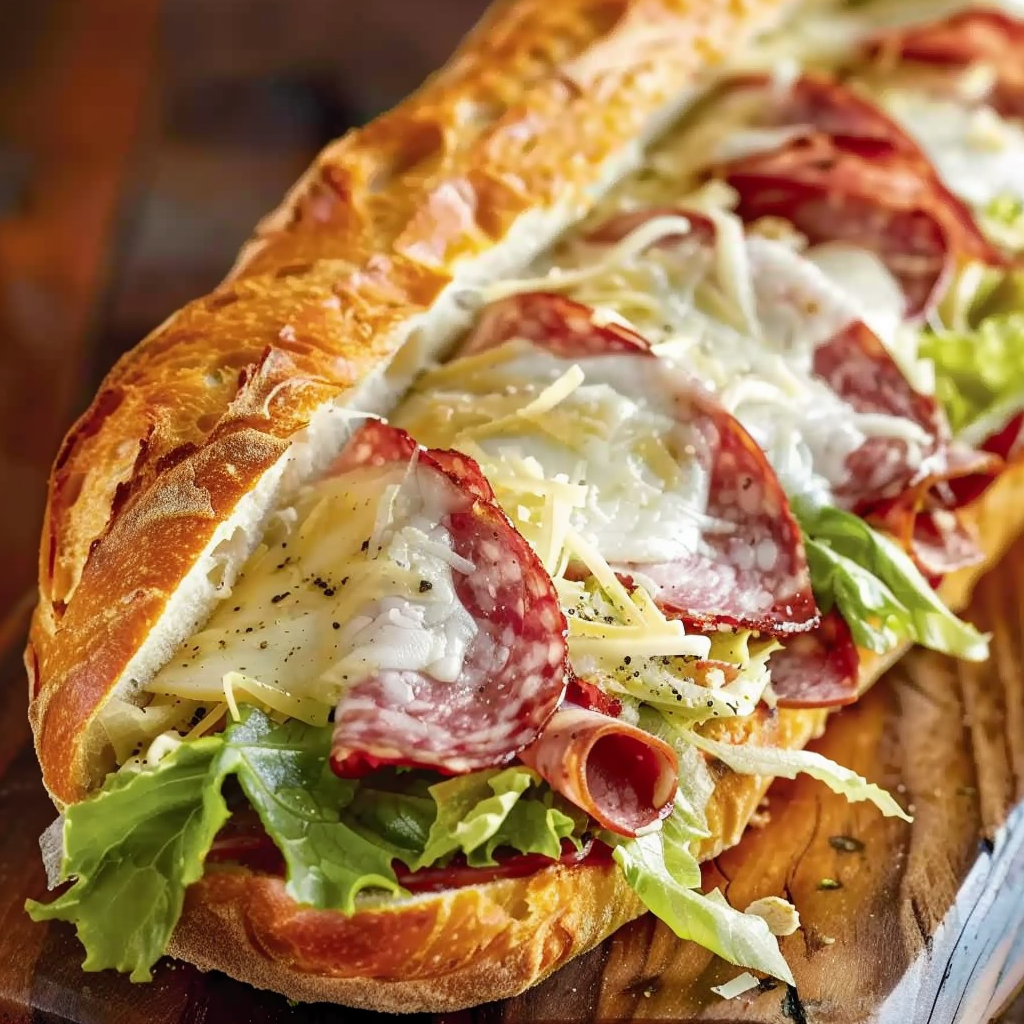
At their core, these subs consist of layered Italian deli meats like salami, ham, and turkey bacon, paired with provolone cheese, and finished with fresh toppings such as shredded lettuce, tomato, and banana peppers. Everything is stacked into a sub roll—often hinged instead of fully sliced—to hold all the components in place during baking. Once heated, the sandwich is finished with a drizzle of olive oil and a sprinkle of Italian seasoning for a bold, zesty flavor.
Unlike their cold counterparts, baked subs allow the ingredients to meld together as they heat, creating a unified taste experience. The cheese melts over the meats, the bread crisps up beautifully, and the seasoning blends deeply into every bite. This combination offers the comfort of a hot meal with the convenience of sandwich assembly.
The use of the oven sets toasted sub sandwiches apart from standard deli fare. Not only does baking enhance flavor and texture, but it also allows you to make multiple sandwiches at once on a single sheet pan—an approach that’s ideal for busy weeknights or large gatherings. Check out some popular party food ideas on Pinterest for creative presentation and serving tips.
Another distinguishing factor is the customizable nature of the sandwich. While the classic Italian combo is always a hit, you can substitute meats or cheeses based on preference or dietary needs. Want a vegetarian twist? Roasted red peppers, mushrooms, and mozzarella work just as well. Looking for heat? Try spicy pepperoni and a drizzle of hot sauce. For those curious about the meat component, this overview of salami offers useful context on flavor and types.
If you’re wondering how this compares to a hoagie or grinder, the main difference often lies in regional terminology and preparation methods. However, baked Italian subs stand out as the ultimate comfort food—easy to make, hard to resist, and guaranteed to become a staple in your home cooking routine.
Why Make Toasted Sub Sandwiches at Home?
Making toasted sub sandwiches at home offers a satisfying combination of customization, flavor control, and cost-efficiency that dining out simply can’t match. Instead of relying on a fast-food chain or deli, you take charge of every layer, ensuring the quality of ingredients and tailoring flavors exactly to your preferences.
First, there’s the unbeatable freshness. When you assemble your own baked Italian subs, you can hand-pick everything from the bread to the toppings. Want to go low-sodium? Choose leaner deli meats like chicken ham or turkey. Craving a bold flavor? Add spicy salami or swap in a sharp provolone. Home assembly allows you to avoid overly processed ingredients or mystery sauces, giving you control over taste and nutrition.
Second, it’s far more economical. For the cost of a single sandwich from a sub shop, you can purchase enough ingredients to feed an entire group. The sheet pan method means you can prepare four or more subs at once, making it perfect for feeding a crowd. Whether you’re meal prepping for the week or hosting a game-day gathering, these subs make it simple. For more inspiration on hosting, Pinterest has a great range of tailgate recipes that pair perfectly with these sandwiches.
Third, toasted subs are extremely versatile. They suit nearly every occasion:
-
Weeknight dinners: Quick to assemble and bake
-
Lunchbox meals: Easy to wrap and reheat
-
Game day snacks: Slice into smaller portions and serve
-
Party platters: Bake a full tray and let guests serve themselves
You can also explore different textures and flavors by switching up your sandwich toppings. Try arugula instead of iceberg lettuce or swap banana peppers for sweet pepper rings. Find more topping combinations on Pinterest for unique ideas beyond the usual lineup.
And let’s not overlook the health aspect. Homemade subs give you the freedom to control portion sizes, minimize preservatives, and reduce unnecessary fats or sugars often found in store-bought sauces and condiments. For those wanting to increase their protein intake or reduce carbs, using lean meats or alternative breads (like whole wheat or keto rolls) is easily done.
Additionally, preparing toasted subs at home makes for a fun group activity. Set up an assembly station and let family or friends build their own—like a sandwich bar. It encourages creativity, prevents picky eating, and brings people together.
Most importantly, there’s something deeply satisfying about enjoying a warm, melted, crispy-edged sub that you crafted with your own hands. It’s the kind of simple pleasure that turns a basic meal into a memorable one. If you’re interested in the science behind the flavor enhancements that occur when foods are toasted, the Maillard reaction is worth exploring—this chemical process is what gives baked sub sandwiches their rich, golden flavor. Read more about this effect via the general principles behind toasted sandwich techniques.
Ultimately, making toasted sub sandwiches at home isn’t just about convenience—it’s about elevating everyday meals into something crave-worthy and customizable, all while saving money and having fun in the kitchen.
Ingredients Breakdown – What You’ll Need
To make the ultimate baked Italian sub sandwich, the ingredients are everything. From the bread to the toppings, each element plays a role in building layers of flavor and texture. Here’s a complete breakdown of what you’ll need to make four delicious, toasted sub sandwiches that are crispy, cheesy, and loaded with bold Italian flavor.
Bread: Sub Rolls
The foundation of any great sub is the bread. For baking, choose sturdy sub rolls or hoagie rolls that can handle heat without falling apart. The hinge-cut method (slicing without going all the way through) keeps the sandwich intact after toasting.
-
Recommended: Italian rolls, French sandwich rolls, or ciabatta
-
Avoid: soft sandwich bread or overly airy baguettes
Deli Meats
A good Italian sub balances multiple flavorful meats for a savory, salty bite. This version includes:
-
Turkey bacon: Adds smoky flavor with less fat than traditional bacon
-
Chicken ham: A leaner, milder protein that balances out the saltiness
-
Hard salami: Brings the bold, cured flavor classic to Italian-style sandwiches
For more background on the meat’s origin and types, see this guide on salami.
You’ll use 2 slices of each meat per sub, which creates that ideal meat-to-bread ratio without overstuffing.
Cheese: Provolone
Mild and melty, provolone is a must-have for its creamy texture and nutty finish when heated. It melts evenly, holds the sandwich layers together, and complements the strong flavors of cured meats.
-
Alternatives: Mozzarella for a stretchier texture or Swiss for a sharper bite
Check out this article on provolone cheese to understand why it’s a popular choice in Italian-style subs.
Fresh Toppings
After baking, fresh, cool ingredients are added for contrast. These toppings provide crunch, acidity, and brightness:
-
Shredded lettuce: Iceberg is standard, but romaine or arugula works too
-
Tomato slices: Thin slices add juiciness and freshness
-
Red onion: For bite and sweetness
-
Banana pepper rings: Tangy, mildly spicy, and classic to Italian subs
-
Learn more about these pickled peppers here
-
Condiments & Flavorings
These ingredients pull everything together and boost the flavor profile:
-
Mayonnaise: Creamy base to complement the meats and cheeses
-
Olive oil: Adds richness and helps seasoning stick
-
Italian seasoning: Dried herbs that bring a signature aroma and flavor
-
Salt and pepper: To balance and enhance all layers
Optional Upgrades and Variations
To personalize your sandwich or make it more gourmet, consider adding:
-
Fresh basil or oregano leaves
-
Pepperoncini or hot cherry peppers for heat
-
Pesto mayo or garlic aioli in place of plain mayo
-
Different cheeses like sharp cheddar, smoked gouda, or pepper jack
-
Whole grain rolls for a healthier option
For visual inspiration and even more flavor combos, check out sandwich toppings and sheet pan recipes on Pinterest.
Gathering the right ingredients ensures your baked Italian subs are not just convenient, but crave-worthy. Each component has its role, and with a few simple tweaks, you can easily make these toasted sub sandwiches uniquely yours every single time.
Tools and Sheet Pan Setup
While great ingredients are essential, the tools you use can make or break your baked Italian sub sandwich. The good news? You don’t need fancy equipment—just a few reliable kitchen basics to ensure an even bake and mess-free process. Setting up correctly also helps you scale your sheet pan sandwiches for larger groups.
Essential Tools for Baked Italian Subs
-
Sheet Pan or Baking Tray: A standard half-sheet pan (18 x 13 inches) fits four sub sandwiches perfectly. It allows even heating and is easy to transfer in and out of the oven. For serving a crowd, use two trays at once or a full-size commercial sheet pan.
-
Parchment Paper or Aluminum Foil: Lining your tray helps with easy cleanup and prevents the bread from sticking or over-toasting on the bottom.
-
Bread Knife: A sharp, serrated knife makes it easy to hinge-cut sub rolls without tearing them. This cut creates a pocket that holds the fillings while baking.
-
Spatula or Tongs: For safely removing the hot subs after baking without crushing them.
-
Oven Mitts: Always important when working with a hot oven and metal trays.
For a look at creative uses of sheet pans beyond just sandwiches, explore sheet pan recipe ideas. These tools aren’t just for Italian subs—they’re versatile enough to support multiple baked meals.
Sheet Pan Setup Tips for Success
-
Preheat Your Oven to 375°F (190°C): This is the sweet spot for melting cheese and toasting bread without burning.
-
Arrange Subs with Space Between: Place each sandwich open-faced on the tray, about an inch apart. This spacing allows heat to circulate evenly, ensuring uniform toasting and melting.
-
Use Hinged Rolls, Not Fully Split: Keeping the bread attached along one edge helps contain all the fillings during baking.
-
Press Gently After Assembly: Once the cheese is on, lightly press the top half of the roll over the fillings to prevent sliding.
-
Don’t Add Lettuce or Tomatoes Yet: These come after baking to retain their texture and freshness. A reminder often missed by home cooks, this tip ensures your toasted sub sandwich isn’t soggy.
You can also find helpful tricks for toasted sandwich techniques on Pinterest, especially if you plan to batch-make sandwiches for an event or party.
By having the right setup in place, making sheet pan Italian subs becomes quick, clean, and hassle-free—especially when feeding multiple people. With a solid prep station and a lined baking tray, you’re ready to build, toast, and serve baked subs that are crisp, flavorful, and satisfying every time.
Step-by-Step Guide – How to Assemble & Bake Italian Subs
Making baked Italian subs at home is easier than it looks. Once you’ve gathered your ingredients and tools, the process becomes a quick, satisfying routine. Follow this step-by-step guide to create subs that are crispy, melty, and loaded with bold Italian flavor.
1. Preheat the Oven
Set your oven to 375°F (190°C). Preheating ensures even baking and helps the cheese melt perfectly while the bread gets toasted just right.
2. Prepare the Baking Sheet
Line your sheet pan with parchment paper or aluminum foil. This prevents sticking and makes cleanup easy—especially helpful if you’re making multiple sandwiches.
3. Slice the Sub Rolls
Using a serrated bread knife, cut each roll in half lengthwise, but don’t slice all the way through. Hinge-cut rolls keep the fillings contained during baking, creating a better final texture.
4. Spread the Mayo
Open each roll and spread a generous layer of mayonnaise on both inner sides. The mayo adds richness and acts as a moisture barrier between the bread and meats.
5. Layer the Meats
On the bottom half of each roll, layer:
-
2 slices of turkey bacon
-
2 slices of chicken ham
-
2 slices of hard salami
Each meat adds its own unique taste—smoky, savory, and slightly spicy. Stagger the slices to distribute flavor evenly from bite to bite.
6. Add the Cheese
Top the meats with 2 slices of provolone cheese per sandwich. This cheese melts beautifully and brings everything together. Curious about provolone’s melting point and structure? Learn more in this Wikipedia article on provolone.
7. Season the Sandwiches
Sprinkle Italian seasoning lightly over the cheese. Then add a dash of salt and pepper to bring out all the layered flavors.
8. Bake the Sandwiches
Place the open sandwiches on your sheet pan and bake for 10 minutes, or until the cheese has melted and the bread is slightly crispy and golden.
9. Add Fresh Toppings
Once out of the oven, finish each sub with:
-
Shredded lettuce
-
Thin tomato slices
-
Sliced red onion
-
Banana pepper rings
These cold toppings add texture, acidity, and balance. Want a deeper dive into banana peppers? Here’s a great overview on banana pepper varieties.
10. Drizzle and Serve
Drizzle each sandwich with olive oil, then sprinkle a final touch of salt and pepper if desired. Gently close the sandwiches and serve warm.
Want more inspiration for party-style sandwich builds? Browse Pinterest sheet pan recipes and sandwich toppings for creative twists.
Now that your baked Italian subs are hot and ready, it’s time to plate them up and dig in.
Visual Guide or Infographic Suggestion
Although not required to write out, this is an ideal spot in your article to include a visual aid or infographic. Consider designing a simple step-by-step image that includes:
-
A top-down view of each stage (roll cutting, meat layering, cheese, baking, fresh toppings)
-
Labels for each ingredient
-
Optional substitution icons (e.g., vegetarian swaps)
Infographics boost SEO, improve engagement, and help visual learners follow the process more easily.
Best Ways to Serve Baked Italian Subs
Once baked, your Italian subs are warm, crispy, and bursting with flavor—making them ideal for multiple occasions. Here’s how to serve them so they stay delicious from oven to plate.
For Weeknight Dinners
Serve the subs straight from the oven with simple, quick sides like:
-
A small Caesar salad or pasta salad
-
Kettle chips or sweet potato fries
-
A cold pickle spear for contrast
For Parties or Game Day
Cut the subs into thirds or quarters and secure with cocktail picks for easy grabbing. These sheet pan sandwiches work well on a buffet table alongside:
-
A platter of mixed olives and cheeses
-
Italian-style finger foods or meatballs
-
Dips like roasted red pepper hummus
For Meal Prep or Lunchboxes
Bake, cool slightly, wrap in foil, and refrigerate. They reheat beautifully in a toaster oven or air fryer for a fast weekday lunch.
Need party-serving inspiration? Explore party food ideas for serving boards and display tips.
Sheet Pan Subs for a Crowd
When you’re hosting a group, sheet pan subs are one of the smartest choices you can make. Here’s how to prep and scale them efficiently.
Scale the Recipe
Each half-sheet pan fits 4 subs. For:
-
8 people: Use 2 sheet pans
-
12 people: Use 3 pans
-
20 people: Use 5 pans (or rotate in two batches)
Set Up an Assembly Line
Lay out ingredients in order: bread → condiments → meats → cheese → seasoning. This helps streamline the process when making multiple sandwiches.
Prevent Soggy Bread
Add fresh toppings only after baking, and avoid over-saturating bread with oil or watery ingredients like tomatoes. Toasting the interior of the roll before layering helps, too.
Keep Warm for Serving
Once baked, wrap sandwiches in foil and store in a low oven (200°F) until ready to serve. Alternatively, use a warming tray or slow cooker on the “keep warm” setting.
Want a look at similar crowd-friendly recipes? Check out tailgate recipes for inspiration.
Creative Variations & Substitutions
While the classic combo of salami, chicken ham, and provolone is always a hit, it’s easy to customize baked Italian subs to suit your mood or dietary needs. Here are some top variations:
Meat Alternatives
-
Roast beef for a heartier sub
-
Pepperoni for a spicier, pizza-inspired twist
-
Capicola or prosciutto for a traditional Italian deli upgrade
-
Vegetarian version: Use grilled zucchini, mushrooms, and roasted red peppers
Cheese Swaps
-
Mozzarella for melty stretchiness
-
Swiss for a nuttier profile
-
Sharp cheddar for bold contrast
Sauce and Spread Options
-
Pesto mayo
-
Spicy mustard
-
Garlic aioli
Bread Options
-
Ciabatta rolls for a rustic touch
-
Whole grain for more fiber
-
Gluten-free rolls for dietary needs
For more ideas, scroll through sandwich toppings to find endless combinations that fit your tastes.
Storing & Reheating Baked Subs
If you have leftovers or want to make subs ahead of time, proper storage and reheating ensure they stay just as tasty.
Storing Tips
-
Let subs cool completely before wrapping
-
Wrap tightly in foil or plastic wrap
-
Store in the fridge for up to 3 days
Reheating Tips
-
Oven: Wrap in foil and heat at 350°F for 10–12 minutes
-
Air fryer: Reheat at 325°F for 5–6 minutes
-
Microwave: Use only if needed—bread may get soggy
Avoid adding lettuce, tomato, or onions if you’re planning to store them; add those fresh after reheating.
Common Mistakes to Avoid
Even though baked Italian subs are simple, there are a few common mistakes that can ruin the texture or flavor. Avoid these for the perfect sandwich every time.
-
Overstuffing the sandwich: Too much meat or cheese can prevent even melting and make the sandwich fall apart
-
Using low-quality bread: Soft or weak rolls won’t hold up during baking
-
Adding veggies before baking: Lettuce and tomatoes should always go on after the oven
-
Skipping seasoning: Italian seasoning, salt, and pepper bring all the layers together
Browse additional toasted sandwich techniques on Pinterest to fine-tune your process.
Nutritional Insights (Optional Section)
A typical baked Italian sub made with the ingredients in this recipe provides a hearty balance of carbs, protein, and fats. Here’s a rough estimate per sandwich:
-
Calories: ~550–650
-
Protein: 28–35g
-
Carbohydrates: 40–45g
-
Fats: 30–35g
Want to lighten it up?
-
Use low-fat cheese and mayo
-
Swap bread for a thin sandwich roll or wrap
-
Increase lettuce and tomato, reduce meats

FAQs – People Also Ask
Can you make Italian subs ahead of time?
Yes! Prepare everything except fresh toppings, wrap in foil, and store in the fridge. Bake when ready to serve, then add lettuce and tomato fresh.
What kind of bread is best for toasted sub sandwiches?
Use sturdy rolls like hoagie, Italian sub, or ciabatta. They hold up to heat and fillings without getting soggy.
How do you keep sub sandwiches from getting soggy?
Toast the bread, avoid adding wet toppings before baking, and layer drier ingredients (like cheese) between moist ones and the bread.
What’s the difference between a hoagie and a sub?
Mostly regional names. Hoagie (Philadelphia), sub (New England), and grinder (New England/Ohio) all refer to the same style of sandwich, though fillings may vary.
Can you freeze baked Italian subs?
Yes. Wrap tightly in foil and freeze for up to 2 months. Reheat in a 350°F oven until hot throughout.
Toasted Sub Sandwiches at Home: Baked Italian Subs You’ll Make on Repeat

These baked Italian subs are the ultimate toasted sandwich—hot, melty, and layered with flavorful meats, cheese, and crisp veggies. Built on sturdy sub rolls and finished in the oven for a golden finish, they’re perfect for feeding a family, prepping lunches, or serving a hungry crowd. Easy to assemble and customizable, this sheet pan sandwich recipe will become a repeat favorite.
- Author: Clara
Ingredients
- 4 sub rolls
- 8 slices turkey bacon
- 8 slices chicken ham
- 8 slices hard salami
- 8 slices provolone cheese
- 1 cup shredded lettuce
- 1 tomato, thinly sliced
- ¼ cup sliced red onion
- ¼ cup banana pepper rings
- ¼ cup mayonnaise
- 2 tablespoons olive oil
- 1 teaspoon Italian seasoning
- Salt and pepper to taste
Instructions
Preheat your oven to 375°F (190°C).
Slice the sub rolls in half lengthwise, without cutting all the way through, and lay them open on a baking sheet.
Spread mayonnaise on the inside of each roll.
Layer two slices of turkey bacon, two slices of chicken ham, and two slices of hard salami on the bottom half of each roll.
Top the meats with two slices of provolone cheese per sandwich.
Sprinkle Italian seasoning over the cheese.
Bake in the oven for about 10 minutes, or until the cheese is melted and the bread is slightly toasted.
Remove from oven and add shredded lettuce, tomato slices, red onion, and banana peppers.
Drizzle with olive oil and season with salt and pepper to taste.
Close the sandwiches and serve warm.
Notes
-
Always add fresh toppings after baking to avoid soggy textures.
-
To save time, pre-layer meats and cheese on rolls in the morning and bake just before serving.
-
For a spicier version, add hot pepper rings or a drizzle of chili oil after baking.
-
Great with pasta salad, coleslaw, or chips on the side.
-
Doubles or triples easily for parties—just add more sheet pans.