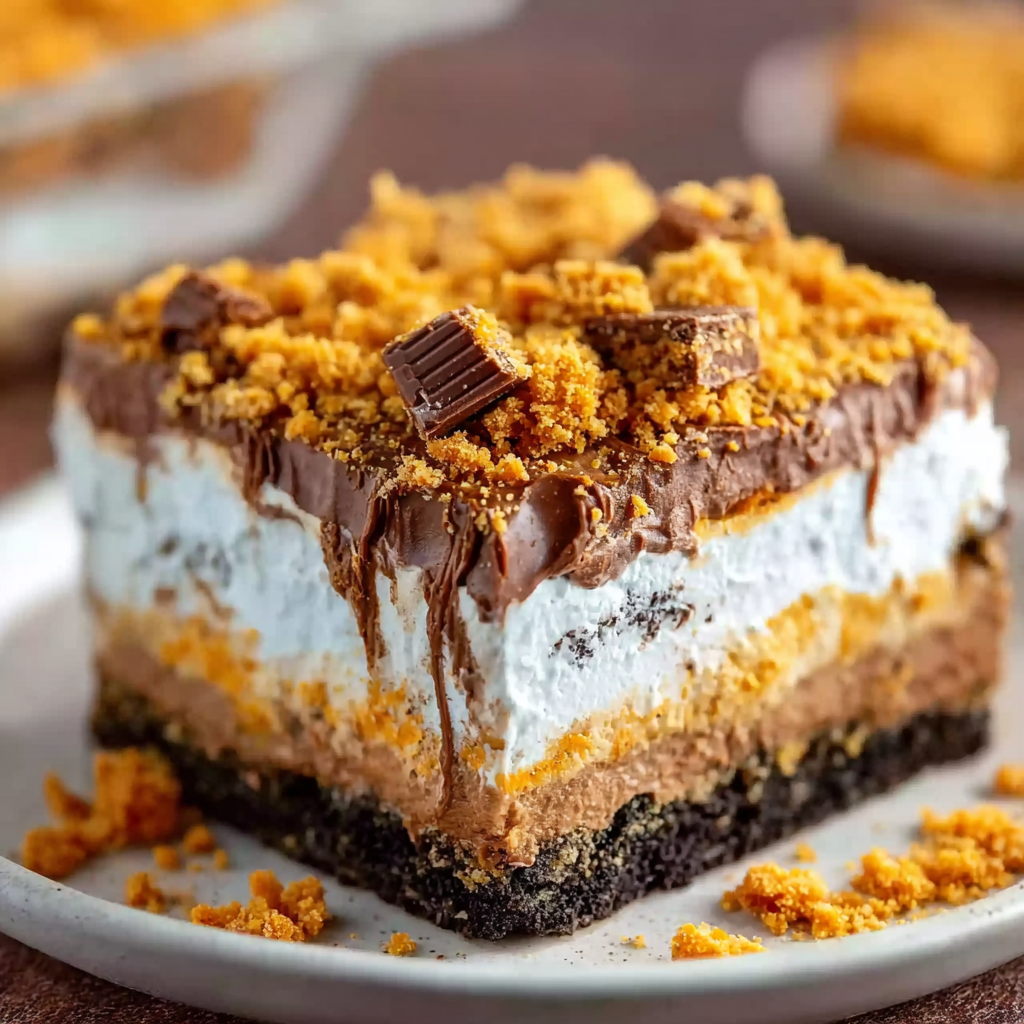
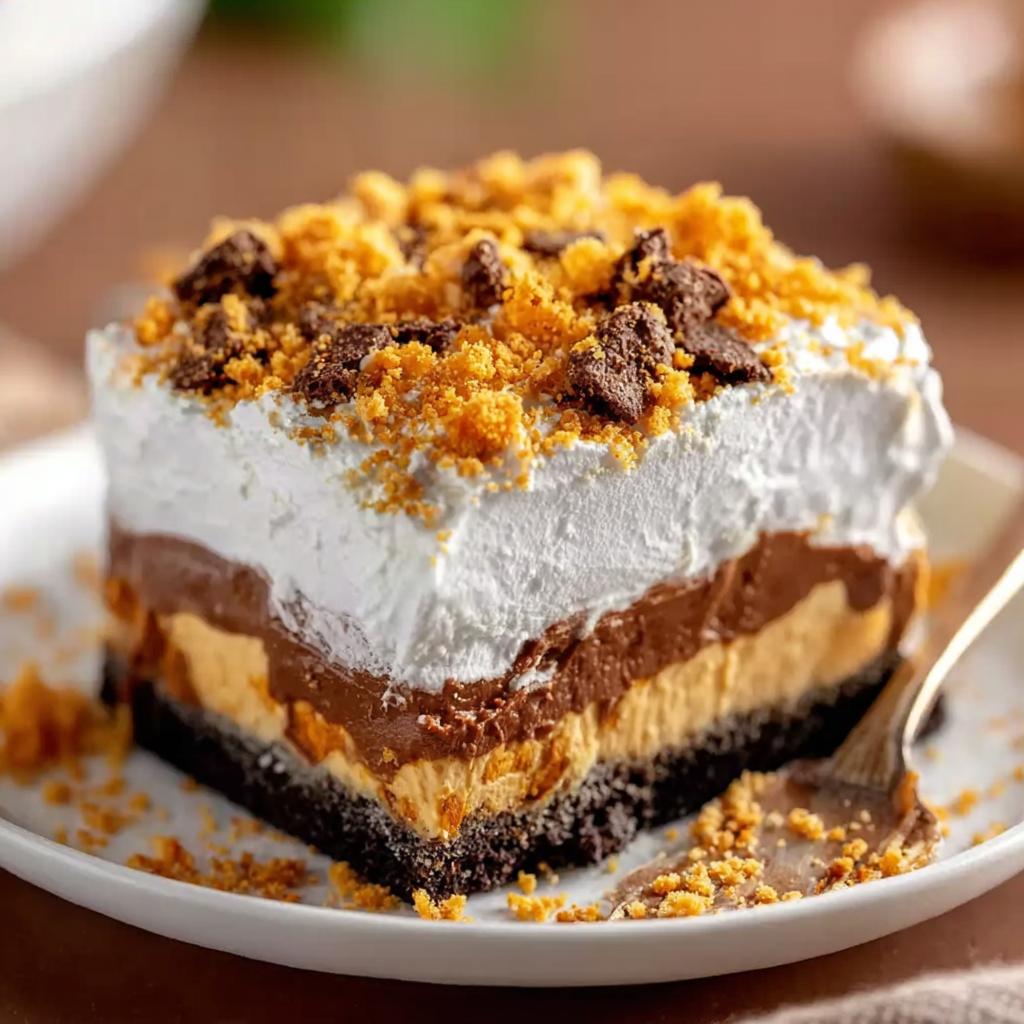
Indulge in the irresistible appeal of a no-bake Butterfinger Lush dessert that meticulously layers creamy Cool Whip with a crunchy crust of chocolate sandwich cookies. This show-stopping, picture-perfect treat elevates classic layering techniques into an indulgent summertime delight, ideal for every occasion.
Featuring a base made from crushed cookies and butter, this dessert promises both simplicity and rich flavor. Explore more tips on our No-Bake Dessert Recipes page and dive into the history of the candy using the Butterfinger (candy) article. This layering dessert guide on Butterfinger Lush walks you through each step. With just a few ingredients, you’ll master the art of layering in no time.
Designed for potlucks, picnics, and afternoon gatherings, this make-ahead marvel saves time and keeps you cool. Its make-ahead convenience offers delicious textures. For inspiration, browse Easy Summer Desserts and discover why a Graham cracker foundation is the secret to a sturdy, flavorful base.
What Is a Butterfinger Lush?
A Butterfinger Lush is a decadent layered dessert combining fluffy whipped toppings, rich instant pudding, and crunchy candy shards. Originating from classic lush recipes, it emphasizes contrasting textures and flavors.
At its core, this treat features a creamy cream cheese and whipped topping layer, followed by a silky instant pudding duo. For layering tips, see our Butterfinger Lush Guide.
The final layer showcases crushed Butterfinger candy bars for satisfying crunch. Discover Butterfinger Desserts inspiration and why a sturdy Graham cracker crust supports every slice. Explore more no-bake treats on our online No-Bake Dessert Recipes page.

Why No-Bake Desserts Are Perfect for Summer
Not only does this no-bake method keep your kitchen cool, it also enables quick prep for large gatherings. The lack of oven time means you can focus on layering flavors and textures. Perfect for outdoor events, this dessert stays crisp even in warm weather.
Find more ideas in our No-Bake Dessert Recipes collection and check creative layering on Pinterest with Layered Dessert Inspiration. Choose a sturdy Graham cracker crust or use chocolate sandwich cookies to diversify textures. Perfect for potlucks, picnics, and backyard BBQs, this dessert highlights flavor contrast and effortless assembly without ovens. and minimal cleanup time. year-round appeal.
Ingredients Overview
This section details essential components for an indulgent, no-bake Butterfinger Lush. Each element balances texture and flavor, ensuring a dessert that’s both simple and spectacular.
-
Crust: chocolate sandwich cookies, melted butter
-
Cream Cheese Layer: cream cheese, powdered sugar, whipped topping
-
Pudding Layer: vanilla and chocolate instant pudding, milk
-
Final Topping: whipped topping, crushed Butterfinger candy
The crust relies on crushed cookies blended with butter for a sturdy base. For variations, see our Pie Crust Guide and explore the science behind a perfect dessert. Discover creative spins on No-Bake Dessert Recipes and draw inspiration from Picnic Dessert Ideas.
The cream cheese layer combines cream cheese and whipped topping for creamy richness. Next, the pudding layer features instant pudding mixes for smooth texture. For variations like layered candy bars, review Butterfinger Desserts and layering tips at Layered Dessert Inspiration. Using cold milk ensures proper setting for the pudding layer, while a light hand during folding preserves airiness in the whipped topping. Consider gluten-free cookie options, swap for graham cracker crusts, or experiment with flavored instant mixes. Layering tips guarantee clean slices and even candy distribution for every bite. Quality ingredients contribute to optimum taste and presentation.
Remember that chilling time is crucial; at least four hours or overnight refrigeration allows each layer to set flawlessly, resulting in a sliceable, spoonable dessert ready for serving delightful finishing touches.
Step-by-Step Recipe Guide
Follow these steps to build your no-bake Butterfinger Lush layer by layer for perfect texture and taste.
-
Prepare the Crust
-
Crush 24 chocolate sandwich cookies into fine crumbs using a food processor or sealed bag and rolling pin.
-
Stir crumbs with 5 tbsp melted butter until evenly moistened.
-
Press mixture firmly into the bottom of a 9×13-inch dish. Chill for at least 15 minutes.
-
-
Make the Cream Cheese Layer
-
Beat 8 oz softened cream cheese with ½ cup powdered sugar until smooth.
-
Gently fold in 8 oz thawed whipped topping until fully incorporated, preserving airiness.
-
Spread evenly over chilled crust using an offset spatula.
-
-
Prepare the Pudding Layer
-
In a medium bowl, whisk together one 3.4 oz package vanilla and one 3.4 oz package chocolate instant pudding with 2¾ cups cold milk for two minutes.
-
Let mixture rest until slightly thickened.
-
Carefully pour pudding over cream cheese layer, smoothing the top.
-
-
Final Assembly
-
Spread remaining 8 oz whipped topping over pudding layer.
-
Sprinkle 1 cup crushed Butterfinger candy bars evenly on top.
-
Cover and refrigerate for at least four hours or overnight for best sliceability.
-
This simple layering method leverages the stability of a cookie crust and the creamy lift of whipped toppings. For variations on crusts, see our Pie Crust Guide, and learn about different layered dessert techniques with Layered Dessert Inspiration. If you prefer a gluten-free option, substitute with gluten-free sandwich cookies.
Chilling time is key: it ensures a firm base and distinct layers that hold up when slicing. For tips on achieving a perfectly even surface, check out our Butterfinger Lush Guide and browse additional no-bake dessert ideas in our No-Bake Dessert Recipes collection.
Variations & Substitutions
-
Alternative Crusts
-
Swap chocolate sandwich cookies for graham crackers or gluten-free wafers.
-
Use 1 ½ cups crushed graham crackers with 5 tbsp melted butter for a classic twist.
-
-
Pudding Flavors
-
Replace vanilla or chocolate instant pudding with peanut butter or caramel mixes.
-
Try a single-flavor layer for a two-tone effect.
-
-
Candy Layer Swaps
-
Use chopped Heath bars or Snickers for different textures.
-
Mix in toffee bits for extra crunch.
-
-
Whipped Topping Options
-
Make homemade whipped cream stabilized with a teaspoon of cornstarch.
-
Use dairy-free whipped topping for vegan adaptation.
-
Experiment with flavored cream cheese by adding a teaspoon of vanilla extract or a swirl of caramel sauce. For inspiration, explore Butterfinger Desserts and delve into the science of a stable whipped topping at Instant Pudding.
Tips for Perfect Texture & Flavor
-
Chill each layer thoroughly: cold layers keep distinct boundaries.
-
Press the crust firmly and evenly for a crunchy base that won’t crumble.
-
Whisk pudding with cold milk—never warm—to ensure thickening.
-
Fold whipped topping gently to preserve lightness and air.
-
Distribute crushed Butterfinger evenly: use the back of a spoon to settle pieces into topping.
Maintaining consistent temperatures in ingredients prevents separation. For deeper insights into whipped topping stabilization, visit the Cream cheese page and contrast textures on Dessert.
Storage & Make-Ahead Tips
-
Refrigeration: Store covered in the fridge for up to five days.
-
Freezing: Freeze for up to two weeks; thaw in the refrigerator overnight.
-
Transport: Secure in a sealed container—freeze for 30 minutes first to firm up.
Label with date prepared and best-by date. Keep chilled until serving to maintain structure. For more make-ahead dessert ideas, explore our No-Bake Dessert Recipes.
Serving Suggestions & Presentation Ideas
-
Cut into uniform squares with a warm knife for clean edges.
-
Serve in individual cups or parfait glasses for plated desserts.
-
Garnish with mini Butterfinger shards and a drizzle of melted chocolate.
-
Pair with cold milk, espresso, or a dessert wine.
Display on a tiered platter for potlucks or wrap slices in parchment for grab-and-go picnic packs. For styling inspiration, see Picnic Dessert Ideas.
Troubleshooting Common Issues
-
Runny Pudding:
-
Whisk longer or reduce milk by ¼ cup.
-
-
Crust Too Crumbly:
-
Add 1 tbsp more melted butter and press firmly.
-
-
Layer Separation:
-
Ensure ingredients are at refrigerator temperature before assembly.
-
-
Whipped Topping Weeping:
-
Fold in gently; avoid overmixing.
-
Address these points promptly to keep layers defined and slices perfect.
Frequently Asked Questions (FAQs)
Can I make this dessert gluten-free?
Yes. Substitute the chocolate sandwich cookies or graham crackers with certified gluten-free versions. Ensure any pudding mix used is also gluten-free.
What’s the best way to crush candy evenly?
Place pieces in a sealed bag and tap gently with a rolling pin. Aim for small chunks rather than dust to maintain crunch.
Can I use homemade whipped cream instead of Cool Whip?
Absolutely. Whip 1 cup heavy cream with 2 tbsp sugar until stiff peaks form. For stability, add 1 tsp cornstarch.
How far in advance can I prepare this?
You can assemble up to 24 hours ahead. Keep refrigerated and add candy topping just before serving if you prefer extra crunch.
Can I halve the recipe?
Yes. Use an 8×8-inch dish and halve all ingredients. Chill times remain the same.
What if my pudding layer is too thick?
Stir in an extra 2 tbsp milk until you reach the desired consistency before layering.
How do I prevent the crust from sinking?
Press firmly and chill before adding subsequent layers to lock it in place.
Is it safe to freeze and re-thaw?
Yes. Freeze for up to two weeks. Thaw in the refrigerator for best texture.
The Complete Guide to No-Bake Butterfinger Lush Desserts

This no-bake Butterfinger Lush features a buttery cookie crust, a fluffy cream cheese–whipped topping layer, dual-flavor pudding, and a final shower of crunchy Butterfinger candy. It’s an easy, make-ahead dessert perfect for summer gatherings, offering creamy, crunchy, and chocolaty bites in every forkful.
- Author: Clara
Ingredients
For the crust:
- 24 chocolate sandwich cookies (like Oreos), crushed
- 5 tbsp unsalted butter, melted
For the cream cheese layer:
- 1 (8 oz) package cream cheese, softened
- 1/2 cup powdered sugar
- 1 (8 oz) tub whipped topping (like Cool Whip), thawed
For the pudding layer:
- 1 (3.4 oz) package instant vanilla pudding mix
- 1 (3.4 oz) package instant chocolate pudding mix
- 2 3/4 cups cold milk
Topping:
- 1 (8 oz) tub whipped topping
- 1 cup Butterfinger candy bars, crushed (about 3–4 bars)
Instructions
In a medium bowl, combine crushed chocolate sandwich cookies and melted butter. Mix well, then press evenly into the bottom of a 9×13-inch baking dish to form the crust. Chill in the refrigerator while preparing the layers.
In a large bowl, beat the softened cream cheese and powdered sugar until smooth. Fold in the whipped topping until well blended. Spread this mixture evenly over the chilled crust.
In another bowl, whisk together both pudding mixes with the cold milk for about 2 minutes until thickened. Spread the pudding mixture over the cream cheese layer.
Top with the remaining whipped topping and spread it evenly.
Sprinkle the crushed Butterfinger candy over the top.
Cover and refrigerate for at least 4 hours or overnight before serving.
Notes
-
For best results, chill each layer separately.
-
Use chilled ingredients to maintain structure.
-
Store tightly covered to prevent fridge odors.
-
Experiment with candy mix-ins like Heath or toffee bits.
-
Recipe scales well for smaller or larger dishes.