A traditional Cornish pasty is more than just a savory treat—it’s a slice of British culinary heritage that has stood the test of time. Originally designed as a hearty, handheld meal for tin miners in Cornwall, this classic dish is now celebrated across the UK and beyond for its rustic charm, rich flavor, and simple ingredients.
What makes the Cornish pasty so beloved is its balance of flaky, buttery pastry and savory beef and vegetable filling, all encased in a distinctive D-shaped crust. It’s no surprise that this regional specialty has earned Protected Geographical Indication status, reinforcing its cultural significance and authenticity.
For those craving a taste of Cornwall without hopping on a train to the southwest of England, this guide will walk you through how to make classic Cornish beef pasties at home. Using traditional ingredients, authentic techniques, and a few expert tips, you’ll recreate a nostalgic, golden-crusted masterpiece right in your own kitchen. If you’re inspired by heritage dishes, you might also enjoy our guide on British comfort food favorites that have stood the test of time.
2. What is a Traditional Cornish Pasty?
The traditional Cornish pasty is a rustic, semicircular pastry filled with a mixture of diced beef, potato, onion, and swede (also known as rutabaga). Its hallmark features are its D-shape, crimped edge, and the use of shortcrust pastry, all contributing to both its flavor and function. Designed originally for Cornish tin miners, the pasty was easy to carry, durable, and filling enough to fuel a long day underground.
What sets it apart from other savory pastries is its simplicity and regional identity. Authentic Cornish pasties contain no additional ingredients like carrots, peas, or gravy—just the essentials, seasoned simply with salt and pepper. Each component is layered raw inside the pastry before baking, allowing the flavors to cook together naturally in the oven.
The shape is not just traditional—it’s practical. Miners would hold the thick crimped edge with dirty hands, eat the clean part, and discard the edge. This distinctive crimped seal is an identifying feature and has led to tutorials like this Cornish pasty crimping guide being highly sought after by enthusiasts looking to preserve authenticity.
According to Wikipedia’s entry on the Cornish pasty, these pasties became such an important staple in Cornwall that they were officially recognized by the European Union as a protected regional food. This means that only pasties made in Cornwall, using the traditional method and ingredients, can legally be labeled as Cornish pasties within the UK and EU.
In modern kitchens, home cooks appreciate them for their freezability, portability, and old-world flavor. If you’re interested in other timeless classics, check out our post on lunchbox pasties perfect for work or school meal prep.
3. History and Origins of the Cornish Pasty
The Cornish pasty is deeply embedded in Cornwall’s working-class heritage. While variations of filled pastries exist across many cultures, the traditional Cornish pasty holds a unique status as a symbol of regional pride, shaped by centuries of local custom and necessity.
Its origins trace back to the 13th century, but the pasty truly became iconic in the 18th and 19th centuries during the height of Cornwall’s tin mining industry. Miners needed a meal that was both portable and nutritious, and the pasty fit the bill perfectly. Wrapped in a sturdy shortcrust pastry, it could survive rough handling and remain warm for hours. According to the Wikipedia page on shortcrust pastry, this style of dough is ideal for both structure and flavor, making it the pastry of choice for hearty fillings.
The pasty’s crimped edge wasn’t just decorative—it served a practical, hygienic purpose. Miners, with arsenic-laced hands, would hold the crust to eat the filling and discard the crimped edge afterward. This unique practice helped prevent ingestion of toxic materials and became a defining trait of the authentic pasty. You can see how this evolved in traditional Cornish pasty styling, where the crimp is both a design element and a signature of regional authenticity.
Interestingly, as Cornish miners emigrated during the decline of local mining, they brought the pasty tradition with them. Communities in Mexico, the U.S., and Australia still bake their own regional versions of the Cornish pasty today, often referred to simply as “meat pies” or “empanadas.” This diaspora helped spread Cornish food culture across the globe.
Today, the Cornish pasty remains a proud staple of British cuisine and is often featured in events like Cornish Pasty Week, celebrating not only the recipe but the hardworking history behind it. Looking to master other iconic British meals? Don’t miss our roundup of classic comfort dishes loved across the UK.
4. Ingredients Breakdown & Their Importance
To create an authentic Cornish pasty, the ingredients must be simple, specific, and carefully chosen. Each component plays a vital role in achieving the perfect balance of flavor, texture, and structure. Unlike other meat pies, a traditional Cornish pasty is defined by its purity—there’s no room for extra ingredients or fancy spices.
The Pastry: Structure and Flavor
The foundation of every pasty is the shortcrust pastry. This rich, crumbly dough provides the sturdy casing needed to hold the hearty filling without falling apart. It’s typically made with:
-
All-purpose flour
-
Cold, unsalted butter (essential for flakiness)
-
Cold water
-
Salt
The use of cold butter and water is crucial for achieving the desired short, flaky texture. According to the Wikipedia article on shortcrust pastry, overworking the dough or using warm ingredients can result in toughness—a common mistake among beginners. For inspiration, check out these vegetarian pasty variations which also utilize flaky pastry but with different fillings.
The Filling: Tradition in Every Layer
A true Cornish pasty is filled with raw ingredients layered in a specific order so they cook together harmoniously inside the sealed pastry. The traditional filling includes:
-
Beef skirt steak – prized for its flavor and tenderness when slow-cooked
-
Potatoes – peeled and finely diced for even cooking
-
Swede (rutabaga) – adds sweetness and texture (see Wikipedia on rutabaga)
-
Onions – for natural moisture and flavor
-
Salt and black pepper – the only acceptable seasonings
The choice of beef skirt is critical. This cut, described on the Wikipedia page about beef cuts, is both flavorful and lean, making it ideal for slow baking in a sealed pastry shell.
Assembly Matters
Layering the ingredients inside the pastry in the correct order ensures that each bite delivers the intended balance. The meat should go in first, followed by the vegetables. This technique also helps the pasty cook evenly and prevents soggy bottoms—something every baker wants to avoid.
If you’re exploring different dietary needs, options like gluten-free pasty dough or meat-free fillings are available, but for authenticity, sticking to the original ingredients is key.
5. How to Make Cornish Pasties – Step-by-Step Instructions
Making a traditional Cornish pasty from scratch may sound complex, but it’s surprisingly straightforward when you follow the steps carefully. Below is a detailed walkthrough for crafting pasties with flaky pastry and a perfectly seasoned filling.
Step 1: Make the Shortcrust Pastry
Start by preparing the dough, which forms the sturdy casing for your pasty.
-
In a large mixing bowl, combine 3 cups of all-purpose flour and 1 teaspoon of salt.
-
Add ¾ cup of cold unsalted butter, cubed, and rub it into the flour using your fingertips until the mixture resembles coarse breadcrumbs.
-
Gradually add 6 to 8 tablespoons of cold water, mixing until the dough just comes together.
-
Form the dough into a ball, wrap it in plastic wrap, and refrigerate for 30 minutes.
For those new to pastry-making, consider reviewing this guide to shortcrust pastry for technique and texture tips. If you’re preparing ahead, you can freeze the dough at this stage for later use—ideal for meal prep pasties.
Step 2: Prepare the Filling
While the dough chills, prepare the filling using traditional Cornish ingredients.
-
Finely dice 1 cup of beef skirt steak, 1 cup of peeled potatoes, ½ cup of rutabaga, and ½ cup of onion.
-
Place everything in a bowl and season generously with salt and freshly ground black pepper.
This no-frills mixture creates the hearty flavor Cornwall is famous for. You can learn more about rutabaga’s role in British cuisine from this Wikipedia entry.
5. How to Make Cornish Pasties – Step-by-Step Instructions
Step 3: Roll and Fill the Pasties
Once the dough has chilled:
-
Divide it into four equal portions and roll each piece into a circle, about 6 to 7 inches in diameter.
-
Place a portion of the filling on one half of each dough circle, leaving a 1 cm border around the edge.
Make sure not to overfill, or the pasties may burst while baking. If you’re unsure how much filling to use, a general guideline is about ¾ cup per pasty.
Step 4: Fold, Crimp, and Seal
-
Fold the dough over the filling to form a D-shape.
-
Press the edges firmly and then crimp by twisting and pinching the edge for the classic look. See this crimping tutorial for guidance.
A well-crimped pasty isn’t just about appearance—it ensures that the filling stays sealed and cooks evenly inside.
Step 5: Bake to Golden Perfection
-
Place the pasties on a baking sheet lined with parchment paper.
-
Brush the tops with a beaten egg for that golden, glossy finish.
-
Bake at 400°F (200°C) for 40–45 minutes, or until the pastry is golden brown and crisp.
Remove and let cool slightly before serving. For a picture-perfect finish, check out traditional Cornish pasty presentation ideas.
6. Tips for Perfect Pasties
Here are a few expert tips to ensure every pasty turns out just right:
-
Keep all ingredients cold, especially the butter and water in the dough, to ensure a flaky texture.
-
Do not overfill the pastry. Overstuffing leads to bursting during baking.
-
Crimp tightly to avoid leaks—learn from the best with this crimping technique pin.
-
Use a firm baking sheet and parchment paper for even browning and easy cleanup.
-
Avoid overworking the dough, which can cause it to become tough instead of tender.
These quick tips help even beginners master the art of making authentic Cornish pasties.
7. Serving Suggestions
The Cornish pasty is a meal in itself, but how and when you serve it can enhance its rustic charm. Here’s how to serve it the traditional way or with a modern twist:
-
Serve warm, ideally fresh from the oven or reheated in a conventional oven for a crisp finish.
-
Pair with tea or a light ale to echo traditional Cornish fare.
-
Add a side of pickled onions or chutney for extra tang.
-
For heartier meals, serve with a side of gravy (though not inside the pasty itself, to maintain tradition).
-
A simple green salad offers a refreshing contrast to the richness of the pastry.
These serving suggestions pair perfectly with ideas from our lunchbox pasties collection, ideal for school or work meals.
8. Variations on the Traditional Cornish Pasty
While the traditional Cornish pasty must follow strict rules to earn its name, many delicious variations exist for those with dietary preferences or a taste for creativity.
Popular Variations:
-
Vegetarian Pasties – Fillings like cheese and onion, mushroom and leek, or mixed root vegetables are excellent alternatives. Check out these vegetarian pasty ideas.
-
Chicken Pasties – A lighter version using chicken and sweetcorn or chicken and leek.
-
Sweet Pasties – Fillings like apple and cinnamon, mixed berries, or mincemeat turn the savory pasty into a dessert. Browse sweet pasty recipes for inspiration.
-
Gluten-Free Pasties – Substitute traditional flour with gluten-free blends. See more in our guide to gluten-free pastry options.
Even with variations, many pasty lovers aim to maintain the classic D-shape and crimped edge as a tribute to the original.
9. Storage, Freezing, and Reheating Tips
The Cornish pasty is excellent for meal prepping thanks to its ability to store well.
Storage:
-
Store baked pasties in an airtight container in the fridge for up to 3 days.
-
Unbaked pasties can be wrapped and chilled for 24 hours before baking.
Freezing:
-
Both baked and unbaked pasties can be frozen. Wrap individually in foil or cling film.
-
Freeze for up to 3 months.
Reheating:
-
Reheat baked pasties in a preheated oven at 350°F (175°C) for 15–20 minutes.
-
Avoid microwaving, which can lead to a soggy crust.
Meal planners will love these tips for building out a weekly lunch menu with minimal effort
10. Common Mistakes to Avoid
Avoiding these pitfalls ensures your traditional Cornish pasty comes out perfect every time:
-
Overworking the dough – Results in a tough texture.
-
Adding too much moisture – Leads to soggy bottoms.
-
Using incorrect cuts of beef – Always go for beef skirt for tenderness.
-
Under-seasoning – Pasties rely on salt and pepper alone, so season well.
-
Poor crimping – Leads to leaking fillings. Use crimping tutorials to master the seal.
11. Cornish Pasty Traditions & Cultural Role Today
Beyond the kitchen, the Cornish pasty remains a cultural icon.
-
It’s celebrated annually during Cornish Pasty Week, which includes baking competitions and local events.
-
The pasty has become a symbol of Cornish identity and pride, similar to regional dishes in other UK areas.
-
In Cornwall, shops selling pasties are a staple on every high street, with each claiming their version is most authentic.
Modern chefs experiment with fillings, but the classic remains central to Cornish life and is even exported to regions with Cornish heritage worldwide.
12. FAQs – People Also Ask
Q1: What is the difference between a Cornish pasty and a regular pasty?
A traditional Cornish pasty uses only beef, potato, onion, and swede in a D-shaped, crimped shortcrust pastry. Regular pasties may vary in shape and ingredients, often including additional vegetables, spices, or sauces.
Q2: Why is swede used in Cornish pasties?
Swede (rutabaga) adds sweetness and texture that balances the savory beef and potato. It’s an essential part of the traditional recipe. Learn more on Wikipedia’s rutabaga entry.
Q3: Can I use puff pastry instead?
No, authentic Cornish pasties require shortcrust pastry for structural integrity and traditional texture. Puff pastry is not suitable and would not meet PGI guidelines.
Q4: How do you crimp a Cornish pasty?
Use the pinch-and-twist method along the curved edge. For a visual guide, see this crimping tutorial.
Q5: What cut of beef is best for Cornish pasty?
Beef skirt steak is preferred for its tenderness and flavor, and it cooks well with root vegetables inside the sealed pastry.
The Best Traditional Cornish Pasty Recipe – A Hearty Homemade Classic
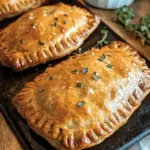
This traditional Cornish pasty recipe brings the flavors of Cornwall to your home with a rustic blend of diced beef, potato, swede, and onion, all wrapped in a buttery shortcrust pastry. Baked until golden and crisp, these hearty pasties are perfect for lunch, dinner, or meal prep. Rooted in British culinary heritage, each bite delivers comfort and authenticity.
- Author: Clara
Ingredients
For the pastry:
- 3 cups all-purpose flour
- 1 tsp salt
- ¾ cup cold unsalted butter, cubed
- 6–8 tbsp cold water
For the filling:
- 1 cup beef steak, finely diced
- 1 cup potatoes, peeled and finely diced
- ½ cup onion, finely chopped
- ½ cup rutabaga or turnip, peeled and finely diced
- Salt and pepper, to taste
- 1 egg, beaten (for egg wash)
Instructions
In a large bowl, mix the flour and salt. Add the cubed butter and rub it into the flour until the mixture resembles breadcrumbs.
Add cold water a tablespoon at a time, mixing until the dough comes together. Form into a ball, wrap in plastic wrap, and refrigerate for 30 minutes.
Preheat oven to 400°F (200°C). Line a baking sheet with parchment paper.
In a bowl, mix the diced beef, potato, onion, and rutabaga. Season with salt and pepper.
Divide the chilled dough into 4 equal parts. Roll each into a circle about 6-7 inches in diameter.
Place a portion of the filling onto one half of each pastry circle, leaving a small border.
Fold the pastry over to encase the filling and crimp the edges to seal tightly.
Transfer pasties to the baking sheet. Brush the tops with beaten egg.
Bake for 40–45 minutes, or until golden brown and cooked through.
Let cool slightly before serving.
Notes
-
Best Beef Cut: Beef skirt steak is ideal for tenderness and flavor.
-
Pastry Tip: Use cold butter and water for a flaky shortcrust.
-
Freezing: Both raw and baked pasties freeze well for up to 3 months.
-
Crimping: Proper crimping ensures the filling stays sealed and traditional.
-
Seasoning: Stick to salt and pepper—no gravy, no extras!