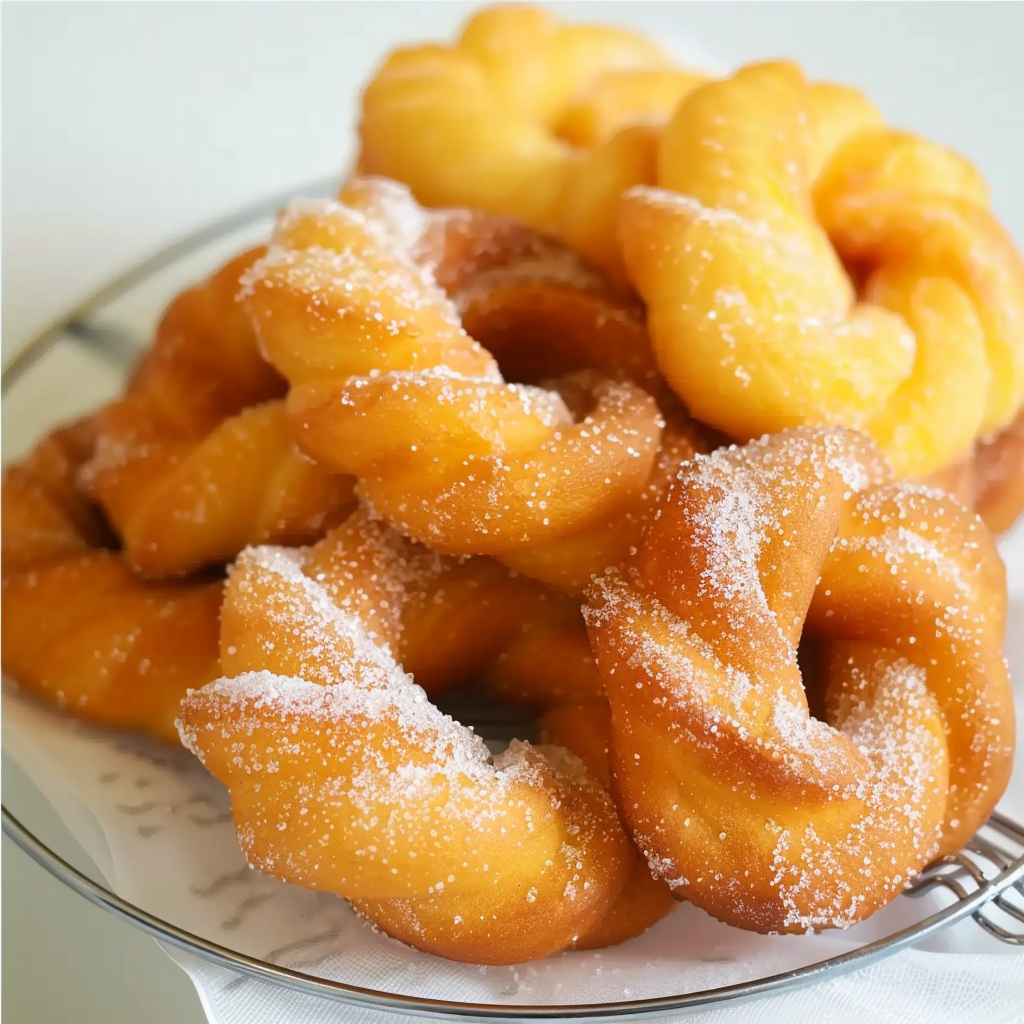
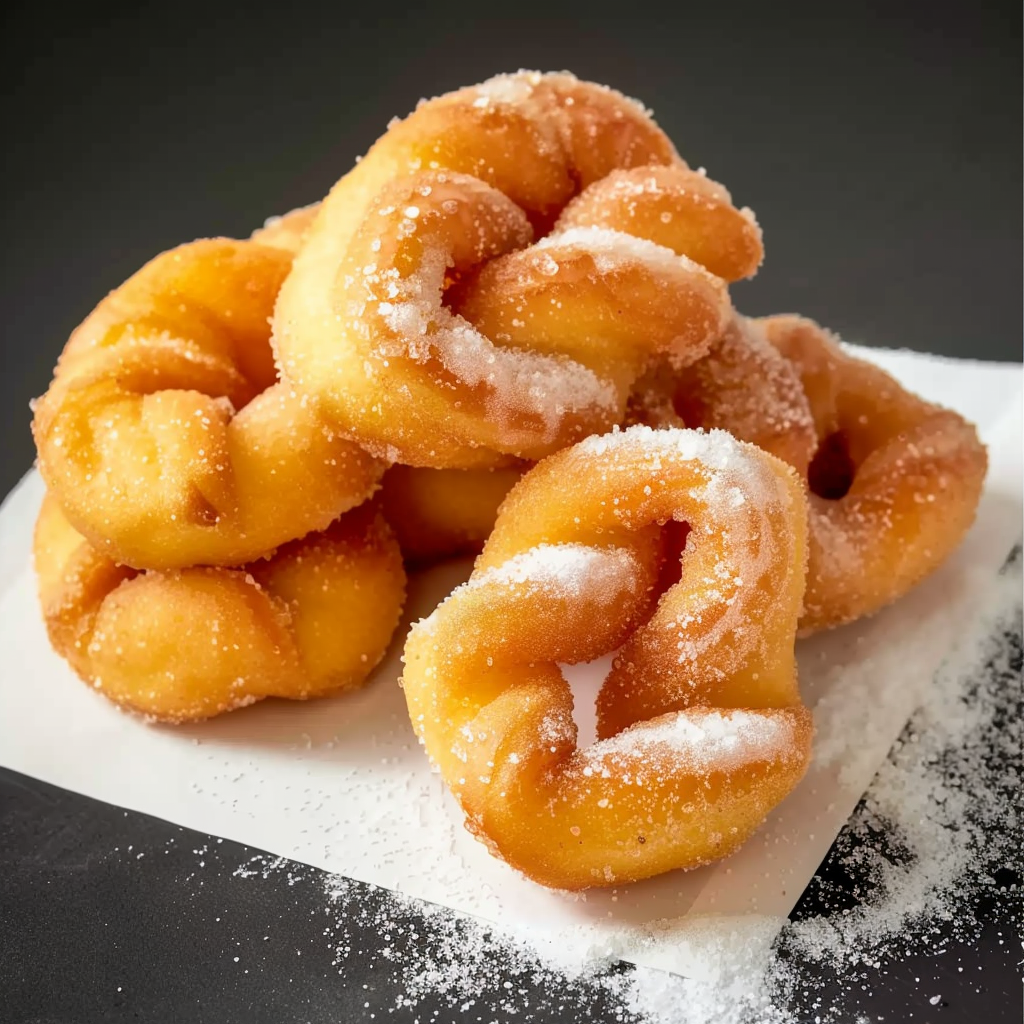
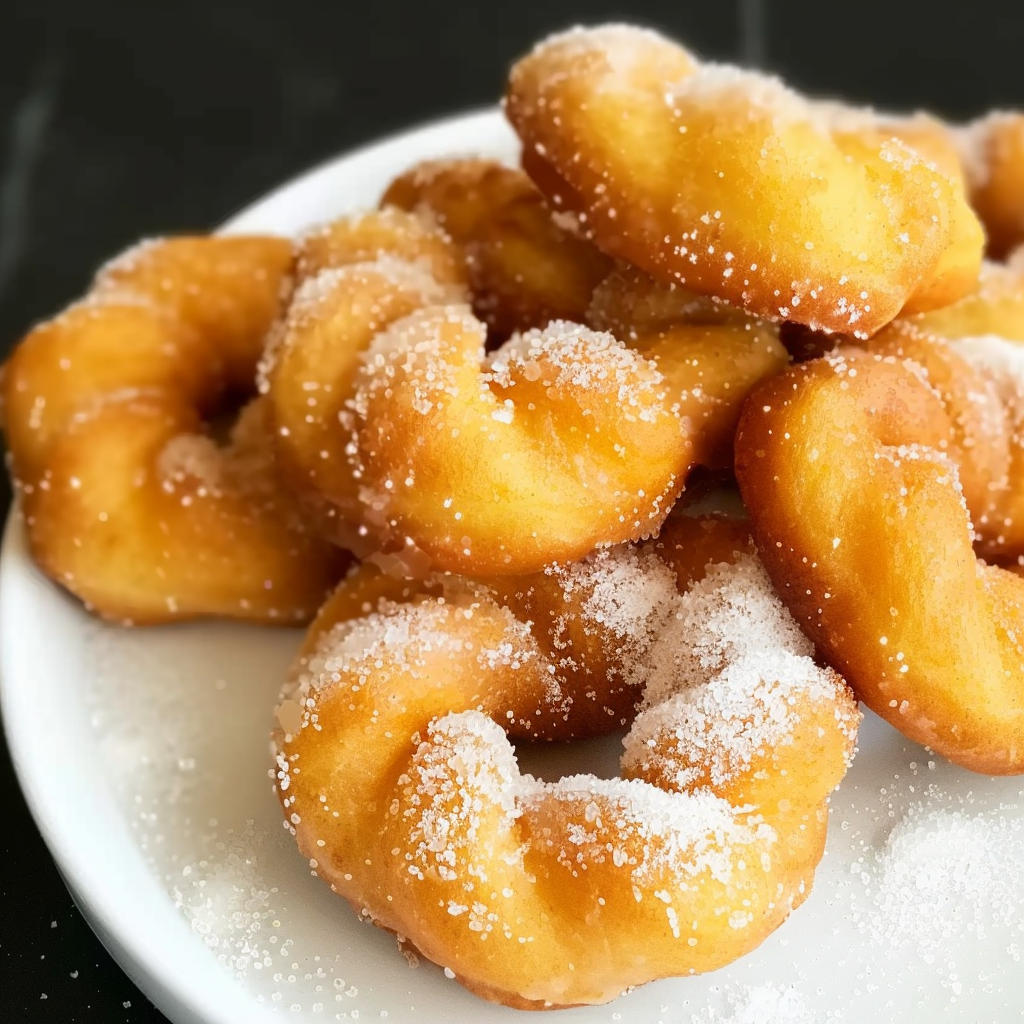
Sugar Twist Donuts
There’s something undeniably comforting about biting into a freshly fried cinnamon sugar twist donut. With a crisp exterior that gives way to a light and airy interior, these pastries blend nostalgic flavors and artisanal charm into one perfect treat. Whether you’re making them for a weekend brunch or a cozy bake day, sugar twist donuts are a crowd-pleasing favorite that never goes out of style.
Unlike traditional ring-shaped donuts or dense cake varieties, sugar twist donuts are made with a yeast-based dough, which gives them that irresistibly soft texture. The twisting technique not only adds a beautiful shape but also enhances the chewiness and fluff of each bite. This recipe keeps things simple but delivers bakery-level results—ideal for beginners and seasoned bakers alike.
If you’ve ever wondered what makes certain donuts puff up just right while others fall flat, it’s all about the ingredients and techniques. For example, using active dry yeast, warming the milk to the proper temperature (around 110°F), and ensuring enough proofing time are all essential to the process. As explained in this Wikipedia article on baker’s yeast, yeast fermentation is what introduces carbon dioxide, creating those signature air pockets.
The addition of cinnamon sugar coating at the end turns a simple dough into a classic treat, much like the traditional doughnuts enjoyed around the world. But these cinnamon twists stand apart thanks to their braided appearance and pillowy softness. A quick twist, a golden fry, and a generous roll in cinnamon sugar—that’s all it takes to create a bakery-style donut right in your own kitchen.
Before diving into the full recipe, make sure you have all the key ingredients on hand and a bit of patience for the dough to rise properly. This is one bake that rewards your time with melt-in-your-mouth results. In the next section, we’ll explore exactly what makes these donuts so light, fluffy, and memorable.
What Makes a Cinnamon Twist Donut Light and Airy?
The secret behind a light and airy cinnamon twist donut lies in the combination of proper fermentation, ingredient quality, and frying technique. Each of these factors plays a vital role in creating that soft, cloud-like texture that defines a perfect sugar twist donut.
First, it all starts with yeast. Yeast is the key leavening agent responsible for creating the air pockets inside the dough. When activated properly—by mixing it with warm milk at around 110°F—it begins the fermentation process, which releases gases that get trapped in the dough. As detailed in this article about proofing, this process is essential for allowing the dough to rise and become tender instead of dense.
Next, the kneading process builds gluten structure, which helps trap those air bubbles produced by the yeast. Without sufficient kneading, the dough won’t develop the elasticity it needs to hold its shape or rise properly. You want the dough to feel smooth and slightly tacky, not sticky. This step also influences how the donuts fry—doughs with a good gluten structure will puff up beautifully in the hot oil.
Another crucial aspect is the second rise, also known as the final proof. After shaping the dough into twists, allowing it to rise again ensures that the structure is maintained and that the donuts don’t deflate during frying. Many bakers skip or rush this step, which often leads to heavier, less satisfying results.
Finally, the frying temperature can make or break your donut’s texture. The oil should be maintained at a consistent 350°F. If the oil is too hot, the donuts brown too quickly on the outside while staying raw in the middle. Too cool, and the donuts absorb excess oil, resulting in a greasy texture. As explained in this Wikipedia guide to deep frying, maintaining consistent oil temperature is essential for crisp, non-greasy results.
By carefully managing these steps—yeast activation, gluten development, proper proofing, and controlled frying—you’ll produce donuts that are not just delicious, but genuinely light, airy, and bakery-worthy. This balance of science and technique is what sets homemade cinnamon twist donuts apart from store-bought options. In the next section, we’ll break down the exact ingredients you need and how each one contributes to the perfect twist.
Ingredients Breakdown: What You’ll Need
Making the perfect cinnamon twist donut starts with using the right ingredients in the correct proportions. Each component plays a specific role in achieving that soft, airy texture and rich flavor. Below is a detailed breakdown of what you’ll need to make the dough and finish the donuts with their signature cinnamon sugar coating.
For the Dough:
-
2 ¼ teaspoons active dry yeast
This is the key to a light and fluffy texture. The yeast helps the dough rise and creates those airy pockets inside the donut. Make sure it’s fresh and properly activated before mixing with the other ingredients. -
¾ cup warm milk (about 110°F)
Warm milk helps activate the yeast. Using milk instead of water adds richness and tenderness to the dough. Ensure the temperature is just right—too hot, and it will kill the yeast; too cool, and it won’t activate. -
¼ cup granulated sugar
Sugar not only sweetens the dough but also feeds the yeast during fermentation. It adds subtle flavor and helps create a golden crust during frying. -
2 ½ cups all-purpose flour
All-purpose flour provides the structure for the donuts. For an even fluffier result, some bakers prefer to use a mix of all-purpose and bread flour to add a bit more gluten, which improves elasticity. -
¼ teaspoon salt
A small amount of salt balances the sweetness and enhances the flavor of the dough. It also helps strengthen the gluten structure. -
1 large egg
The egg enriches the dough, contributing to the soft crumb and tender texture. It also adds moisture and structure. -
¼ cup unsalted butter, softened
Butter adds flavor and richness, making the dough softer and more luxurious. Make sure it’s well softened so it blends easily into the dough without clumping.
As described in the Wikipedia article on cinnamon, cinnamon pairs especially well with enriched doughs like this one, creating a flavor combination that’s both warm and comforting. You’ll find that once fried and coated in cinnamon sugar, the flavor profile becomes irresistibly nostalgic.
If you’re interested in creative ways to adjust your twist donuts, you can explore visual ingredient inspiration and variations through this Pinterest board on soft donuts, where bakers experiment with glazes, fillings, and alternative sugars.
For Frying and Coating:
-
Vegetable oil (for frying)
A neutral oil like vegetable oil is ideal for deep frying. It has a high smoke point and doesn’t overpower the donut’s flavor. Peanut or canola oil can also be used. -
½ cup granulated sugar (for coating)
This is used to coat the donuts after frying. To make cinnamon sugar, simply mix ½ cup granulated sugar with 1 to 2 teaspoons of ground cinnamon, depending on your preference.
As an optional twist, explore more donut coating ideas and presentation inspiration on this Pinterest board, which features everything from powdered sugar coatings to unique spice blends.
These carefully chosen ingredients work together to create the ideal donut: crisp on the outside, soft and fluffy on the inside, and finished with a sweet, aromatic coating. In the next section, we’ll walk through each step of the dough preparation process to ensure your donuts rise to perfection.
Step-by-Step Dough Preparation
Creating light and fluffy sugar twist donuts starts with preparing a well-developed dough. This stage is crucial—everything from activating the yeast to kneading and proofing directly affects the final texture of your donuts. Follow these steps precisely to achieve a bakery-level result.
1. Activate the Yeast
Begin by dissolving 2 ¼ teaspoons of active dry yeast in ¾ cup of warm milk (110°F). Let this sit for 5–10 minutes until it becomes foamy on top. This foam signals that the yeast is active and ready to ferment the dough. If there’s no foam, discard and start over with fresh yeast. For more about how yeast works, the Wikipedia article on baker’s yeast offers a comprehensive explanation of its role in baking.
2. Mix the Dough
In a large mixing bowl, combine:
-
2 ½ cups all-purpose flour
-
¼ cup granulated sugar
-
¼ teaspoon salt
Add the yeast mixture, 1 large egg, and ¼ cup of softened unsalted butter. Stir the ingredients together with a wooden spoon or dough hook attachment until a rough dough begins to form.
3. Knead Until Smooth
Turn the dough onto a lightly floured surface. Knead it for 8–10 minutes, or until the dough becomes smooth, elastic, and only slightly tacky. Proper kneading helps develop the gluten network that traps air bubbles and gives the donuts their airy interior. A well-kneaded dough will spring back slightly when pressed.
Need help knowing what a well-kneaded dough looks like? This Pinterest shaping tutorial offers visual guidance and helps ensure you’re on the right track.
4. First Rise (Proofing)
Place the kneaded dough into a lightly greased bowl, cover it with a damp towel or plastic wrap, and let it rise in a warm place for 1 hour, or until it doubles in size. This is the first fermentation stage, and it’s where the dough develops its structure and begins to build flavor.
If your kitchen is cool, you can proof the dough in an off oven with the light on to create a slightly warm environment. More details on proper proofing conditions are available in this Wikipedia article on proofing.
5. Punch Down and Divide
Once the dough has doubled, gently punch it down to release the built-up gas. Divide it into 10 to 12 equal pieces using a bench scraper or sharp knife. Cover the dough balls lightly with a clean towel to prevent them from drying out while you move on to shaping.
At this point, your dough is ready for twisting. This phase builds on the structure you’ve already created and sets the stage for the signature cinnamon twist shape. In the next section, we’ll guide you through exactly how to shape and twist the dough for the perfect finish.
How to Twist the Donuts Perfectly
Shaping your sugar twist donuts is where the fun begins—and where the final texture and look really take shape. The twist not only adds visual appeal but also enhances the fluffiness and pull-apart texture of each donut. Proper technique here ensures the donuts puff evenly during frying and hold that signature braided design.
1. Roll Into Ropes
Take each dough portion (from the 10–12 you previously divided) and roll it into a rope about 8 to 10 inches long. If the dough resists stretching or snaps back, let it rest for 2–3 minutes to relax the gluten, then try again. You want the ropes to be smooth and even in thickness.
For visual inspiration and shaping tips, check out this Pinterest board on braided donut designs where you’ll find various techniques, including single-rope spirals and multi-strand braids.
2. Form the Twist
Once you’ve rolled two ropes, gently twist them together, spiraling them in a uniform pattern. Pinch the ends to seal them, tucking any loose ends underneath to keep the twist neat. Repeat this process with all remaining pieces.
3. Keep the Shape Uniform
To ensure all your donuts fry evenly, try to keep the twists the same length and thickness. Uneven shapes can result in undercooked centers or over-browned edges. If desired, you can make mini twists or longer ones for a more dramatic presentation.
For added creativity, some bakers add a cinnamon filling before twisting, or use a three-strand braid. Explore more styling options through this Pinterest twist shaping guide, which showcases unique ways to style your donuts.
4. Prepare for the Second Rise
Place the twisted donuts on a parchment-lined baking sheet, leaving enough space between each one to rise without touching. Cover loosely with a towel and let them rest for 30–40 minutes, or until puffy and light.
This second proofing stage is essential for locking in the structure and achieving that perfect pillowy finish. In the next section, we’ll dive into the final rise in more detail and how to tell when your twists are ready for frying.
Second Rise: Letting Twists Puff Up
After shaping your cinnamon twist donuts, the second rise—also called the final proof—is a critical step in ensuring a soft and airy texture. This rest period allows the dough to relax, expand, and fully develop its pillowy softness before frying.
Place the shaped twists on a parchment-lined tray, spaced apart to avoid sticking as they rise. Cover them with a clean kitchen towel or loosely draped plastic wrap. Let them rest in a warm, draft-free spot for 30–40 minutes, or until they look noticeably puffed and lighter in texture. You’ll know they’re ready when you lightly press the dough and the indentation slowly bounces back.
Avoid over-proofing, which can cause the twists to collapse when fried. If your kitchen is cool, use the proofing trick again: place the tray in a turned-off oven with the light on to simulate a warm environment. Proper final proofing ensures the donuts maintain their shape and fry evenly, delivering that ideal golden-brown color with a tender inside.
In the next section, we’ll go over exactly how to fry the twists for maximum fluff without absorbing too much oil.
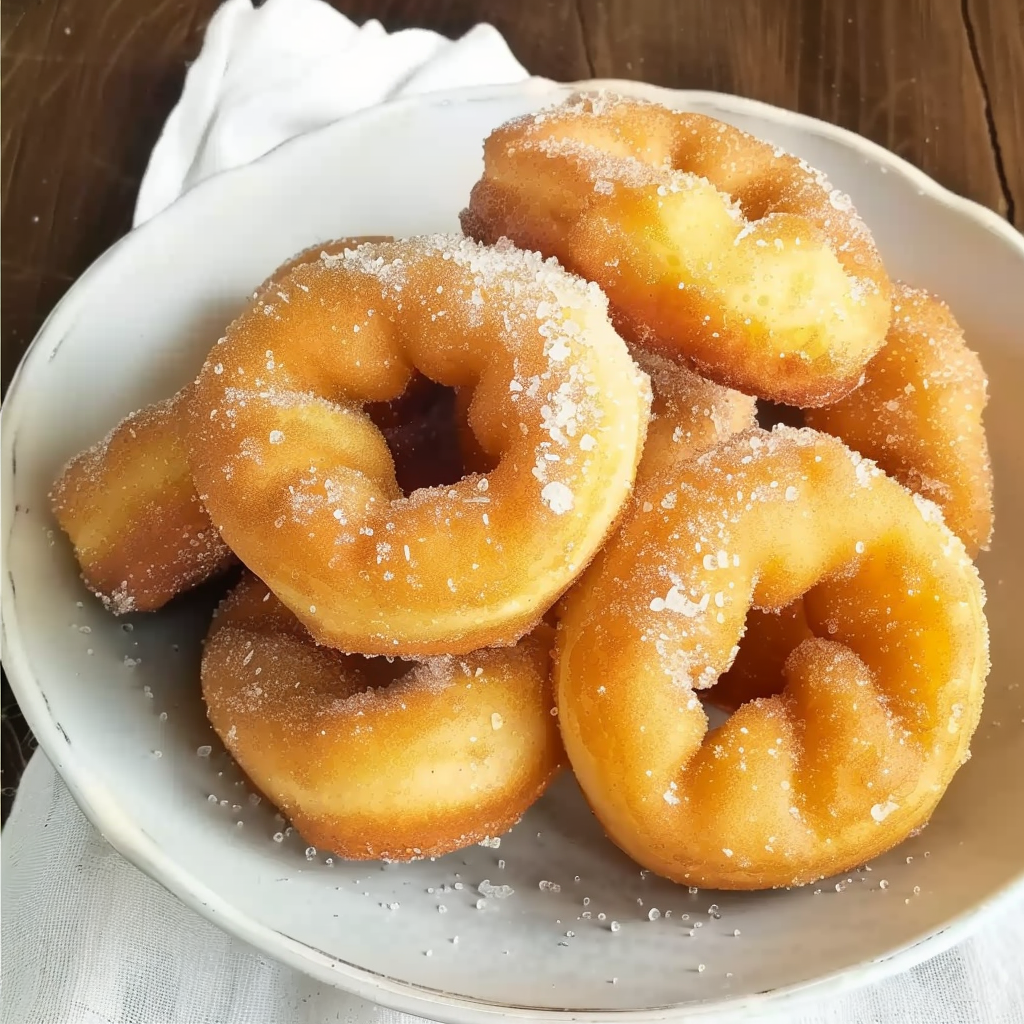
Frying the Twists: Light, Golden, and Perfect
Once the twists are fully proofed, it’s time to fry them to golden perfection. This is the moment where all your preparation pays off—crispy exteriors, soft centers, and that unmistakable aroma of fresh donuts filling your kitchen.
Start by heating vegetable oil in a deep pan or Dutch oven to 350°F (175°C). Use a thermometer to keep the temperature consistent—this is key to achieving a non-greasy, evenly cooked donut. As mentioned in this guide to deep frying, steady temperature control prevents soggy or raw centers.
Carefully lower each twist into the oil using a slotted spoon or tongs. Avoid overcrowding the pan, as this drops the oil temperature and results in uneven frying. Fry the donuts in batches, 2–3 minutes per side, until golden brown and puffed.
Once fried, place them on paper towels or a wire rack to drain excess oil. Let them rest for a few minutes before coating, but don’t wait too long—coating works best when the donuts are still warm and slightly damp from the fryer.
A properly fried sugar twist donut will have a light crust, soft interior, and a slightly chewy bite. In the next section, we’ll coat them in a classic cinnamon sugar blend that completes the nostalgic flavor.
Cinnamon Sugar Coating: The Final Touch
Now that your twists are beautifully golden and slightly warm, it’s time to coat them in cinnamon sugar—the final flourish that transforms them into a true treat.
To make your coating, combine:
-
½ cup granulated sugar
-
1–2 teaspoons ground cinnamon (adjust to taste)
Toss each donut gently in the cinnamon sugar mixture while it’s still warm. The residual heat helps the sugar adhere evenly, creating that sweet, slightly crunchy exterior. Make sure to coat all sides, and gently press the sugar into the twist if needed.
For an extra kick, add a pinch of nutmeg or vanilla sugar to the blend. You can also explore alternative toppings like powdered sugar or glazes. For coating ideas, visit this Pinterest board on donut toppings.
Don’t let the coating sit too long in open air before serving—these twists are best enjoyed fresh, when the sugar is still slightly warm and fragrant.
In the next section, we’ll look at how to serve, store, and even freeze your cinnamon twist donuts for future indulgence.
Serving Suggestions & Storage Tips
Sugar twist donuts are best served fresh, ideally within an hour of frying. Their warm, fluffy interior and crisp sugar coating are most enjoyable when freshly made.
Here are some serving ideas to elevate the experience:
-
Pair with fresh coffee, chai, or hot cocoa
-
Serve with a vanilla glaze dip or chocolate drizzle
-
Sprinkle with powdered sugar for a lighter finish
For storage:
-
Keep leftovers in an airtight container at room temperature for up to 2 days
-
Avoid refrigeration—it dries out the dough
-
To reheat, use an oven or air fryer at 300°F for 3–5 minutes
Freezing instructions:
-
Freeze uncoated fried twists in a single layer, then transfer to a zip-top bag
-
Reheat directly from frozen in the oven and coat with cinnamon sugar afterward
If you’re looking for ways to elevate presentation or find seasonal serving variations, this Pinterest inspiration board features creative ways to serve and plate donuts for parties, brunches, and events.
Now that you’re fully equipped to make and serve your homemade cinnamon twists, let’s dive into the most common questions people have about this recipe.
FAQs
Can you bake cinnamon twist donuts instead of frying?
Yes, you can bake them at 375°F for 12–15 minutes, but the texture will be more like sweet bread than a traditional donut. Frying is key to achieving the crisp exterior and airy interior associated with classic sugar twist donuts.
What’s the difference between a sugar twist donut and a cruller?
A sugar twist donut is made with yeast dough that’s twisted and fried, while a cruller is often made with choux pastry or piped dough and has a distinct ridged shape. Crullers are lighter in weight and have a more custardy texture.
Can I make the dough the night before?
Yes. After the first rise, punch down the dough and refrigerate it overnight. Let it come to room temperature in the morning, then shape, proof again, and fry. This method actually enhances flavor development.
What’s the best flour for fluffy donuts?
All-purpose flour works well, but for a slightly chewier and airier texture, you can replace half with bread flour. The higher protein content improves gluten development, helping the donuts rise better.
Why did my donuts turn out dense or greasy?
Common causes include:
-
Underproofing or overproofing
-
Using expired yeast
-
Frying at the wrong oil temperature
-
Overworking or under-kneading the dough
Check oil heat with a thermometer and follow rise times closely for best results.
Sugar Twist Donut Recipe The Soft and Fluffy Cinnamon Twists Guide
These homemade sugar twist donuts are soft, fluffy, and irresistibly coated in cinnamon sugar. Made from a yeast-based dough and fried to golden perfection, they’re a bakery-style treat you can enjoy anytime. Their signature twist shape is easy to achieve and adds that perfect pull-apart texture. Serve warm for a comforting, nostalgic dessert or brunch centerpiece.
- Author: Clara
Ingredients
For the dough:
- 2 ¼ teaspoons active dry yeast
- ¾ cup warm milk (about 110°F)
- ¼ cup granulated sugar
- 2 ½ cups all-purpose flour
- ¼ teaspoon salt
- 1 large egg
- ¼ cup unsalted butter, softened
For frying and coating:
- Vegetable oil, for frying
- ½ cup granulated sugar (for coating)
Instructions
In a small bowl, dissolve the yeast in the warm milk and let it sit for about 5–10 minutes until foamy.
In a large mixing bowl, combine the flour, sugar, and salt. Add the egg, softened butter, and the yeast mixture.
Mix until a dough forms, then knead the dough on a floured surface for about 8–10 minutes until smooth and elastic.
Place the dough in a lightly greased bowl, cover, and let it rise in a warm place until doubled in size, about 1 hour.
Punch down the risen dough and divide it into equal pieces (about 10–12).
Roll each piece into a rope, then twist two ropes together and pinch the ends to seal. Repeat with remaining dough.
Place the twisted donuts on a parchment-lined baking sheet, cover, and let them rise for another 30–40 minutes until puffy.
Heat vegetable oil in a deep pan to 350°F. Fry the donut twists in batches until golden brown on both sides, about 2–3 minutes per side.
Drain on paper towels, then roll the warm donuts in granulated sugar to coat.
Serve fresh and enjoy.
Notes
-
Use fresh active dry yeast to ensure proper rise
-
Let the dough fully proof twice for the best airy result
-
Maintain oil at 350°F to prevent greasy or undercooked donuts
-
Twist shape helps create a fluffy interior and crispy edges
-
Coat while warm to help the cinnamon sugar stick better
-
For best flavor, enjoy within hours of frying
-
Freeze uncoated for up to 1 month; reheat and coat before serving
-
Try adding fillings like cream or fruit preserves for variation
-
Experiment with glazes for a different finish—vanilla, maple, or chocolate
-
Ideal for weekend baking, brunch spreads, or gifting