Why Chocolate Cream Pie Never Goes Out of Style
Few desserts match the indulgent, timeless appeal of a rich chocolate cream pie. With its silky, decadent filling, buttery crust, and fluffy whipped cream topping, it’s a crowd-pleaser for both casual gatherings and formal celebrations. Whether you’re preparing it for a weekend dinner, a birthday, or a holiday table, this dessert offers comfort and sophistication in every slice.
What sets this pie apart is the layered texture—a buttery graham cracker crust that gives way to a smooth, chocolatey custard, topped with lightly sweetened whipped cream. This contrast in texture and flavor is what keeps people coming back for more. Unlike many overly sweet or heavy desserts, chocolate cream pie balances richness with lightness, making it suitable for every season and setting.
Though its origins trace back to early American pies, this dish has evolved. From variations using a graham cracker crust to no-bake versions popular on platforms like Pinterest, this pie has proven to be as versatile as it is beloved. Today, food lovers experiment with twists like Oreo crusts, French silk filling, or even dairy-free adaptations, ensuring this classic continues to thrive in modern kitchens.
Many home bakers appreciate how accessible the ingredients are—staples like whole milk, semisweet chocolate, and egg yolks—and yet the result feels like something you’d get at a high-end bakery. It’s a go-to dessert for those who want to impress without spending hours in the kitchen. For tips on presentation and plating, explore this chocolate pie presentation guide, especially helpful for holiday tables or special occasions.
In this article, you’ll not only learn how to master a rich chocolate cream pie with whipped cream topping, but also discover variations, pro tips, make-ahead strategies, and answers to the most common questions bakers have. If you’ve ever wanted a dessert that’s as satisfying as it is reliable, you’ll find yourself returning to this recipe again and again.

What Is Chocolate Cream Pie?
Chocolate cream pie is a beloved dessert made from a creamy, rich chocolate custard nestled in a flaky or crumbly crust, typically topped with whipped cream. It’s a comfort food classic that combines elements of both pie and pudding—silky and spoonable, yet firm enough to slice. This dessert finds its roots in traditional American custard pies, where milk, egg yolks, and sugar form the basis of a rich filling.
Unlike baked chocolate pies that rely on eggs to set in the oven, chocolate cream pie is made on the stovetop using cornstarch to thicken the custard. This method produces a smoother, more pudding-like texture. If you’re curious about the science behind it, you can learn more about the role of cornstarch and custard bases in desserts like this one.
The filling is typically made with semisweet chocolate or unsweetened cocoa powder, which gives the pie a deep chocolate flavor without being overpoweringly sweet. It’s a more refined taste compared to overly sugary chocolate desserts. Some bakers even experiment with darker chocolates for a richer experience—explore the variations in chocolate types here.
It’s also a flexible dessert in terms of presentation. You can keep it rustic with a simple graham crust and a swirl of cream, or dress it up with pie crust decorating ideas for holiday-worthy impact. The classic version, however, sticks to three key layers: crust, chocolate filling, and whipped topping—each one playing a crucial role in the overall bite.
For those who want to serve a reliable yet crowd-pleasing dessert, this pie is a go-to. Its balance of textures, chocolatey richness, and cool whipped finish makes it a staple for birthdays, potlucks, or any time you need a guaranteed hit.
Essential Ingredients for the Perfect Chocolate Cream Pie
Crafting the perfect chocolate cream pie starts with understanding the importance of each ingredient. From the crust to the filling and finally the whipped cream topping, each layer contributes to the overall flavor, texture, and presentation. Whether you’re following a classic approach or adding your own twist, the quality and balance of these elements will make or break your pie.
For the Crust
The base of your pie sets the tone. While a graham cracker crust is traditional and adds a slightly sweet, nutty crunch, other options like Oreo cookie crusts or classic baked pie dough work beautifully too. Learn more about the structure and role of a graham cracker crust, which is especially useful for no-bake or refrigerated pies.
A standard graham cracker crust includes:
-
1½ cups graham cracker crumbs
-
⅓ cup granulated sugar
-
6 tablespoons melted unsalted butter
Mix these and press into a pie dish. Bake for 8–10 minutes at 350°F (175°C), or skip baking for a firmer no-bake option (especially useful in warmer months or for quicker prep).
If you’re interested in holiday dessert table inspiration, this Pinterest board offers beautiful ideas for crust enhancements and pie styling that add visual appeal without complicating the recipe.
For the Filling
The heart of this dessert is the rich, silky chocolate filling. The secret to its smoothness is a combination of cornstarch, egg yolks, and whole milk. Unlike traditional baked pies, this filling is cooked on the stovetop, giving you control over thickness and flavor development.
Key ingredients include:
-
1 cup granulated sugar
-
¼ cup unsweetened cocoa powder
-
¼ cup cornstarch
-
¼ teaspoon salt
-
3 cups whole milk
-
4 large egg yolks
-
6 oz semisweet chocolate, chopped
-
2 tablespoons unsalted butter
-
2 teaspoons vanilla extract
The addition of semisweet chocolate ensures a bold flavor that’s not overly sweet. Using chopped chocolate over chips ensures smoother melting and a creamier finish. The butter and vanilla added at the end enhance richness and balance the bitterness of the cocoa.
If you’re curious about the role of egg yolks in thickening and adding creaminess, they act as an emulsifier, giving your custard a luxurious mouthfeel. The trick is to temper the eggs by slowly incorporating hot milk into them before adding them back into the saucepan—this prevents scrambling and ensures a silky consistency.
For the Topping
To finish, a light, fluffy whipped cream cuts through the richness of the filling and gives the pie its signature look. For best results, always whip your cream fresh and avoid canned alternatives, which can deflate quickly.
Whipped topping ingredients:
-
1 cup heavy whipping cream
-
2 tablespoons powdered sugar
-
1 teaspoon vanilla extract
Beat until soft peaks form. This topping not only adds flavor but texture and visual appeal. For decorative flair, explore piping techniques or use a simple offset spatula to create rustic swirls. You can also top with chocolate shavings, berries, or even a touch of sea salt for contrast.
For more visual examples, check out this Pinterest guide to chocolate pie presentation, which includes tips on garnishing with flair.
Together, these ingredients form the foundation of a dessert that’s rich, balanced, and endlessly customizable. With just a few pantry staples, you can create a pie that feels special every time you make it.
Step-by-Step Recipe: Rich Chocolate Cream Pie with Whipped Cream
Making a chocolate cream pie from scratch might seem intimidating, but each step is simple when broken down. Here’s a foolproof method to achieve a smooth, rich filling, a sturdy crust, and a light topping that elevates every bite. Follow this sequence to create a dessert that’s as beautiful as it is delicious.
a. Make the Crust
Start with the base—it’s the literal foundation of your pie and adds essential texture.
-
In a medium bowl, combine:
-
1½ cups graham cracker crumbs
-
⅓ cup granulated sugar
-
6 tablespoons unsalted butter, melted
-
-
Stir until all crumbs are coated in butter and the mixture resembles wet sand.
-
Press firmly into the bottom and up the sides of a 9-inch pie dish using a flat-bottomed measuring cup or glass.
-
Bake at 350°F (175°C) for 8–10 minutes until golden and fragrant. Let cool completely.
You can also try an Oreo or baked pastry crust, which we’ll explore later. For inspiration on crust styling, refer to this pie crust decorating board.
b. Make the Chocolate Filling
This is the heart of your pie—thick, smooth, and intensely chocolatey.
-
In a medium saucepan (off heat), whisk together:
-
1 cup granulated sugar
-
¼ cup unsweetened cocoa powder
-
¼ cup cornstarch
-
¼ teaspoon salt
-
-
Slowly whisk in 3 cups whole milk, making sure the mixture is smooth and lump-free.
-
Place over medium heat and cook, whisking constantly. As the mixture warms, it will begin to thicken. This takes about 7–10 minutes.
-
In a small bowl, beat 4 large egg yolks. Slowly ladle in about ½ cup of the hot chocolate mixture, whisking constantly to temper the yolks and prevent curdling.
-
Pour the egg mixture back into the saucepan and reduce heat to low. Cook 2–3 more minutes, whisking continuously, until the filling is thick like pudding.
-
Remove from heat and stir in:
-
6 oz semisweet chocolate, chopped
-
2 tablespoons unsalted butter
-
2 teaspoons vanilla extract
-
The chocolate and butter will melt from the residual heat, creating a velvety custard. If you’re unfamiliar with custards, the Wikipedia page on custard offers useful context on texture and consistency expectations.
To avoid lumps, some bakers prefer to strain the filling through a mesh sieve at this stage—this step is optional but helpful.
c. Chill and Set
-
Pour the chocolate filling into the cooled crust, smoothing the top with a spatula.
-
Press plastic wrap directly onto the surface to prevent a skin from forming.
-
Refrigerate for at least 4 hours, preferably overnight, until the filling is fully set and sliceable.
This step is critical—cutting too early will result in a runny pie. For those juggling prep for a dinner party, this is where your make-ahead strategy pays off.
d. Make the Whipped Cream Topping
The topping adds balance and elegance to the rich filling.
-
In a chilled mixing bowl, combine:
-
1 cup heavy whipping cream
-
2 tablespoons powdered sugar
-
1 teaspoon vanilla extract
-
-
Beat with a hand or stand mixer on medium-high until soft peaks form. Avoid overmixing or the cream will become grainy.
For a dairy-free twist, you can substitute with whipped coconut cream. Pinterest has several no-bake dessert ideas showcasing plant-based options.

e. Assembly and Final Garnish
-
Remove the chilled pie from the fridge.
-
Spread the whipped cream evenly over the top, using a spatula or piping bag for decoration.
-
Optional toppings:
-
Chocolate curls or shavings
-
Cocoa powder dusting
-
Berries or a sprinkle of sea salt
-
Chocolate shavings can be made easily by running a vegetable peeler down the side of a chocolate bar. Use semisweet chocolate for best results.
Once assembled, keep the pie chilled until ready to serve. This dessert is at its best when cold—firm filling, fluffy cream, and crisp crust all intact.
Crust Options: From Graham Cracker to Oreo Cookie Base
While a graham cracker crust is the classic choice for a chocolate cream pie, other options can add variety, texture, or even a flavor twist. Choosing the right crust depends on your preferences and the occasion. Here are three popular types and how they compare:
1. Graham Cracker Crust
-
Light, slightly sweet, and easy to make.
-
Pairs beautifully with the richness of the chocolate filling.
-
Best for classic cream pies and casual servings.
2. Oreo Cookie Crust
-
Offers a deeper chocolate flavor and a crunchier bite.
-
Made by mixing crushed Oreo cookies (with filling) and melted butter.
-
Ideal for no-bake pies or when you want a double-chocolate experience.
3. Baked Pastry Crust (Pie Dough)
-
A traditional pie shell made with flour, butter, and a touch of salt.
-
Offers a flakier texture, though it requires more prep and blind baking.
-
Great for formal occasions and when a sturdier slice is preferred.
For a festive presentation, check out holiday dessert inspiration on Pinterest, which often features decorative crust edges and layered designs. These variations not only enhance visual appeal but also allow you to tailor your pie to different events or seasons.
If you’re looking to make this pie gluten-free, consider using gluten-free graham crackers or cookies as a base. Combine with butter as you would in a traditional crust for a seamless swap.
Make-Ahead Tips for Busy Bakers
One of the best things about chocolate cream pie is how well it holds up when made in advance. With proper storage, each layer maintains its texture and flavor, allowing you to prepare your dessert stress-free.
Make-Ahead Plan:
-
Crust:
-
Can be made 2–3 days ahead.
-
Store at room temperature, wrapped tightly, or refrigerate if using a dairy-based crust.
-
-
Filling:
-
Make and chill the filling in the crust up to 2 days in advance.
-
Always cover with plastic wrap pressed directly against the surface to avoid a skin forming.
-
-
Whipped Cream Topping:
-
Best made fresh on the day of serving for peak texture.
-
If prepping early, stabilize with a teaspoon of cornstarch or dry milk powder to help it hold longer in the fridge.
-
Looking for more no-fuss no-bake dessert ideas? Browse this Pinterest collection for make-ahead inspiration that pairs convenience with crowd-pleasing results.
Popular Variations on the Classic Chocolate Cream Pie
The classic chocolate cream pie is a dream as-is, but its flexible base invites experimentation. Here are a few popular spins you can try:
1. No-Bake Chocolate Pudding Pie
-
Uses instant pudding mix and pre-made crust.
-
Quick and beginner-friendly, though less rich than the traditional version.
-
Great for warm-weather or fast prep.
2. French Silk Chocolate Pie
-
Made with butter, sugar, eggs, and melted chocolate.
-
Whipped into a silky, mousse-like filling.
-
Often served in a baked pie crust and topped with whipped cream.
3. Vegan or Dairy-Free Chocolate Pie
-
Made with coconut milk, dairy-free chocolate, and arrowroot or cornstarch.
-
Coconut whipped cream offers a flavorful topping.
-
Perfect for those with dietary restrictions.
Each variation changes the texture and flavor slightly, but all maintain the core appeal of a chocolate-filled pie. For more on dairy-based dessert options, explore whipped cream’s role in baking and how it pairs with different fillings.
Serving and Presentation Ideas
Great desserts deserve great presentation. Even a simple chocolate pie can shine with thoughtful styling. Here’s how to serve yours beautifully:
-
Use a piping bag to swirl whipped cream in rosettes or stars.
-
Top with chocolate curls, made by shaving a bar of semisweet chocolate.
-
Add a pop of color with raspberries, strawberries, or mint leaves.
-
Dust with cocoa powder or drizzle with chocolate ganache for a refined finish.
Explore presentation tips on Pinterest to see how others style their pies for holidays, birthdays, or elegant dinner parties.
Pair this pie with coffee, espresso, or even dessert wine for a balanced dessert course. If you’re serving buffet-style, consider making mini pies or tartlets for individual portions.
Storing and Freezing Instructions
Proper storage keeps your chocolate cream pie tasting fresh for days.
Refrigerating:
-
Store covered in the refrigerator for up to 4 days.
-
Keep whipped cream topping intact by placing toothpicks around the pie and tenting with foil or plastic wrap.
Freezing:
-
Freeze the pie without the whipped cream topping for best results.
-
Wrap tightly in plastic wrap and foil. Store for up to 2 months.
-
Thaw in the refrigerator overnight before adding fresh whipped cream and serving.
For longer shelf life without compromising flavor, make the filling and crust ahead, freeze separately, and assemble the day of.
Common Mistakes to Avoid
Even seasoned bakers can run into issues with chocolate cream pie. Avoid these common pitfalls for a flawless result:
-
Overcooking the filling: leads to a grainy texture.
-
Not tempering egg yolks properly: causes curdled custard.
-
Skipping the chill time: results in a runny or unset filling.
-
Overwhipping the cream: makes it stiff or buttery.
-
Using low-fat milk: affects richness and thickening.
Review the importance of egg yolks and their role in custards before starting. A smooth custard depends on gradual heating and consistent whisking.
Chocolate Pie Recipes You’ll Make on Repeat
Here’s a roundup of irresistible chocolate pie variations that’ll have you reaching for your pie dish week after week:
-
Classic Chocolate Cream Pie:
-
Our star recipe—perfect balance of richness and lightness.
-
-
No-Bake Oreo Chocolate Pie:
-
Cookie crust and pudding filling make this a hit for summer.
-
-
Dark Chocolate Tart with Sea Salt:
-
Elegant and bittersweet, finished with flaky sea salt.
-
-
Mini Chocolate Cream Pies:
-
Perfect for parties or individual servings.
-
-
Chocolate Peanut Butter Pie:
-
Rich and nutty with a creamy texture.
-
-
Triple Chocolate Mousse Pie:
-
Layers of milk, dark, and white chocolate mousse in one bite.
-
These recipes make excellent additions to your dessert rotation. Consider saving them to your dessert idea board for future inspiration.

FAQs (Frequently Asked Questions)
Can I make chocolate cream pie a day ahead?
Yes, and it’s even better that way. Chill the pie overnight for best texture. Add whipped cream the day of serving.
What’s the difference between chocolate cream pie and chocolate pudding pie?
Chocolate cream pie is usually made from scratch with egg yolks and real chocolate, while pudding pie often uses instant pudding mix. Cream pie is richer and more custard-like.
Why did my chocolate filling turn lumpy?
This usually happens from uneven heating or failing to temper eggs. Whisk constantly and strain the mixture before chilling to ensure smoothness.
Can I use milk chocolate instead of semisweet?
Yes, but it will be sweeter and less intense. For a balanced taste, stick with semisweet chocolate.
How long does chocolate cream pie last in the fridge?
Up to 4 days when properly covered. Whipped cream topping may soften over time.
Can I make this pie without eggs?
Yes. Use cornstarch and full-fat coconut milk for a vegan version. Be sure to check out custard alternatives for more ideas.
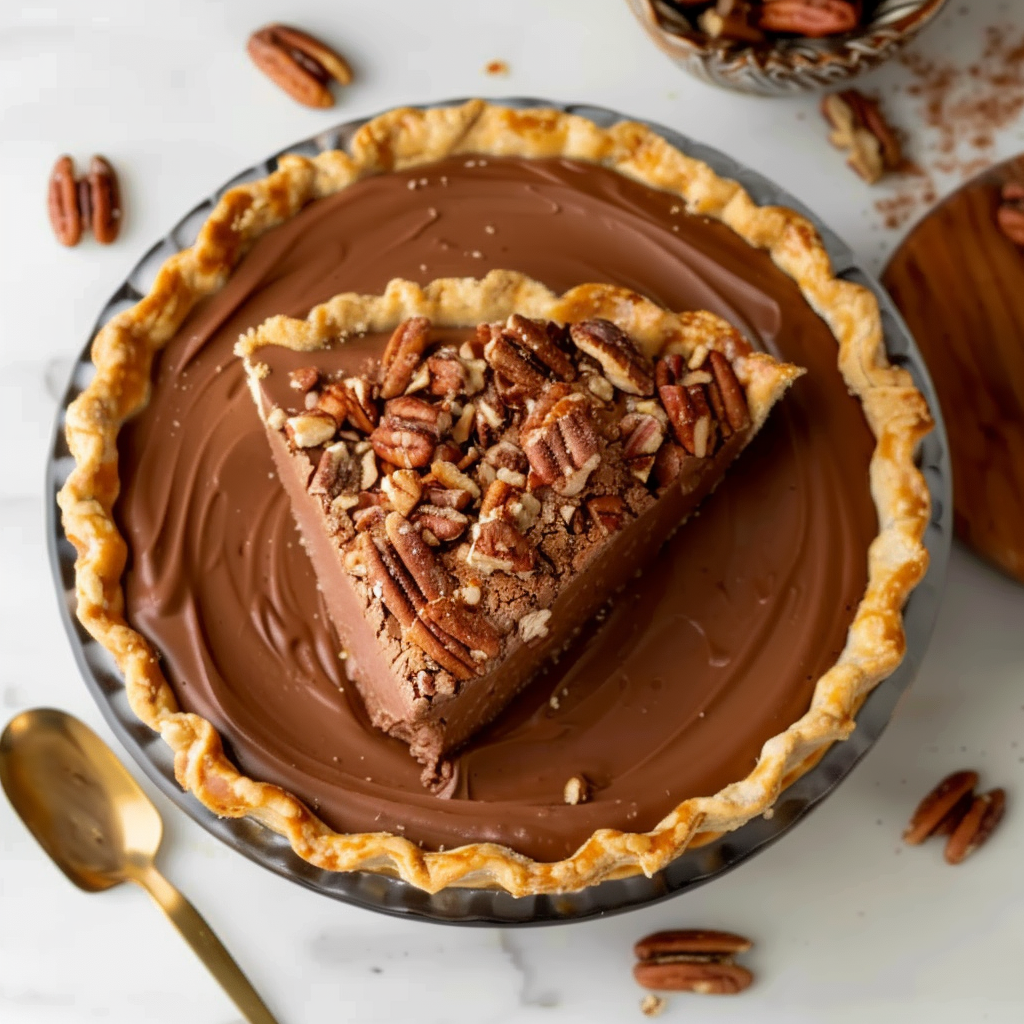
Rich Chocolate Cream Pie With Whipped Cream Topping

A smooth and decadent chocolate cream pie layered over a buttery graham cracker crust and topped with soft, vanilla-scented whipped cream. This recipe combines rich semisweet chocolate, silky custard, and cloud-like topping into a sliceable dessert that’s perfect for holidays, birthdays, or any time you crave a little indulgence.
- Author: Clara
Ingredients
For the crust:
- 1 ½ cups graham cracker crumbs
- ⅓ cup granulated sugar
- 6 tablespoons unsalted butter, melted
For the filling:
- 1 cup granulated sugar
- ¼ cup unsweetened cocoa powder
- ¼ cup cornstarch
- ¼ teaspoon salt
- 3 cups whole milk
- 4 large egg yolks
- 6 oz semisweet chocolate, chopped
- 2 tablespoons unsalted butter
- 2 teaspoons vanilla extract
For the topping:
- 1 cup heavy whipping cream
- 2 tablespoons powdered sugar
- 1 teaspoon vanilla extract
- Chocolate shavings or curls (optional)
Instructions
Preheat your oven to 350°F (175°C).
In a bowl, mix graham cracker crumbs, sugar, and melted butter until well combined. Press the mixture firmly into the bottom and sides of a 9-inch pie dish. Bake for 8-10 minutes, then let cool completely.
In a medium saucepan, whisk together sugar, cocoa powder, cornstarch, and salt. Gradually whisk in the milk until smooth.
Place the pan over medium heat. Cook the mixture, whisking constantly, until it begins to thicken and bubble.
Reduce heat to low. Slowly whisk in the egg yolks, then continue to cook for 2-3 more minutes until thickened.
Remove from heat and stir in the chopped chocolate, butter, and vanilla extract. Mix until the chocolate and butter are fully melted and smooth.
Pour the chocolate filling into the cooled crust. Smooth the top with a spatula and cover the surface with plastic wrap to prevent a skin from forming. Refrigerate for at least 4 hours or until set.
To make the whipped topping, beat the heavy cream, powdered sugar, and vanilla extract in a large bowl until soft peaks form.
Spread the whipped cream over the chilled pie. Garnish with chocolate shavings or curls if desired.
Serve chilled.
Notes
-
Always temper your egg yolks to avoid scrambled textures in the filling.
-
Use high-quality chocolate for a deep, rich flavor.
-
Whip the cream just until soft peaks form for the best texture.
-
Want extra visual appeal? Garnish with chocolate curls or a dusting of cocoa powder.
-
For a time-saving version, try a no-bake Oreo crust and store-bought whipped topping.
-
This pie is best served chilled and sliced with a clean, sharp knife wiped between cuts.