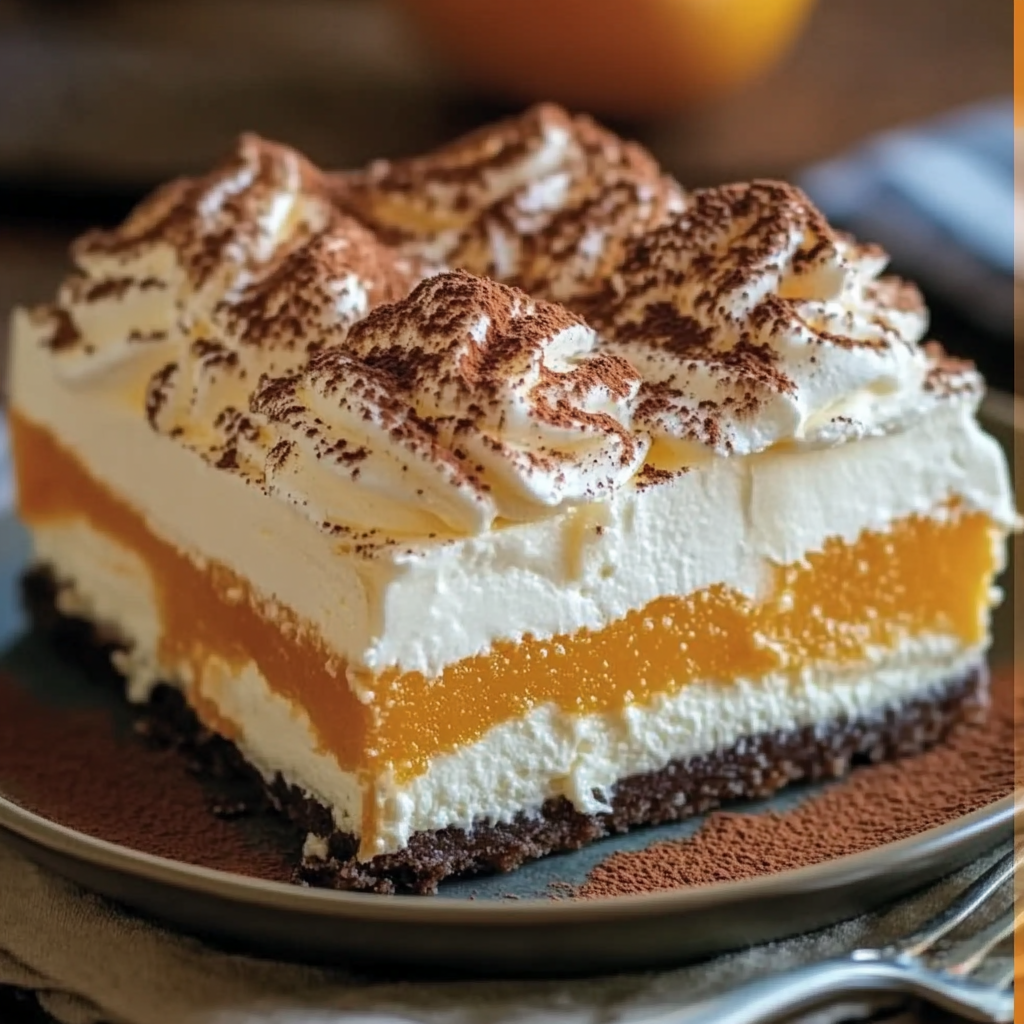
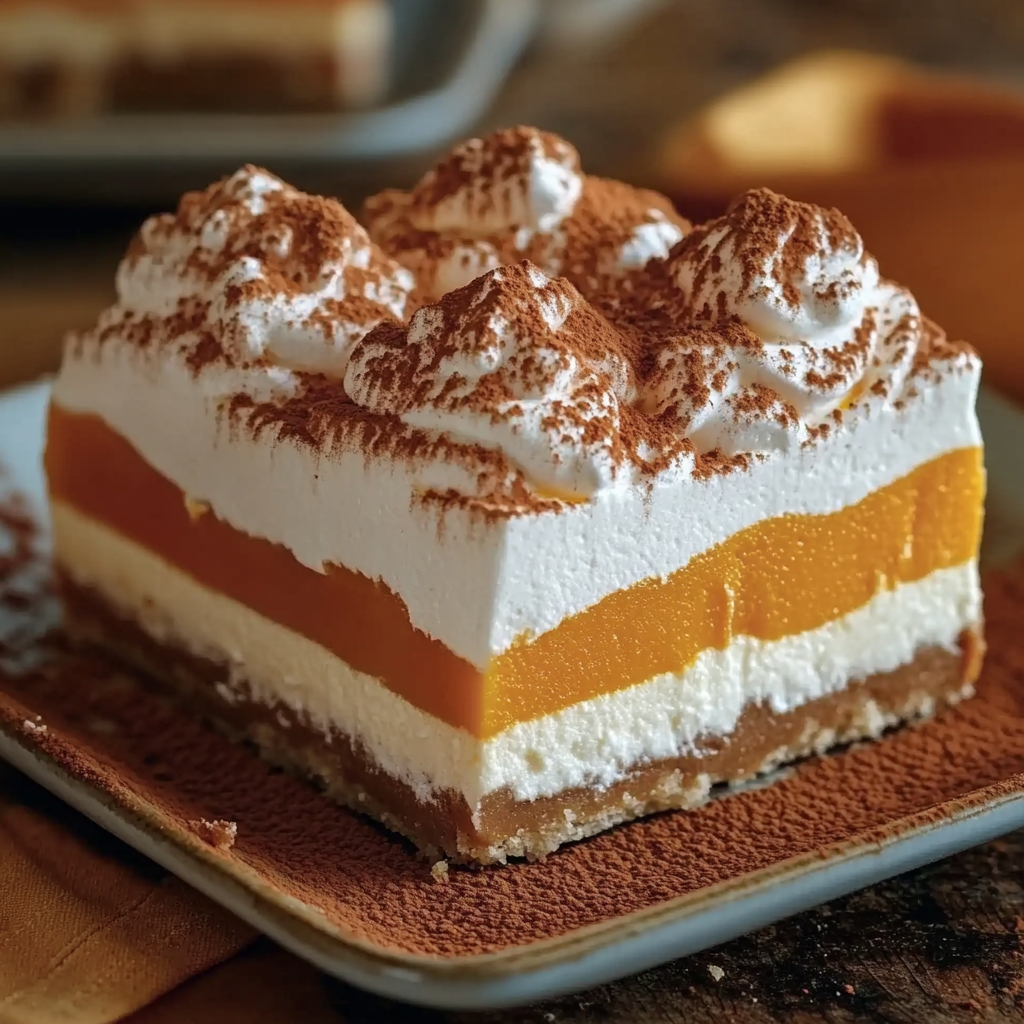
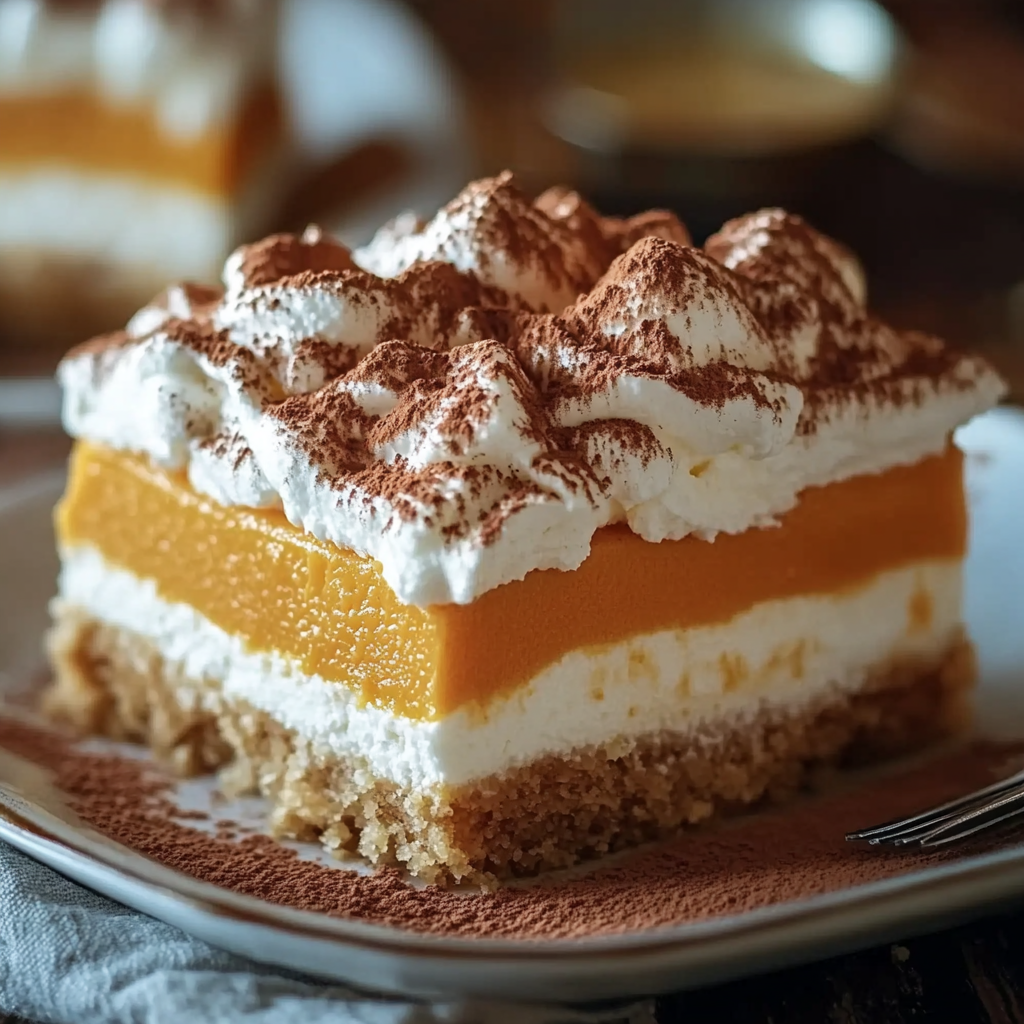
When the crisp autumn air sets in, there’s nothing quite like indulging in a dessert that captures the essence of the season. Layered pumpkin dessert is a decadent treat that combines the creamy richness of cream cheese, the warm flavors of pumpkin pie spice, and the satisfying crunch of a graham cracker crust. Whether you’re hosting a Thanksgiving dinner or simply enjoying a cozy night at home, this dessert promises to steal the spotlight.
Pumpkin-based desserts have long been a staple of fall. With their naturally sweet and earthy flavors, pumpkins are incredibly versatile in creating holiday-worthy recipes. This particular layered dessert brings a unique twist to the traditional pumpkin pie. Instead of a single uniform layer, this dish features multiple textures and flavors stacked into a delightful presentation.
What makes this dessert especially popular is its simplicity. Using basic ingredients such as pumpkin puree and instant vanilla pudding mix, you can create a visually stunning dessert without needing advanced baking skills. Plus, the convenience of incorporating store-bought items like whipped topping means less time in the kitchen and more time enjoying the company of loved ones.
For more background on the history of pumpkin desserts, visit Pumpkin Desserts on Pinterest, which showcases creative variations and inspiring ideas for fall treats. Additionally, you can explore the origins of pumpkin pie spice and its cultural significance on Wikipedia.
The layered pumpkin dessert isn’t just a treat—it’s a celebration of fall flavors. Its delicate layers come together to create a harmonious blend of taste and texture that’s guaranteed to leave your guests asking for seconds. Whether you’re a seasoned baker or a novice in the kitchen, this dessert is as foolproof as it is crowd-pleasing.
Let’s dive into the details, starting with a breakdown of the essential ingredients that make this dessert so special.
Breakdown of Ingredients and Their Role
To create a truly unforgettable layered pumpkin dessert, each ingredient plays a critical role in building the dessert’s flavor, texture, and structure. Here’s a closer look at the components of this recipe and why they are essential.
Crust Ingredients
- Graham Cracker Crumbs: This classic base provides a slightly sweet and crumbly foundation for the dessert. The subtle honey and molasses flavors of the crackers complement the creamy layers above. If you’re looking for an alternative, crushed gingersnaps or Oreos work well, adding a new dimension of flavor. For more insight into crust varieties, check out Graham Cracker Crust on Wikipedia.
- Unsalted Butter: Melted unsalted butter binds the crust together, ensuring it holds its shape while adding a rich, buttery flavor. Using unsalted butter also allows you to control the salt content of the dessert.
- Granulated Sugar: A touch of granulated sugar enhances the sweetness of the crust and balances the overall flavor of the dessert.
Cream Cheese Layer Ingredients
- Cream Cheese: As the base of the second layer, cream cheese provides a tangy, smooth, and creamy texture that contrasts beautifully with the pumpkin layer above it. Softened cream cheese is easier to whip into a light and airy consistency, ensuring a luscious layer. Read more about the properties of cream cheese on Wikipedia.
- Powdered Sugar: Unlike granulated sugar, powdered sugar dissolves completely into the cream cheese, creating a silky-smooth mixture without any graininess.
- Vanilla Extract: A small amount of vanilla extract adds depth and enhances the natural sweetness of the layer.
- Whipped Topping: Folding in whipped topping (like Cool Whip) transforms the cream cheese mixture into a light, fluffy texture that complements the denser layers below.
Pumpkin Layer Ingredients
- Pumpkin Puree: The star ingredient of the dessert! Pumpkin puree is rich in natural sweetness, vibrant in color, and packed with the flavors of fall. Be sure to use pure pumpkin puree, not pumpkin pie filling, which is pre-seasoned and may alter the balance of flavors. Learn more about pumpkin puree on Wikipedia.
- Instant Vanilla Pudding Mix: This versatile ingredient gives the pumpkin layer its creamy consistency while helping it set properly. The mild vanilla flavor enhances the pumpkin without overpowering it.
- Pumpkin Pie Spice: A blend of cinnamon, nutmeg, cloves, and ginger, this spice mix infuses the dessert with a warm, aromatic flavor. If you’d like to make your own, you can find recipes on Pinterest’s Fall Desserts section.
- Cold Milk: Used to activate the pudding mix, cold milk helps achieve the perfect consistency for the pumpkin layer. Whole milk works best for a richer texture, but lower-fat options can also be used.
Topping Ingredients
- Whipped Topping: The final layer of whipped topping adds an airy, creamy finish to the dessert. It balances the spice of the pumpkin layer and creates an elegant visual appeal. For tips on whipping cream at home, visit Whipped Cream on Wikipedia.
- Chopped Nuts (Optional): Sprinkling chopped pecans or walnuts on top adds crunch and a nutty flavor that contrasts beautifully with the creamy layers. You can also toss the nuts with a touch of cinnamon sugar for an extra-special topping.
Each of these ingredients contributes to the layered pumpkin dessert’s signature taste and texture. The balance of sweetness, creaminess, and spice ensures that every bite is satisfying and perfectly seasonal. Now that you understand the ingredients, let’s move on to assembling this fall masterpiece!
How to Make the Layered Pumpkin Dessert
Now that we’ve explored the essential ingredients, it’s time to bring them together to create the ultimate layered pumpkin dessert. Follow these step-by-step instructions to ensure each layer is perfectly assembled for maximum flavor and presentation.
Step 1: Preparing the Crust
- Start by preheating your oven to 350°F (175°C). This step ensures the crust bakes evenly.
- In a medium mixing bowl, combine the graham cracker crumbs, melted butter, and granulated sugar. Stir until the mixture resembles wet sand.
- Press the mixture firmly into the bottom of a 9×13-inch baking dish to form an even crust. Use the back of a spoon or the bottom of a measuring cup to pack it tightly—this will prevent the crust from crumbling later.
- Bake the crust in the preheated oven for 10 minutes. Remove it from the oven and let it cool completely. Cooling is essential to ensure the layers above don’t melt or destabilize.
For more tips on creating a foolproof crust, you can visit Graham Cracker Crust on Wikipedia.
Step 2: Creating the Cream Cheese Layer
- While the crust cools, prepare the cream cheese layer. In a large mixing bowl, beat the softened cream cheese, powdered sugar, and vanilla extract together until smooth and creamy. Using an electric mixer on medium speed works best for achieving the right texture.
- Gently fold in 1 cup of whipped topping. This step is crucial—folding, rather than mixing, helps maintain the airy texture of the layer.
- Spread the cream cheese mixture evenly over the cooled crust. Use an offset spatula to ensure a smooth and even layer.
Step 3: Making the Pumpkin Layer
- In a separate mixing bowl, whisk together the pumpkin puree, instant vanilla pudding mix, pumpkin pie spice, and cold milk. Whisk vigorously for 2-3 minutes until the mixture thickens. The pudding mix will begin to set quickly, so be sure to work efficiently.
- Once the pumpkin mixture is thick and creamy, spread it evenly over the cream cheese layer. The contrast of the orange pumpkin against the white cream cheese creates a visually appealing dessert.
For inspiration on incorporating these flavors into other fall treats, check out the Fall Desserts collection on Pinterest.
Step 4: Adding the Topping and Final Touches
- Spread the remaining whipped topping evenly over the pumpkin layer. The whipped topping not only adds a creamy finish but also helps to seal in the moisture of the dessert.
- If desired, sprinkle chopped nuts (like pecans or walnuts) over the top for added crunch and decoration. For a festive touch, consider adding a dusting of pumpkin pie spice or cinnamon.
Step 5: Refrigeration and Setting
- Cover the dish with plastic wrap or aluminum foil and place it in the refrigerator for at least 4 hours, or preferably overnight. This refrigeration step allows the layers to fully set and the flavors to meld together.
- When ready to serve, slice into squares using a sharp knife, wiping the blade clean between cuts for neat edges.
This simple process ensures that every layer of your pumpkin dessert is perfectly balanced and beautifully presented. For more ideas on no-bake and easy desserts, check out No-Bake Desserts on Pinterest.
With these steps completed, your layered pumpkin dessert is ready to impress your family and friends. But before you serve it, let’s dive into some expert tips to elevate your dessert-making game.
Tips and Tricks for Success
Creating the perfect layered pumpkin dessert may be simple, but a few pro tips can elevate your dessert from good to outstanding. From achieving the ideal texture to exploring creative alternatives, these tricks will ensure your dessert turns out flawless every time.
1. Perfecting the Crust
- Pack it tightly: Use a flat-bottomed object, like a measuring cup or glass, to firmly press the graham cracker crumb mixture into the pan. This helps the crust hold together when slicing.
- Cool completely: Allow the crust to cool completely after baking. If it’s warm when you add the cream cheese layer, the heat may cause it to melt or separate.
- Experiment with flavors: Substitute gingersnaps or chocolate cookies for the graham crackers to customize the base. A gingersnap crust pairs beautifully with the warm spices in the pumpkin layer.
2. Achieving a Smooth Cream Cheese Layer
- Room temperature cream cheese: Make sure your cream cheese is fully softened before mixing. Cold cream cheese can result in a lumpy texture.
- Beat thoroughly, fold gently: Use an electric mixer to beat the cream cheese, powdered sugar, and vanilla extract until smooth. When adding the whipped topping, fold gently to preserve the light and fluffy texture.
3. Mastering the Pumpkin Layer
- Avoid watery puree: If you’re using homemade pumpkin puree, make sure to strain any excess liquid. Watery puree can prevent the pumpkin layer from setting properly.
- Work quickly with pudding mix: Once the instant vanilla pudding mix is combined with the milk, it thickens rapidly. Whisk vigorously and spread it immediately over the cream cheese layer.
- Customize your spices: If you want a stronger flavor, add a pinch of extra cinnamon or nutmeg to the pumpkin pie spice.
4. Topping and Decoration Ideas
- Piping whipped topping: For a more professional look, pipe the whipped topping onto the dessert using a piping bag with a star tip. This works well if you’re making individual servings in jars or cups.
- Add texture and color: Sprinkle chopped pecans, walnuts, or even toasted coconut for added crunch. A light dusting of cinnamon or nutmeg creates an elegant finishing touch.
- Festive extras: Consider adding small candy pumpkins or crumbled gingersnaps on top for a seasonal, decorative flair.
5. Storage Tips
- Refrigeration is key: This dessert must be refrigerated to maintain its structure and flavors. Keep it covered tightly with plastic wrap or foil to prevent it from drying out.
- Freeze for longer storage: If you need to prepare the dessert well in advance, it can be frozen. Wrap it tightly and store it for up to a month. Thaw overnight in the fridge before serving.
6. Serving Suggestions
- Neat slicing: Use a sharp knife and clean it with a damp towel between cuts for perfect slices.
- Pair it with drinks: Serve alongside warm beverages like spiced apple cider or pumpkin spice lattes for a cozy autumn experience.
7. Substitutions for Dietary Needs
- Gluten-free crust: Use gluten-free graham crackers or cookies for those with gluten sensitivities.
- Dairy-free alternatives: Replace cream cheese with a non-dairy version and use a coconut-based whipped topping.
- Low-sugar option: Opt for sugar-free pudding mix and reduce the amount of powdered sugar for a lighter version.
These tips ensure that your layered pumpkin dessert turns out as a visually stunning and delicious treat that everyone will enjoy. By paying attention to small details, you can confidently serve a dessert that tastes as good as it looks.
Next, let’s explore some creative variations to customize this dessert to your liking!
Creative Variations of the Recipe
The beauty of the layered pumpkin dessert lies in its versatility. While the classic recipe is a crowd-pleaser, there are countless ways to customize it based on your taste preferences, dietary needs, or the occasion. Below are some creative variations to make this dessert truly your own.
1. Chocolate Pumpkin Layered Dessert
- Swap the crust: Use crushed chocolate graham crackers or Oreo cookies instead of traditional graham crackers for a rich, chocolatey base.
- Chocolate topping: Add a drizzle of melted dark chocolate or chocolate shavings over the whipped topping for an elegant finish.
- Cocoa in the pumpkin layer: Mix a tablespoon of unsweetened cocoa powder into the pumpkin layer for a subtle chocolate flavor.
2. No-Bake Version
- Skip the oven: If you’re short on time, skip baking the crust. Instead, refrigerate it for 30 minutes after pressing it into the pan to let the butter set and hold the crust together.
- Gelatin for setting: To ensure the cream cheese and pumpkin layers hold firm without baking, you can mix a little unflavored gelatin (dissolved in water) into each layer.
For more no-bake inspiration, check out No-Bake Desserts on Pinterest.
3. Gluten-Free Option
- Use gluten-free graham crackers: These are widely available in most grocery stores and can be used as a 1:1 substitute for the crust.
- Check pudding mix: Make sure the instant vanilla pudding mix you’re using is certified gluten-free, as some brands may contain trace amounts of gluten.
- Nut-based crust: Alternatively, make a crust using ground almonds or pecans mixed with a little butter and sugar for a naturally gluten-free alternative.
4. Spiced Nut Topping
- Candied nuts: Toss chopped pecans or walnuts with cinnamon and brown sugar, then toast them in the oven. This adds a crunchy, caramelized topping that pairs beautifully with the creamy layers.
- Pumpkin seed garnish: Sprinkle roasted and salted pumpkin seeds on top for a nut-free alternative that adds crunch and ties into the pumpkin theme.
5. Individual Servings
- Mason jars or dessert cups: Assemble the dessert in small jars or clear cups for an elegant, single-serving presentation. These are perfect for parties or potlucks.
- Layer creativity: In individual servings, you can alternate layers more frequently (e.g., a layer of crust crumbs between the cream cheese and pumpkin).
6. Dairy-Free and Vegan Version
- Dairy-free substitutes: Use plant-based cream cheese and whipped topping, which are widely available in most grocery stores.
- Coconut milk: Replace the cold milk in the pumpkin layer with full-fat coconut milk for added richness.
- Crust alternatives: Use vegan graham crackers or crushed nuts as the base.
7. Holiday-Themed Variations
- Christmas twist: Add a pinch of gingerbread spice to the crust or pumpkin layer for a festive Christmas flavor.
- Halloween version: Decorate the top with candy pumpkins, chocolate bats, or orange and black sprinkles.
- Thanksgiving presentation: Serve the dessert garnished with cinnamon sticks or small autumn leaves cut from pie dough and baked until crisp.
For holiday-specific variations and ideas, browse Holiday Dessert Ideas on Pinterest.
These variations demonstrate how easily you can adapt the layered pumpkin dessert to suit different occasions and dietary preferences. Whether you’re looking for a chocolate twist, a healthier alternative, or a festive flair, this recipe provides endless opportunities for customization.
Now that we’ve covered how to make and customize this dessert, let’s move on to storage tips and how to serve it like a pro.
Storing and Serving Suggestions
Once your layered pumpkin dessert is prepared, it’s important to store it properly to maintain its flavor and texture. Knowing how to serve it neatly and creatively can also elevate the presentation, making your dessert the star of any gathering. Let’s explore the best ways to store and serve this indulgent treat.
Storage Tips
- Refrigerate Immediately: This dessert contains dairy-based layers like cream cheese and whipped topping, which need to be kept chilled to stay fresh. Cover the baking dish tightly with plastic wrap or aluminum foil to prevent it from absorbing odors in the fridge.
- Shelf Life in the Refrigerator: Stored properly, the dessert will remain fresh for 3-4 days. Be sure to keep it cold until serving to ensure the layers maintain their texture.
- Freezing the Dessert: If you want to make this dessert well in advance, it can be frozen. To freeze, wrap the dish tightly in plastic wrap, followed by a layer of aluminum foil, to prevent freezer burn. It will keep for up to 1 month.
- Thawing Instructions: Place the dessert in the refrigerator for 6-8 hours or overnight to thaw. Avoid leaving it at room temperature, as the layers may lose their structure.
- Storing Individual Portions: If you have leftovers, cut the dessert into single-serving squares and store them in airtight containers. This makes it easier to grab a portion whenever the craving strikes!
Serving Suggestions
- Slice Cleanly: To achieve neat, professional-looking squares, use a sharp knife to cut the dessert. Wipe the knife clean with a damp paper towel between each cut. This prevents smearing between the layers, ensuring every piece looks as appealing as the first.
- Serve Chilled: This dessert tastes best when served cold. The chilled layers offer a refreshing contrast to warm fall beverages like pumpkin spice lattes or hot apple cider.
- Pair with Beverages:
- A rich cup of coffee or a frothy chai latte complements the dessert’s creamy and spiced flavors.
- For a festive occasion, consider pairing it with sparkling apple cider or a spiced mulled wine.
- Garnish for Extra Flair:
- Dust the top of the dessert with a light sprinkle of pumpkin pie spice or cinnamon just before serving for a decorative touch.
- Add a dollop of freshly whipped cream on each slice and top with a candied pecan or a sprinkle of toasted coconut.
- Use edible decorations like candy pumpkins or chocolate leaves for themed events like Thanksgiving or Halloween.
- Serving Individual Portions: If you’ve prepared the dessert in mason jars or dessert cups, garnish the top of each serving with a small drizzle of caramel sauce or a sprinkle of crushed graham crackers for added texture and flavor.
- Turn It Into a Parfait: For a more creative presentation, layer the dessert ingredients in tall glasses to create a parfait. Alternate the crust, cream cheese, pumpkin, and whipped topping in multiple layers for a visually stunning and easy-to-serve dessert.
For more presentation ideas and inspiration, visit the Fall Desserts collection on Pinterest.
With proper storage and thoughtful serving techniques, you’ll ensure that every bite of your layered pumpkin dessert is as delicious as it is visually appealing. Now, let’s wrap up with answers to some of the most common questions people ask about this dessert!
FAQs: Common Questions About Layered Pumpkin Dessert
To make sure you have all the information you need to create the perfect layered pumpkin dessert, here are answers to some frequently asked questions. These tips and clarifications will help you troubleshoot any issues and customize the dessert to suit your needs.
Q1: Can I use homemade pumpkin puree instead of canned?
Absolutely! Homemade pumpkin puree can be a great alternative to canned. However, make sure your puree is thick and not watery, as excess moisture could affect the texture of the pumpkin layer. To thicken homemade puree, strain it through a fine mesh sieve or cheesecloth to remove extra liquid.
Q2: Can I prepare this dessert ahead of time?
Yes, this dessert is perfect for preparing ahead of time. In fact, it’s recommended to refrigerate it for at least 4 hours or overnight to allow the layers to fully set. Preparing it a day in advance not only saves time but also enhances the flavor as the layers meld together.
Q3: Can I substitute the graham cracker crust with something else?
Of course! While the graham cracker crust is a classic choice, you can experiment with other bases such as:
- Crushed gingersnaps for a spiced crust.
- Crushed Oreos for a chocolatey twist.
- A nut-based crust made with crushed almonds, pecans, or walnuts mixed with butter and sugar for a gluten-free option.
For more inspiration on crust alternatives, check out Graham Cracker Crust on Wikipedia.
Q4: How long will this dessert last in the fridge?
When properly stored in an airtight container or tightly wrapped, the dessert will stay fresh in the refrigerator for 3 to 4 days. After this period, the layers may begin to soften and lose their structure, so it’s best to enjoy it sooner rather than later.
Q5: Can I freeze the dessert?
Yes, the layered pumpkin dessert freezes well. Wrap it tightly to avoid freezer burn and store it for up to 1 month. When ready to serve, thaw it overnight in the refrigerator. Keep in mind that the texture of the whipped topping may change slightly after freezing, but the flavors will remain delicious.
Q6: Can I make a dairy-free version?
Yes! To make a dairy-free version of this dessert:
- Substitute cream cheese with a plant-based alternative.
- Use a non-dairy whipped topping made from coconut cream or almond milk.
- Replace the milk in the pumpkin layer with a creamy non-dairy option, such as full-fat coconut milk or oat milk.
Q7: What if I can’t find pumpkin pie spice?
If you don’t have pumpkin pie spice on hand, you can make your own using common spices found in your pantry. Combine the following:
- 1 teaspoon cinnamon
- 1/4 teaspoon nutmeg
- 1/4 teaspoon ginger
- 1/8 teaspoon cloves
This homemade blend works perfectly in the pumpkin layer and can also be used to sprinkle on top for decoration.
Q8: How can I ensure my layers don’t mix while assembling?
To create clean, distinct layers:
- Allow the crust to cool completely before adding the cream cheese layer.
- Spread each layer evenly using an offset spatula.
- Refrigerate between layers if the dessert starts to feel too soft.
Q9: Can I add extra toppings?
Yes! Toppings are a fun way to personalize this dessert. Try:
- Crushed cookies (graham crackers, gingersnaps, or Oreos).
- Caramel drizzle for added sweetness.
- Toasted coconut flakes for texture.
- Sprinkles or candy for a festive touch, especially during the holidays.
Q10: Can I make this dessert in smaller portions?
Definitely! Instead of a 9×13-inch dish, you can assemble this dessert in:
- Individual mason jars: Great for grab-and-go servings.
- Small ramekins: Perfect for portion control.
- Dessert cups: A fancy option for parties or holiday dinners.
Layered Pumpkin Dessert
This layered pumpkin dessert is the ultimate fall treat that combines rich, creamy textures with the warm, comforting flavors of autumn. Featuring a buttery graham cracker crust, a tangy cream cheese layer, a spiced pumpkin pudding layer, and a fluffy whipped topping, this no-fuss recipe is a showstopper for holidays, potlucks, and cozy family gatherings. It’s easy to prepare, requires minimal baking, and can be customized to suit a variety of preferences and dietary needs. Whether you’re celebrating Thanksgiving or simply craving a seasonal dessert, this recipe is sure to impress!
- Author: Clara
Ingredients
For the crust:
- 2 cups graham cracker crumbs
- ½ cup unsalted butter, melted
- ¼ cup granulated sugar
For the cream cheese layer:
- 8 oz (225g) cream cheese, softened
- 1 cup powdered sugar
- 1 tsp vanilla extract
- 1 cup whipped topping (like Cool Whip)
For the pumpkin layer:
- 1 (15 oz) can pumpkin puree
- 2 small boxes (3.4 oz each) instant vanilla pudding mix
- 2 tsp pumpkin pie spice
- 2 cups cold milk
For the topping:
- 2 cups whipped topping (like Cool Whip)
- ¼ cup chopped nuts (optional)
Instructions
Preheat your oven to 350°F (175°C).
In a bowl, mix graham cracker crumbs, melted butter, and granulated sugar. Press the mixture into the bottom of a 9×13-inch baking dish to form the crust. Bake for 10 minutes, then let it cool completely.
In a separate bowl, beat the softened cream cheese, powdered sugar, and vanilla extract until smooth. Fold in the whipped topping. Spread this mixture evenly over the cooled crust.
In another bowl, whisk together pumpkin puree, instant vanilla pudding mix, pumpkin pie spice, and cold milk until thick and creamy. Spread the pumpkin mixture over the cream cheese layer.
Top the dessert with the remaining whipped topping. Sprinkle with chopped nuts if desired.
Refrigerate for at least 4 hours or overnight to set before serving.
Notes
Tips for Success:
- Cool the crust completely before layering to ensure stability and prevent the cream cheese from melting.
- Use cold milk to achieve the right consistency for the pumpkin pudding layer.
- Gently fold in the whipped topping for a light and airy cream cheese layer, rather than stirring or mixing vigorously.
Storage Tips:
- Refrigerate the dessert for at least 4 hours (or overnight) to allow the layers to set properly.
- Leftovers can be stored in an airtight container in the fridge for up to 3-4 days.
- For long-term storage, wrap tightly and freeze for up to 1 month, then thaw in the refrigerator before serving.
Substitutions and Variations:
- For a gluten-free version, use gluten-free graham crackers or a nut-based crust.
- To make it dairy-free, use plant-based cream cheese, non-dairy whipped topping, and a milk alternative like almond or coconut milk.
- Add a twist by using gingersnap cookies or chocolate cookies for the crust.
Customization Ideas:
- Create individual servings in mason jars or dessert cups for a party-friendly option.
- Drizzle caramel sauce or sprinkle chopped nuts on top for an extra layer of flavor and texture.
- For a festive touch, garnish with candy pumpkins, pumpkin pie spice, or a light dusting of cinnamon.
Perfect Pairings:
- Enjoy with a warm drink like pumpkin spice lattes, hot apple cider, or chai tea.
- Serve alongside other fall classics, such as spiced muffins or apple crisp, for a seasonal dessert spread.