1. Craving restaurant-style hibachi at home? With our Ultimate Guide to Hibachi, you’ll bring authentic grill-and-chill flavors straight to your own kitchen, whether you’re hosting friends for a weekend feast or enjoying a solo cooking adventure. By equipping yourself with the right tools—from a sturdy hibachi grill to essential teppanyaki spatulas—and mastering simple techniques like marinating chicken in soy sauce and sesame oil, you can create sizzling platters of perfectly seared chicken, tender sautéed vegetables, and creamy yum yum sauce just like the pros. Dive deeper into hibachi grill basics, explore traditional Teppanyaki cooking methods and plating styles, and round out your menu with expert tips on vegetable stir-fries, chicken nutrition facts, and inspired side-dish ideas. Finally, trace hibachi’s origins and build your confidence with our complete guide to essential hibachi equipment and classic sauces, so every home-cooked hibachi night feels like a trip to your favorite grill spot.

2. History & Origins of Hibachi Cooking
The word “hibachi” literally combines the Japanese characters for “fire” and “bowl,” a nod to the small, portable charcoal grills that once kept families warm during tea ceremonies and seasonal gatherings. Originally designed for mobility and even heat distribution, these cast-iron braziers were fixtures at local festivals long before teppanyaki-style cooking emerged. In the aftermath of World War II, inventive chefs in Osaka and Tokyo replaced charcoal with large, flat iron griddles, transforming humble hibachi into the theatrical performance art we associate with today’s teppanyaki restaurants.
By the 1960s, this sizzling spectacle had crossed oceans: Japan’s first teppanyaki houses opened in New York, introducing American diners to interactive meals where chefs diced vegetables and flipped shrimp with dramatic flair. Resorts and hotels soon expanded on the concept, pairing live cooking demonstrations with signature sauces—most famously, creamy yum yum—alongside vibrant vegetable medleys. As cooking shows gained popularity on television, hibachi and teppanyaki chefs became household names, cementing these techniques in global culinary culture.
Understanding hibachi’s journey—from charcoal “fire bowls” in traditional gatherings to high-heat iron griddles and international dining phenomena—adds depth and authenticity to your own home-cooked hibachi adventures. Whether you’re recreating classic teppanyaki moves or experimenting with modern flavor combinations, this rich history underscores every sizzle and flip on your countertop grill.
3. Essential Hibachi Equipment & Tools
Before firing up the grill, assemble the right toolkit by making sure you have a reliable heat source—such as a flat-top griddle or a nonstick skillet—along with sturdy metal spatulas, turners, and squeeze bottles for sauces and oils. Add an instant-read thermometer for checking doneness and small prep bowls for mise en place, choose durable, dishwasher-safe utensils that can withstand high heat, and arrange your workspace with ingredient bowls and squeeze bottles close at hand to streamline cooking flow and simplify cleanup.
4. Ingredient Deep Dive
Mastering hibachi chicken, sautéed vegetables, and umami-rich sauces starts with selecting top-quality ingredients and understanding their impact on texture, aroma, and nutritional profile. Proper cuts and freshness ensure optimal moisture, caramelization, and flavor retention under high-heat cooking. This deep dive into each ingredient category equips you to craft balanced, restaurant-quality plates at home. Let’s explore each core component in detail.
Inspired by hibachi grill basics and refined through the Teppanyaki cooking overview, these ingredients form the foundation of every recipe.
Chicken
- Cut & Quality: Use boneless, skinless chicken breasts or thighs for uniform searing.
- Preparation: Bring pieces to room temperature for even cooking.
- Fat Content: Thighs offer richer taste, while breasts yield leaner results.
Explore chicken nutrition facts and browse hibachi chicken inspiration to refine your selection. Then continue to Step-by-Step Hibachi Chicken Recipe to apply these choices.
Vegetables
- Best Picks: Onion, zucchini, mushroom, carrot for vibrant color and crunch.
- Cut Size: Uniform ½-inch slices ensure consistent tenderness.
- Dry Thoroughly: Pat veggies dry to prevent steaming and boost caramelization.
Learn more about vegetable stir-fry techniques or see teppanyaki plating styles.
Fats & Oils
- Sesame Oil: Adds a nutty aroma and deep flavor.
- Butter: Provides richness and helps achieve a golden crust.
- Neutral Oils: Use canola or grapeseed oil for higher smoke points.
Read about sesame oil applications and soy sauce overview to balance flavors.
Aromatics & Seasonings
- Garlic & Ginger: Mince finely for even flavor distribution.
- Green Onions: Separate white and green parts to layer freshness.
- Sugar, Salt & Pepper: Essential for taste balance and caramelization.
- Optional Spices: Paprika, chili paste, or Sriracha for heat.
Check out our Yum Yum sauce ideas and revisit Essential Hibachi Equipment & Tools. Finally, see our History & Origins for context. Happy cooking.
5. The Magic of Yum Yum Sauce
Transform any hibachi chicken or sautéed vegetable platter with homemade yum yum sauce, a creamy condiment bursting with umami and tang. Simple ingredients combine for a versatile dip that elevates every bite.
Classic recipes blend:
- Mayonnaise base for smooth creaminess
- Ketchup or tomato paste for sweet acidity
- Rice vinegar to add tang
- Paprika and garlic powder for depth
- Optional Sriracha or chili paste for heat
Explore variations and storage tips on yum yum sauce ideas or refine your taste with our soy sauce overview and sesame oil applications, enhancing richness without overpowering. Check portion size using chicken nutrition facts and improve efficiency with tools from hibachi cooking tools guide. Revisit the in-depth Ingredient Deep Dive for precise measurements.
Pair your sauce with techniques from our Step-by-Step Hibachi Chicken Recipe and plate like a pro using teppanyaki plating styles informed by the Teppanyaki cooking overview. For veggie sides, explore vegetable stir-fry techniques or draw inspiration from hibachi chicken inspiration. Finally, anchor your experience in tradition by reviewing Hibachi grill basics.
Its bright balance of sweet, savory, and creamy notes makes it an indispensable Japanese-style sauce that complements grilled proteins and vegetables alike. Store in an airtight container up to one week.

6. Step-by-Step Hibachi Chicken Recipe
Creating juicy hibachi chicken relies on a simple marinade and precise high-heat cooking. Follow these steps to achieve perfect sear and moisture retention. This recipe yields flavorful morsels infused with umami from soy sauce, sesame oil, and aromatic spices. Let’s begin.
- Prepare marinade by whisking together soy sauce, sesame oil, melted butter, minced garlic, grated ginger, sugar, salt, and pepper.
- Reserve one tablespoon of marinade for a finishing drizzle.
- Coat 1½ lb of room-temperature chicken pieces evenly, then rest 10–15 minutes.
- Preheat a flat-top griddle or nonstick skillet until it smokes faintly.
- Spread chicken in a single layer and let it sear undisturbed for 2 minutes.
- Stir or flip pieces, maintaining high heat, until interior reaches 165 °F (74 °C) on an instant-read thermometer.
- During the last minute, add sliced green onion whites and toss to soften slightly.
- Transfer chicken to a platter, drizzle with reserved marinade, and sprinkle green onion tops.
Incorporate lessons from our Ingredient Deep Dive to select optimal cuts, and ensure consistent caramelization. If you need visual guidance on spatulas or grill setup, refer back to Essential Hibachi Equipment & Tools. For best results, maintain a clear workspace and use squeeze bottles to apply oils or additional sauce precisely. Serve immediately alongside sautéed vegetables or steamed rice for an interactive meal reminiscent of classic teppanyaki experiences. The key to signature hibachi flavor lies in temperature control, proper ingredient timing, and that final hit of umami-rich sauce.
7. How to Sauté Vegetables Hibachi-Style
Perfect sautéed vegetables complement hibachi chicken by adding crispness, vibrant color, and balanced nutrition. Key factors include uniform cuts, proper heat, and timing to retain crunch and flavor.
- Choose firm vegetables like zucchini, mushrooms, onions, and carrots.
- Slice into consistent ½-inch pieces for even cooking.
- Pat vegetables completely dry to encourage caramelization.
- Preheat a clean section of your griddle or skillet over medium-high heat.
- Add a blend of neutral oil and a small drizzle of sesame oil for aroma.
- Stir-fry in quick, continuous motions, keeping vegetables moving.
- Season mid-cook with salt, pepper, and a dash of garlic powder.
- Transfer to a serving dish as soon as edges begin to brown.
For plating inspiration, revisit our Teppanyaki cooking overview and explore vegetable stir-fry techniques to refine presentation. Use vibrant garnishes like chopped cilantro or sesame seeds to elevate visual appeal.
8. Pro Tips for Perfect Hibachi Cooking
Elevate your hibachi skills with insider techniques that guarantee consistent results. Focus on temperature control, ingredient readiness, and audience engagement to recreate the dynamic interactive dining experience.
- Preheat zones: designate a sear zone (high heat) and a finish zone (medium heat).
- Dry chicken and vegetables completely to prevent steaming and ensure crisp edges.
- Avoid overcrowding the surface, which lowers temperature and inhibits caramelization.
- Keep utensils and squeeze bottles within reach for seamless transitions.
- Stir-fry aromatics like garlic and ginger briefly on the side before adding main ingredients.
- Incorporate a small pat of butter or a drizzle of sesame oil at the end for a rich aroma.
- Clean spatula edges between flips to avoid burnt residue transfer.
- Use visual cues—light browning and sizzling sounds—to assess doneness without a thermometer.
For detailed equipment recommendations, revisit Essential Hibachi Equipment & Tools. Browse hibachi cooking tools guide to visualize professional setup options.
9. Serving & Presentation Ideas
Presentation transforms hibachi dishes into a feast for the eyes. Arranging elements thoughtfully enhances perceived flavor and encourages interactive dining. Use contrasting colors, textures, and garnishes to highlight signature components.
- Serve chicken and vegetables on a warm, flat platter to maintain heat.
- Create a rice or noodle bed and arrange ingredients in neat rows.
- Add lemon wedges for brightness and guests to customize acidity.
- Sprinkle chopped green onion tops and toasted sesame seeds for contrast.
- Drizzle extra yum yum sauce artistically around the perimeter.
- Use vibrant vegetables like red bell peppers or purple cabbage for color pop.
- Place squeeze bottles of sauces on the side for DIY flavor boosts.
- Garnish with fresh herbs like cilantro or parsley to elevate aroma.
Refer back to our Step-by-Step Hibachi Chicken Recipe for plating sequence and explore teppanyaki plating styles to inspire creative layouts. Serve on heated stone platters for dramatic flair with garnishes.
10. Common Mistakes & Troubleshooting
Even experienced home chefs can stumble when trying to nail hibachi-style cooking, but a few simple adjustments make all the difference. First, always pat chicken and vegetables completely dry before they hit the griddle—wet ingredients steam rather than sear, so thorough drying is essential. Avoid overcrowding the cooking surface, since piling on too many pieces traps steam and robs the griddle of heat; instead, cook in batches to maintain a consistent sizzle. Keep the temperature in check—too low, and you won’t form a proper crust; too high, and you risk burning your food—so listen for that steady, clear sear. Measure your marinade ingredients precisely: too much sauce will burn on the hot metal, while too little leaves your chicken bland. Make sure your spatulas and turners are clean and sharp, as dull or dirty tools can cause sticking and make flipping awkward. Pay attention to timing, too—flipping too often breaks your crust, but waiting too long leads to charring—so develop a feel for the right rhythm. Finally, trust your nose: if garlic or ginger starts to smell scorched, dial back the heat or remove those aromatics immediately. With attentive technique and a bit of practice, you’ll build both confidence and consistently delicious hibachi results.

11. FAQ
What is the difference between hibachi and teppanyaki? Hibachi refers to a small, portable charcoal cooking device, whereas teppanyaki describes the style of cooking on a flat iron griddle, often performed tableside.
Can I make yum yum sauce ahead of time? Yes; you can prepare yum yum sauce up to one week in advance and store it in an airtight container in the refrigerator.
What temperature should hibachi chicken reach? Use an instant-read thermometer to ensure chicken reaches an internal temperature of 165 °F (74 °C) for both optimal flavor and food safety.
How do I prevent vegetables from getting soggy? Thoroughly dry your vegetables before cooking, use high heat, and stir continuously so they sear quickly and retain a crisp texture.
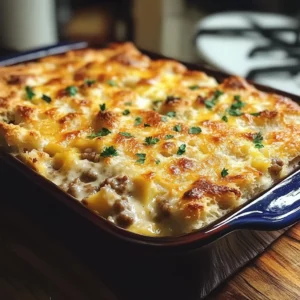
PrintHow to Make Hibachi Chicken and Vegetables at Home: A Step-by-Step Guide

Experience the thrill of hibachi cooking at home with this foolproof recipe for tender chicken seared to golden perfection and paired with vibrant sautéed vegetables. A velvety yum yum sauce—rich, tangy, and subtly spiced—ties every bite together, delivering the unmistakable umami punch of a Japanese steakhouse straight to your table.
Ingredients
- 1½ lb (680 g) boneless, skinless chicken breasts, cut into bite-sized pieces
- 2 Tbsp soy sauce
- 1 Tbsp sesame oil
- 2 Tbsp unsalted butter
- 2 cloves garlic, finely minced
- 1 tsp fresh ginger, grated
- 1 tsp granulated sugar
- ½ tsp kosher salt
- ⅛ tsp freshly ground black pepper
- 2 green onions, sliced (white and green parts separated)
- Lemon wedges, for serving
Instructions
Melt the butter in a small bowl and whisk in the soy sauce, sesame oil, garlic, ginger, sugar, salt, and pepper until the sugar dissolves and the mixture is smooth. Reserve a tablespoon of the sauce for garnish.
Toss the chicken pieces in the remaining sauce until each piece is well coated. Let the chicken marinate briefly at room temperature while you heat your pan or griddle.
Heat a large nonstick skillet or hibachi griddle over medium-high heat until very hot. Add the chicken in a single layer, searing without moving for about 2 minutes to develop a golden crust.
Stir or flip the chicken pieces and continue cooking, stirring occasionally, until they’re cooked through and register 165 °F (74 °C) on an instant-read thermometer, about 4–5 more minutes.
Add the white parts of the sliced green onions to the pan and toss with the chicken for the last minute of cooking, until slightly softened. Remove from heat.
Transfer the chicken to a serving platter, drizzle with the reserved sauce, and sprinkle with the green parts of the green onions. Serve immediately with lemon wedges on the side.
Notes
-
Temperature Tips: Preheat your griddle or skillet until it’s just shy of smoking—this high heat is crucial for that signature crust.
-
Uniform Cuts: Aim for 1–1½-inch chicken pieces and ½-inch vegetable slices to ensure simultaneous doneness.
-
Marinade Balance: If your sauce leans too salty, add a teaspoon of honey or mirin; too sweet, stir in a few drops of rice vinegar.
-
Oil Management: Brush the surface with neutral oil between batches to maintain a slick cooking plane without excess smoke.
-
Garnish Variations: Swap green onions for chives or Thai basil for an aromatic twist.
-
Plating Hack: Serve on pre-warmed plates or over a bed of garlic fried rice to lock in heat and flavor.
-
Dietary Swaps: Use low-fat mayo or Greek yogurt in your sauce and swap chicken for tofu or shrimp to suit dietary preferences.
-
Cleanup Shortcut: Line your griddle’s drip tray with foil for quick post-cook cleanup.