The Takeout Fakeout Trend
Craving sweet and sour chicken but want to skip the takeout? You’re not alone. In recent years, more home cooks have embraced the takeout fakeout trend—a growing movement to recreate popular restaurant dishes at home. This approach not only satisfies cravings but also offers greater control over ingredients and nutrition.
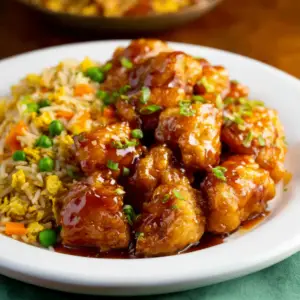
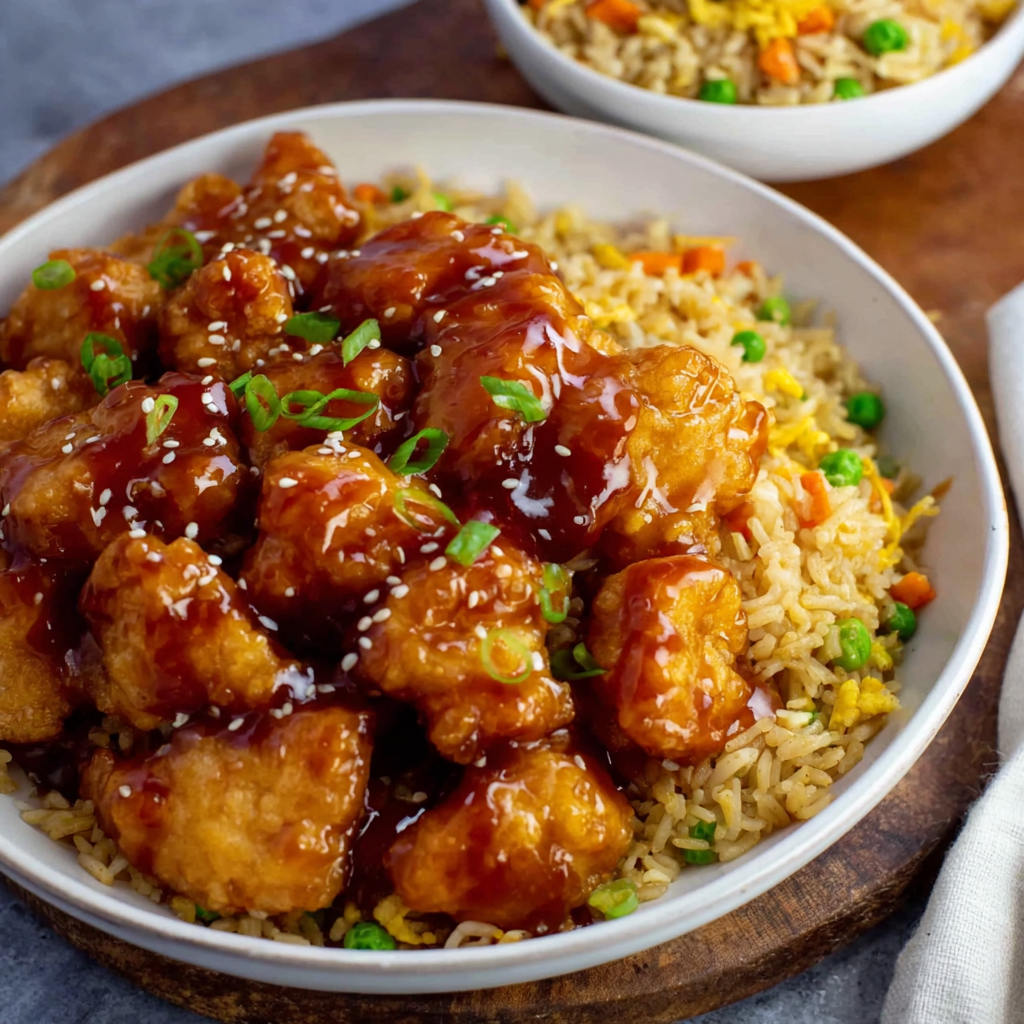
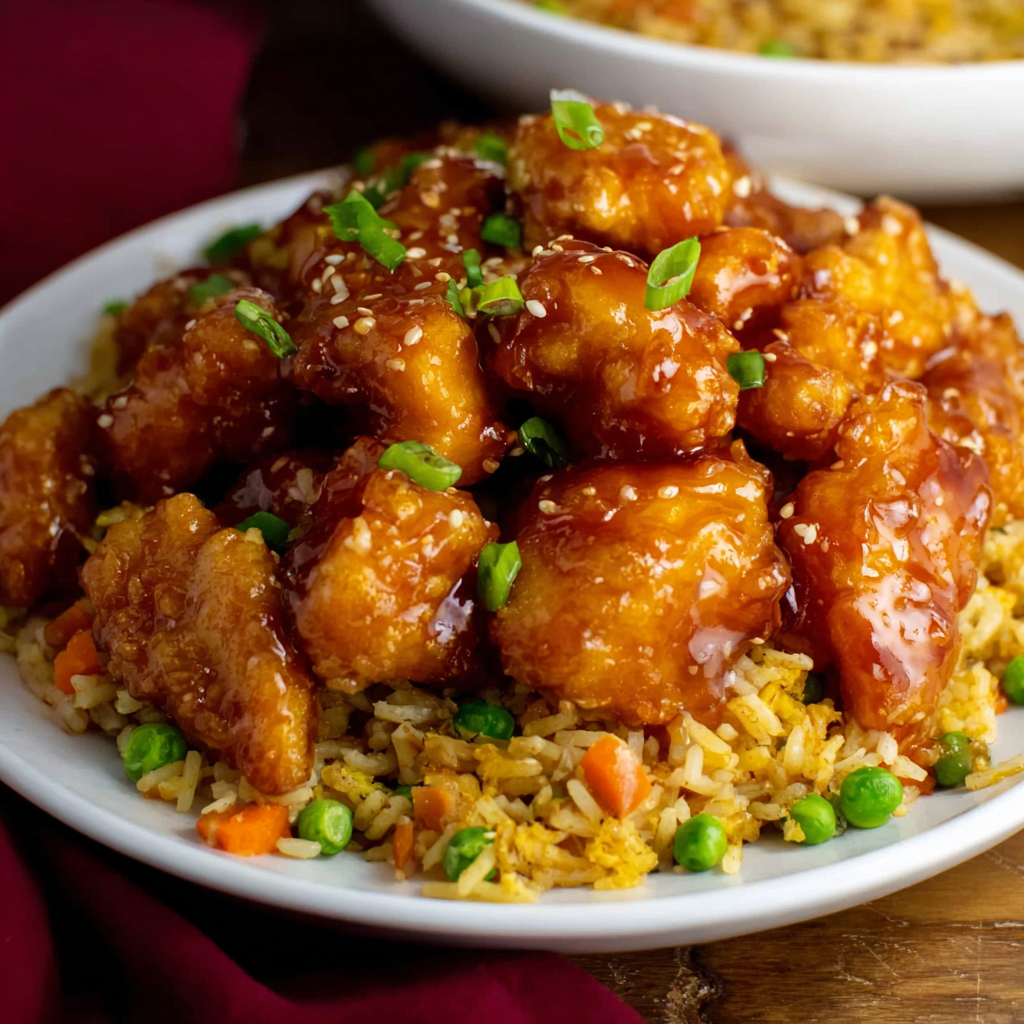
Making homemade sweet and sour chicken delivers the same bold, tangy-sweet flavor you expect from Chinese takeout, but without the extra grease, mystery additives, or steep price tag. With a few pantry staples and just 30 minutes, you can whip up a meal that rivals your favorite restaurant’s version. The best part? It’s family-approved, perfect for leftovers, and surprisingly simple to prepare, even on a busy weeknight.
This easy sweet and sour chicken recipe features tender, crispy chicken bites coated in a vibrant sauce made with pantry ingredients like ketchup, vinegar, and a touch of sugar. Add in pineapple chunks, bell peppers, and onions for texture and a pop of freshness. For more information on the science of sweet and sour flavor combinations, check out what sweet and sour means on Wikipedia.
If you’re interested in exploring more fast and satisfying dinner ideas like this one, visit this collection of quick dinner inspiration on Pinterest. Keep reading to learn why this meal is a weeknight favorite and how to make it effortlessly at home.
Why You’ll Love This 30-Minute Sweet and Sour Chicken
This 30-minute sweet and sour chicken is more than just a quick dinner—it’s a reliable recipe that checks all the right boxes for flavor, convenience, and flexibility. Whether you’re feeding a family, prepping meals for the week, or just craving a healthier take on a classic, this dish delivers every time.
Here’s why it stands out:
-
Quick and Easy: With minimal prep and cook time, this recipe fits perfectly into any busy evening routine. You can even speed things up more by pre-chopping your veggies or using pre-cut chicken.
-
Budget-Friendly: All the ingredients are affordable and easy to find at any grocery store. Swapping takeout for this homemade version can save you money while giving you more servings. Plus, the sauce uses common pantry items like soy sauce, ketchup, and sugar, so there’s no need for a special grocery run.
-
Meal-Prep Friendly: This recipe holds up well in the fridge and reheats beautifully, making it ideal for weekday lunches or planned leftovers. For more ideas on how to use this recipe in your weekly planning, check out this Pinterest board for sweet and sour chicken meal prep.
-
Customizable Flavors: You can adjust the sweetness, tanginess, or spice level to match your preference. Want more heat? Add chili flakes. Prefer it tangier? Use more rice vinegar. Learn more about the versatility of rice vinegar in cooking by visiting this rice vinegar explained article on Wikipedia.
-
Family-Friendly: The combination of crispy chicken and sweet sauce is a hit with kids and adults alike. Serve it over white or brown rice, or even noodles, to satisfy any appetite.
With its satisfying crunch, glossy sauce, and vibrant colors, this dish doesn’t just taste amazing—it looks just like something you’d order from your favorite Chinese restaurant. Only this time, it’s made by you, in your own kitchen, in under half an hour.
Ingredients Breakdown
Creating homemade sweet and sour chicken starts with a handful of accessible, affordable ingredients. Each element serves a purpose—either delivering flavor, building texture, or contributing to the vibrant finish that makes this dish a takeout classic.
For the Chicken:
-
Chicken breast or thighs: While boneless, skinless chicken breast is lean and cooks quickly, chicken thighs offer extra juiciness and a richer flavor. Both work well, depending on your preference.
-
Cornstarch: Essential for creating a light, crispy coating. It’s what gives the chicken that signature crunch without deep-frying. Learn more about how stir-frying works here.
-
Eggs: Binding the cornstarch to the chicken and adding extra crispiness during pan-frying.
-
Salt and pepper: Simple seasoning that allows the sweet and sour sauce to shine.
-
Vegetable oil: Used for shallow frying. It’s neutral in flavor and helps achieve a golden, crisp exterior.
For the Sauce:
-
Sugar: Adds the “sweet” to the sauce. You can reduce the amount slightly if you prefer a less sugary result.
-
Ketchup: Adds tang, color, and body to the sauce. It also contains vinegar and sugar, which support the balance of flavors.
-
Vinegar: Rice vinegar or white vinegar delivers the essential tanginess. Rice vinegar is milder and more traditional in Asian-style sauces.
-
Soy sauce: Adds umami and depth. Opt for low-sodium if desired.
-
Garlic powder: Easy to use and evenly distributes garlic flavor without the risk of burning.
-
Cornstarch slurry (optional): For thickening the sauce to your liking. This ensures it clings to every piece of chicken and vegetable.
Optional Add-ins:
-
Red and green bell peppers: Provide crunch, color, and a fresh sweetness that complements the sauce.
-
Onion: Adds aromatic depth and a bit of sharpness.
-
Pineapple chunks: A sweet, juicy contrast to the tangy sauce and savory chicken. Canned works fine, but fresh adds more texture and brightness. Read about the benefits of pineapple in cooking here.
This combination creates a full-flavored dish that’s vibrant, texturally diverse, and just as satisfying as your favorite takeout.
Step-by-Step Cooking Instructions
Bringing this sweet and sour chicken fakeout together is easy and efficient. Follow these steps for a flawless finish every time:
1. Prep the Chicken:
-
Cut boneless, skinless chicken breasts into bite-sized cubes.
-
Season with salt and pepper.
-
Dredge each piece in cornstarch, ensuring an even coating.
-
Dip each coated piece into beaten eggs. This double coating ensures a crispy, golden finish.
2. Cook the Chicken:
-
Heat vegetable oil in a large skillet over medium-high heat.
-
Working in batches, pan-fry the chicken until all sides are golden and crispy.
-
Remove and drain on paper towels.
3. Make the Sauce:
-
In a bowl, whisk together sugar, ketchup, vinegar, soy sauce, and garlic powder.
-
If using, mix cornstarch with cold water in a separate cup to form a slurry.
4. Sauté the Veggies:
-
In a clean skillet or wok, add a small amount of oil.
-
Sauté the chopped red and green bell peppers, onion, and pineapple chunks for 3–4 minutes until slightly tender.
5. Combine Everything:
-
Return the cooked chicken to the skillet with the vegetables.
-
Pour the sauce over the top.
-
Stir well to coat everything evenly.
6. Simmer and Finish:
-
Bring the sauce to a simmer and cook for 5–7 minutes.
-
If thicker sauce is desired, stir in the cornstarch slurry and cook an additional 1–2 minutes.
-
Serve hot over steamed jasmine rice, brown rice, or noodles.
Want more inspiration for healthy home-cooked dinners? Browse this board of healthy chicken dinner ideas.
Optional Add-ins & Customizations
This recipe is highly adaptable, allowing you to personalize it to your taste or dietary needs.
-
Add vegetables: Broccoli, carrots, sugar snap peas, or baby corn add nutrition and texture.
-
Make it spicy: Stir in red chili flakes, a drizzle of sriracha, or diced jalapeños.
-
Swap proteins: Try it with shrimp, tofu (for a vegan option), or even tempeh. For more on meal variety, explore Asian meal prep ideas.
-
Go low-carb: Serve with cauliflower rice or lettuce wraps.
-
Add crunch: Sprinkle sesame seeds or chopped cashews on top before serving.
For more creative takeout fakeout recipes, visit this collection on homemade takeout recipes.
Meal Prep Tips & Storage Info
Making this dish ahead of time is simple and smart. Here’s how to prep and store it like a pro:
-
Storage containers: Use BPA-free, leak-proof containers with separate compartments for rice and chicken to maintain texture.
-
Refrigeration: Store in the fridge for up to 4 days.
-
Freezing: Freeze individual portions without rice for up to 2 months. Thaw overnight in the fridge before reheating.
-
Reheating: Use a microwave or skillet. If using a microwave, reheat in short bursts and stir halfway through to ensure even heating.
For more meal prep guidance, explore the basics of meal prep and how it helps streamline your week.
Is This Healthier Than Takeout?
Yes, homemade sweet and sour chicken is significantly healthier than most takeout versions. Here’s why:
-
Less oil: This recipe uses shallow pan-frying, not deep frying, so it cuts down on fat and calories.
-
Controlled sugar and sodium: You decide how much sugar and soy sauce to use. Low-sugar ketchup and low-sodium soy sauce make it even better.
-
No additives: Unlike restaurant versions, this dish contains no MSG or preservatives.
-
Fresh ingredients: You’re using fresh vegetables and lean proteins without relying on processed shortcuts.
Compare it to typical takeout, which often contains double the oil and sugar, and it’s easy to see why this homemade version is a smart swap.
Baking Instead of Pan-Frying
Want an even easier and lower-fat method? Bake the chicken instead of frying it.
-
How to bake: After coating the chicken in cornstarch and egg, place it on a parchment-lined baking sheet. Lightly spray with oil and bake at 400°F (200°C) for 20–25 minutes, flipping halfway through.
-
Benefits of baking: This method is hands-off, healthier, and reduces cleanup. It also makes bulk cooking easier for meal prep.
-
Texture differences: While baked chicken won’t be as crispy as pan-fried, it still holds up well once coated in sauce.
This method makes the recipe ideal for batch cooking. See this guide to takeout fakeout recipes for more oven-friendly ideas.
Sweet and Sour Sauce Variations
Switching up your sauce is a great way to keep the meal exciting throughout the week.
-
Use pineapple juice: Replace part of the vinegar with pineapple juice for added sweetness and a more tropical flavor.
-
Add hoisin or oyster sauce: These bring more depth and complexity.
-
Use honey instead of sugar: A natural sweetener with rich flavor.
-
Make it spicy: Add sambal oelek or chili oil.
-
Vegan-friendly swaps: Use tofu instead of chicken and replace egg with plant-based milk when coating.
For more inspiration, browse Asian meal prep boards for flavor pairing ideas.
How to Serve It
Pair this dish with a simple base and optional sides for a complete, satisfying meal.
-
Base options:
-
Steamed white rice
-
Brown rice for more fiber
-
Stir-fried noodles
-
Cauliflower rice for low-carb
-
-
Garnishes:
-
Sliced green onions
-
Toasted sesame seeds
-
Fresh cilantro
-
-
Side dishes:
-
Wonton soup
-
Steamed dumplings
-
Stir-fried veggies like bok choy or green beans
-
Discover more ways to plate your meal with this collection of Asian meal presentation tips.
Sweet and Sour Chicken for Meal Prep
This recipe is tailor-made for meal prep. Here’s how to get the best results:
-
Portion smart: Divide into individual servings of chicken and rice. Keep the sauce separate if you want the chicken to stay crispy.
-
Flavor rotation: Vary the veggies and swap the sauce (teriyaki, orange, or sesame) to change it up through the week.
-
Storage tips: Use microwave-safe containers and label with date. Eat within 3–4 days for best taste.
Check out this curated board of Asian meal prep ideas to level up your weekly lunches.
Common Mistakes to Avoid
To get the best results, avoid these common pitfalls:
-
Overcrowding the pan: It causes steaming instead of crisping.
-
Skipping the coating steps: Without cornstarch and egg, the chicken won’t crisp properly.
-
Not thickening the sauce: If you skip the simmer or slurry, the sauce may be watery.
-
Too much vinegar or sugar: Balance is key—adjust slowly and taste as you go.
FAQs
Can I use chicken thighs instead of breasts?
Yes, thighs are juicier and add more flavor. Just trim the excess fat before cooking.
Is sweet and sour chicken healthy?
When made at home, yes. You can control oil, sugar, and sodium.
What is sweet and sour sauce made of?
Typically, sugar, vinegar, ketchup, soy sauce, and garlic powder form the base.
Can I make this gluten-free?
Yes—use tamari or gluten-free soy sauce and a gluten-free cornstarch alternative.
How long can I store this in the fridge?
Up to 4 days in airtight containers.
Can I freeze sweet and sour chicken?
Yes. Freeze before adding the sauce for best texture.
Can I air fry the chicken instead?
Absolutely. Coat as directed, then air fry at 380°F (193°C) for 12–15 minutes.
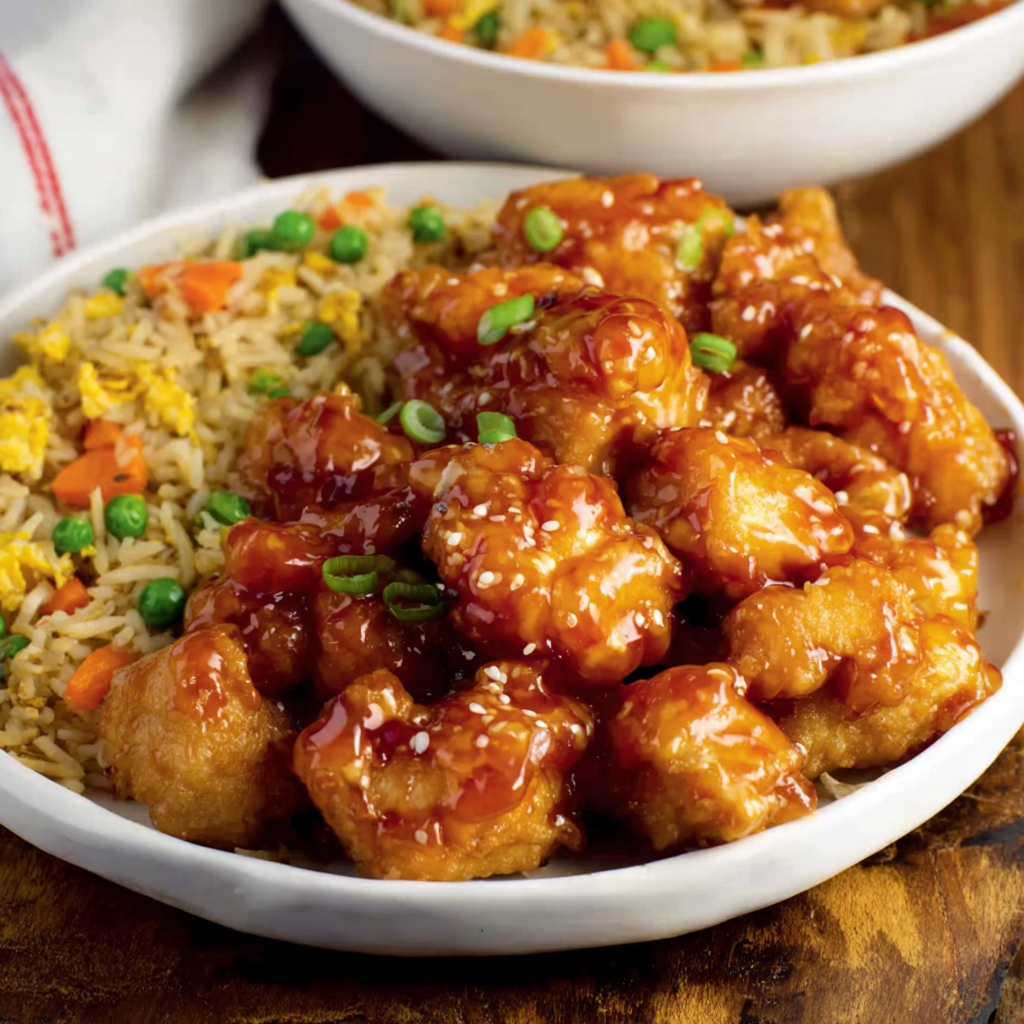
Easy Sweet and Sour Chicken Takeout Fakeout in 30 Minutes

This easy sweet and sour chicken is a 30-minute takeout fakeout that brings crispy chicken bites tossed in a tangy, homemade sauce together with pineapple, peppers, and onion. Perfect for busy nights, it’s flavorful, family-friendly, and ideal for meal prep. Serve over steamed rice and finish with sesame seeds and green onions for a restaurant-quality meal at home.
- Author: Clara
Ingredients
For the chicken:
- 1 ½ lbs boneless, skinless chicken breast, cut into bite-sized pieces
- 1/2 cup cornstarch
- 2 large eggs, beaten
- Salt and pepper to taste
- 1/3 cup vegetable oil (for frying)
For the sauce:
- 1/2 cup sugar
- 1/4 cup ketchup
- 1/2 cup rice vinegar or white vinegar
- 1 tbsp soy sauce
- 1 tsp garlic powder
- 1 tbsp cornstarch mixed with 2 tbsp cold water (optional, for thickening)
Optional add-ins:
- 1 red bell pepper, chopped
- 1 green bell pepper, chopped
- 1 small onion, chopped
- 1 cup pineapple chunks (canned or fresh)
Instructions
- Season the chicken pieces with salt and pepper.
- Coat each piece of chicken in cornstarch, then dip into the beaten eggs.
- Heat the vegetable oil in a large skillet over medium-high heat. Add the coated chicken pieces and cook until golden and crispy on all sides. Work in batches if needed.
- Remove the chicken from the skillet and set aside on a paper towel-lined plate.
- In a medium bowl, whisk together the sugar, ketchup, vinegar, soy sauce, and garlic powder.
- In a large clean skillet or wok, optionally sauté the chopped bell peppers, onion, and pineapple chunks for 3–4 minutes.
- Add the cooked chicken to the skillet, then pour the sauce over everything. Stir to coat evenly.
- Bring to a simmer and cook for 5–7 minutes, until the sauce thickens slightly. If you prefer a thicker sauce, stir in the cornstarch-water mixture and cook for 1–2 more minutes.
- Serve hot over steamed rice.
Notes
-
Pineapple juice swap: For extra depth, use the juice from canned pineapple in the sauce.
-
Batch cooking: Double the recipe and freeze extra portions without rice.
-
Gluten-free tip: Use tamari instead of soy sauce and ensure all other ingredients are certified gluten-free.
-
Crisp tip: Let chicken sit for 2–3 minutes before tossing in sauce to retain crunch.
-
Storage: Keeps well in the fridge for 3–4 days and freezes beautifully.