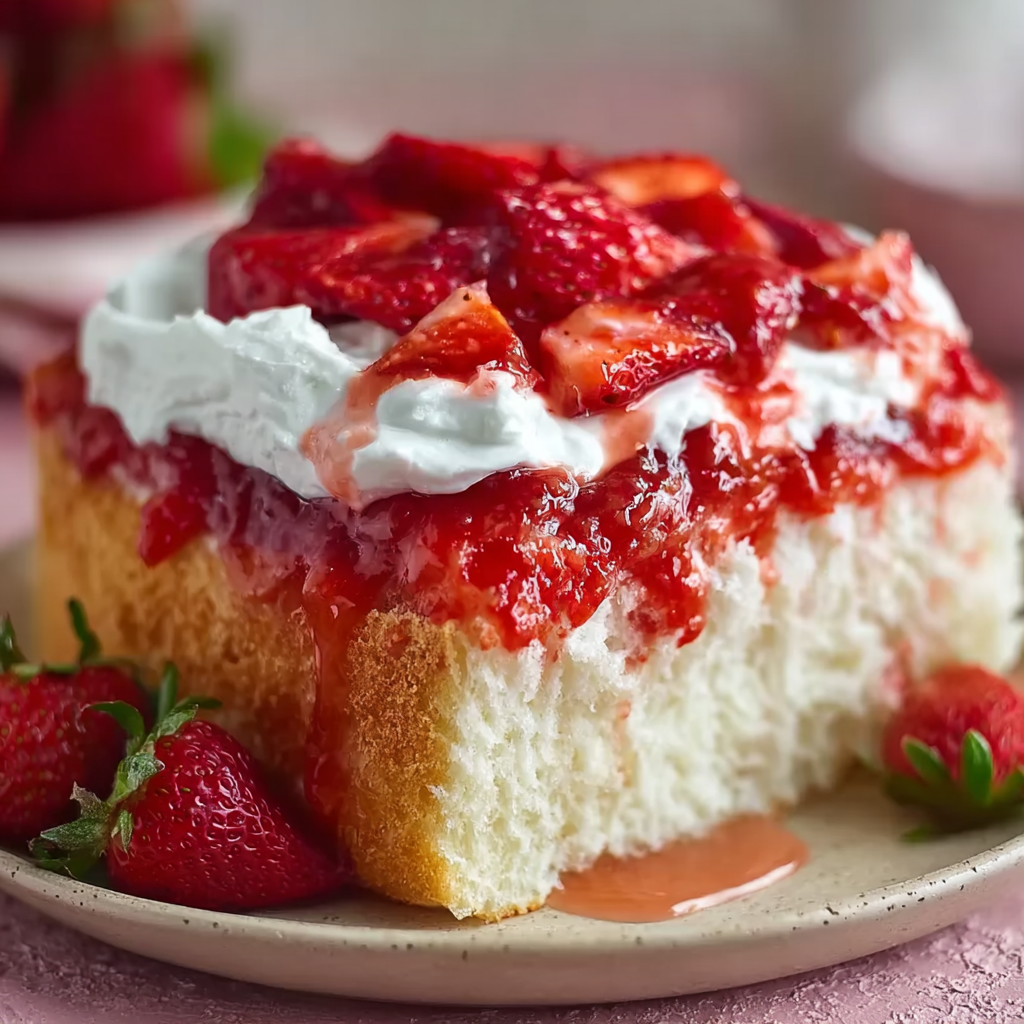
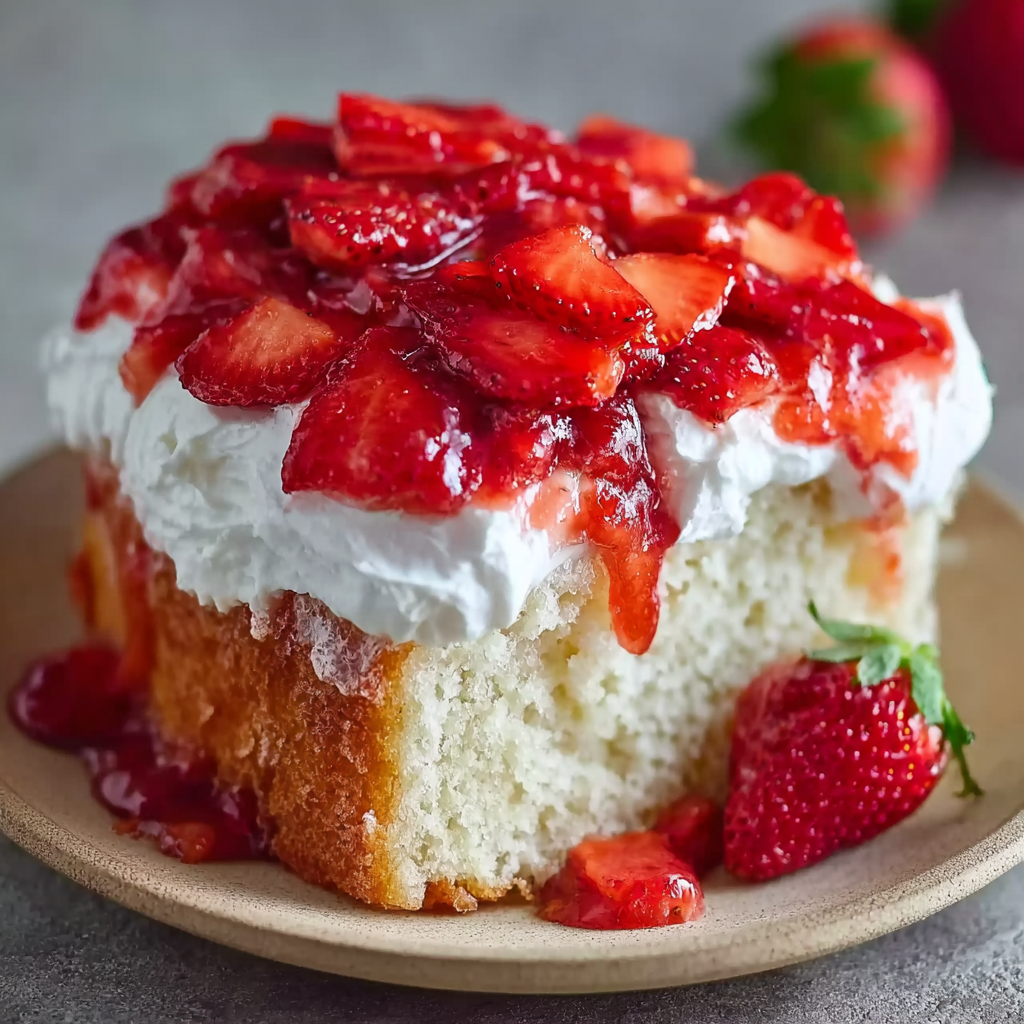
The classic strawberry shortcake cake combines airy cake layers and fresh berries, evoking sunny afternoons. Perfect for bakers seeking a memorable dessert, this guide delivers a foolproof recipe that dazzles both novice and seasoned chefs. Whether you crave a simple summer baking project or a centerpiece for special occasions, this recipe guarantees crumb texture and flavor.
In this step-by-step tutorial, you will:
- Master the art of moist vanilla sponge
- Whip stable cream frosting
- Showcase ripe berries with effortless assembly
Discover more on the history of strawberry shortcake here and explore decorating ideas on Pinterest. For advanced tips, visit our baking techniques section or browse related cake recipes.
By following each clear step, you’ll create a stunning layered treat that delights every guest. Plus, learn how to adapt the recipe for seasonal fruit twists by checking out our ingredient substitutions and enjoying inspiring visuals on Pinterest.
What Makes This Recipe Stand Out
This strawberry shortcake cake excels at marrying light sponge and vibrant berries, creating a harmonious blend of textures. The tender crumb supports creamy layers without collapsing, while the fresh berry topping adds a natural sweetness and pop of color. Simple techniques yield professional-looking results, making this dessert accessible to all skill levels.
Key highlights include:
- Balanced layers of whipped cream and fruit, as detailed on Wikipedia’s whipped cream page, for a stable frosting.
- Moist vanilla sponge enriched by proper mixing methods; explore tips on our baking techniques guide.
- Versatile fruit options and ingredient substitutions to suit seasonal produce or dietary needs.
Perfect for celebrations or casual gatherings, this recipe’s reliability and stunning presentation ensure guests will be impressed. Adapt the process by visiting our cake recipes collection for fresh inspiration. Its proven success makes it the go-to dessert for home bakers seeking perfection every time, guaranteed.
Ingredient Deep Dive
Understanding ingredients is crucial for perfect results. This recipe uses:
- All-purpose flour (2 cups): provides structure
- Baking powder (1 Tbsp): ensures rise and airy crumb
- Granulated sugar (1 cup): balances sweetness
- Unsalted butter (½ cup): adds moisture and richness
- Large eggs (2): contribute stability
- Whole milk (1 cup): enhances tenderness
- Vanilla extract (2 tsp): infuses aroma
- Fresh strawberries (3 cups): top and fill with natural sweetness
For optimal sponge texture, sift the flour and baking powder together to avoid lumps and ensure even distribution. Learn why all-purpose flour matters from Wikipedia’s flour overview and dive deeper into leavening on Wikipedia’s baking powder page. Our detailed baking techniques guide offers additional tips for perfecting your cake crumb and troubleshooting common issues.
The heavy whipping cream transforms into stable frosting when whipped with powdered sugar and vanilla extract. Discover frosting variations on Wikipedia’s vanilla extract article. For inspiration beyond strawberries, explore fresh berry combinations on Pinterest and get whipped cream decoration ideas at Pinterest whipped cream frosting. If you need to swap ingredients for dietary needs, check our ingredient substitutions resource.
Advanced readers can compare crumb density metrics and sponge porosity data in our comprehensive cake structure analysis post for detailed insight.
Essential Equipment
Creating the perfect strawberry shortcake cake requires the right tools:
- Two 8-inch nonstick cake pans
- Stand mixer or handheld mixer with paddle and whip attachments
- Silicone spatulas and offset spatula for smooth frosting
- Mixing bowls (one chilled) to whip stable cream
- Strawberry huller or paring knife for clean slices
- Wire rack for even cooling
Silicone liners and parchment paper ensure easy release and clean cleanup, every time.
Chilling metal bowls and beaters overnight helps form stiff peaks. Browse inspiration on Pinterest cake decoration inspiration and plan your display with dessert table styling. For troubleshooting, check our baking techniques guide.
Preparing the Cake Batter
Begin by creaming the butter and sugar until pale and fluffy, ensuring proper aeration for a tender crumb. Next, add eggs one at a time, mixing to maintain emulsion. In a separate bowl, whisk together sifted all-purpose flour, baking powder, and salt to distribute leavening evenly. Gradually incorporate the dry ingredients into the wet mixture, alternating with whole milk, starting and ending with the flour. Use a gentle folding motion to avoid overmixing, which creates a tough cake crumb.
Aim for a smooth batter with no visible flour streaks. Scrape down bowl sides and bottom for uniform consistency. Transfer the batter into two prepared 8-inch pans, smoothing each surface with an offset spatula. Tap pans gently on the counter to release trapped air bubbles and promote even oven spring. Position pans on the center rack of a preheated 350 °F (175 °C) oven.
Monitor the cake after 20 minutes, rotating pans if necessary for even baking. Layers are done when a toothpick inserted into the center emerges clean with a few crumbs. Remove from oven and cool in pans for ten minutes before inverting onto a wire rack to cool completely. For mixing tips, see our baking techniques guide.
Baking the Cake Layers
After preparing the batter properly, it’s time to evenly bake the sponge layers. Preheat the oven to 350 °F (175 °C) and position one rack in the center. Place the two 8-inch pans, ensuring they share heat evenly. Bake for 22 to 25 minutes, checking at 20 minutes to prevent overbrowning. Rotate pans halfway through baking for uniform color and rise.
Use the toothpick test by inserting into the center; if it emerges clean or with a few moist crumbs, the cakes are done. Avoid opening the oven too often, as temperature fluctuations can cause sinking. Once baked, remove pans from the oven and set them on a wire rack. Let the cakes rest in pans for ten minutes to stabilize structure, then run a knife around the edges. Invert layers onto the rack and peel off parchment if used. Allow cooling before filling to prevent whipped cream from melting.
Making Perfect Whipped Cream
Chill a metal bowl and beaters in the refrigerator for at least 15 minutes to ensure cold equipment, which helps stabilize the whipped cream. Pour cold heavy whipping cream into the chilled bowl and add powdered sugar and vanilla extract. Begin mixing at low speed to combine ingredients, then increase to high speed as the cream thickens. Use an electric mixer’s whisk attachment for best results.
Watch the cream’s texture closely. Soft peaks form when the mixture holds a gentle curl; for piping consistency, beat until medium peaks appear, where ridges stand tall but bend slightly. Avoid overbeating, which leads to grainy butter. If stability is a concern, incorporate a teaspoon of gelatin dissolved in warm water, or add a pinch of cream of tartar.
Once desired firmness is reached, transfer the cream frosting to another bowl to prevent residual heat from the mixer warming it. Cover and refrigerate until assembly. For alternative sweeteners, substitute honey or maple syrup for powdered sugar and explore frosting flavors in our recipe variations section. Discover decorative piping tutorials on Pinterest. Understanding peak stages ensures ideal cream stability during assembly. Reference our baking tips for deeper insights into peak definitions and frosting techniques.
Layering & Assembly
Before assembling, ensure cake layers are level by trimming any domed tops with a serrated knife on a cutting board. Place one layer on a cake turntable or serving plate. Spread an even layer of whipped cream—approximately one cup—over the cake using an offset spatula, holding the blade at a 45° angle to create a smooth surface.
Arrange half of the sliced fresh strawberries in concentric circles or random clusters to guarantee balanced distribution. For visual interest, alternate orientations of slices. Add a light crumb coat of cream around the edges and refrigerate for 15 minutes to set.
Once set, apply the final coat of cream frosting, using the spatula to rotate the turntable for clean, sharp edges. Fill any gaps with additional berries or crushed crumbs for texture. Place the second cake layer on top, pressing gently to adhere.
Repeat frosting and berry arrangement on the top surface, leaving a border for piped decorations if desired. For inspiration, consult our cake structure analysis and explore decorative tutorials on Pinterest layered cake designs.
Use brief pauses between steps to ensure each layer settles; this prevents slippage and maintains cake stability. The complete assembly process should take about twenty minutes before chilling. Use cake garland or decorative wrap around sides to catch stray crumbs during smoothing. For on-the-go events, carefully secure chilled assembly on a non-slip mat. Keep extra berries in a bowl for garnish just before serving to prevent weeping and maintain vibrant berry appearance and fresh flavor.
Decoration & Finishing Touches
Elevate presentation with simple piping and garnish techniques. Use a piping bag fitted with a star tip to create rosettes or shells around the top border. Dust a fine layer of powdered sugar over berries for a frosted effect. Arrange whole strawberries at the cake’s center or perimeter to add height and contrast. For metallic sheen, lightly brush edible gold dust on cream peaks. Incorporate mint leaves or edible flowers for color accent. If desired, drizzle homemade berry coulis in a spiral across the cake surface. Serve on a decorative platter to highlight your strawberry shortcake cake artistry and drama.
Variations & Flavor Twists
Experiment with variations to personalize this dessert. Add lemon zest to the batter for citrus brightness or fold in crushed raspberries for tartness. Replace half the flour with almond flour to introduce nutty undertones. Swap vanilla extract for almond or orange blossom water for aromatic nuance. For a richer filling, mix mascarpone with whipped cream. Incorporate a thin layer of strawberry jam between the cake layers for extra fruit intensity. Use mixed berries—blueberries, blackberries, raspberries—and adjust sugar in the whipped cream to balance sweetness. Try gluten-free flour blends to accommodate dietary needs without sacrificing cake texture and rich flavor depth.
Storage, Make-Ahead & Transport Tips
Proper storage ensures your strawberry shortcake cake retains freshness and structure. After assembly, refrigerate the cake, covered loosely with plastic wrap or placed in a cake keeper, for up to 24 hours. Avoid pressing wrap directly onto frosting to prevent damage. When storing longer, flash freeze the cake uncovered for one hour, then wrap tightly and freeze for up to one month. Thaw frozen cake overnight in the refrigerator.
For transport, secure the cake on a flat surface inside a box or carrier. Use non-slip liners or a damp towel beneath the cake stand to minimize movement. If your cake has tall decorations, consider transporting the layers separately and assembling on-site. Label containers clearly with serving instructions. When ready to serve, remove wrapping and allow the cake to rest at room temperature for 15 minutes for optimal cream consistency. For detailed transport guidance, see our baking tips, and flavor preservation.

FAQs
How do I keep the cake layers moist? Gently brush each layer with a simple syrup made from equal parts sugar and water before applying frosting.
Can I substitute frozen strawberries? Yes, but thaw and drain frozen berries thoroughly to avoid excess moisture.
What’s the best way to hull and slice berries evenly? Use a strawberry huller or insert a straw at the base, push through, then slice with a sharp knife.
Can I prepare this cake a day ahead? Assemble cake up to the crumb coat stage, refrigerate overnight, and finish decorating on serving day.
How long will whipped cream filling stay stable? Properly stabilized whipped cream lasts 24 hours refrigerated; using gelatin or cream of tartar extends stability.
Can I use alternative sweeteners? Replace powdered sugar with coconut sugar or stevia blends, adjusting quantities for taste.
Is this recipe suitable for high-altitude baking? Increase baking powder,
PrintEasy Strawberry Shortcake Cake
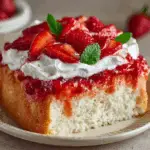
This strawberry shortcake cake features light, airy vanilla sponge layers paired with stabilized whipped cream and fresh berries. It’s the perfect centerpiece for special occasions or casual gatherings, offering a harmonious balance of sweetness and fruit brightness. The detailed guide walks you through each stage—from ingredient selection to flawless decoration—ensuring professional results at home.
Ingredients
- For the cake:
- 2 cups (250 g) all-purpose flour
- 1 cup (200 g) granulated sugar
- 1 Tbsp baking powder
- ½ tsp salt
- ½ cup (115 g) unsalted butter, softened
- 2 large eggs, room temperature
- 1 cup (240 ml) whole milk
- 2 tsp vanilla extract
- For the filling & topping:
- 2 cups (480 ml) heavy whipping cream, cold
- ¼ cup (30 g) powdered sugar
- 1 tsp vanilla extract
- 3 cups fresh strawberries, hulled and sliced
Instructions
• Preheat your oven to 350 °F (175 °C). Grease and flour two 8-inch round cake pans.
• In a large bowl, whisk together flour, sugar, baking powder, and salt until well combined.
• Add the softened butter, eggs, milk, and vanilla extract to the dry ingredients. Beat on medium speed for about 2–3 minutes, until the batter is smooth and slightly thickened.
• Divide the batter evenly between the prepared pans and smooth the tops with a spatula.
• Bake for 22–25 minutes, or until a toothpick inserted into the center comes out clean. Let cakes cool in the pans for 10 minutes, then transfer to a wire rack to cool completely.
• While the cakes cool, make the whipped cream: in a chilled bowl, beat the heavy cream, powdered sugar, and vanilla on high speed until stiff peaks form.
• Place one cake layer on a serving plate. Spread half of the whipped cream over the top, then arrange half of the sliced strawberries in an even layer.
• Top with the second cake layer. Frost the top and sides with the remaining whipped cream. Decorate the top with the remaining strawberries.
• Refrigerate the assembled cake for at least 1 hour to let the flavors meld and the whipped cream set.
• Slice and serve chilled.
Notes
- Ingredient Temperature: Use room-temperature eggs and softened butter for proper emulsion and volume.
- Stabilizing Cream: Gelatin or cream of tartar enhances whipped cream firmness for extended display.
- Make-Ahead Tips: Bake and freeze layers days ahead; assemble the day before serving for convenience.
- Decorating Tools: An offset spatula, piping tips, and turntable simplify assembly and create clean edges.
- Substitutions: Almond or gluten-free flours, alternative sweeteners, and seasonal fruits adapt this recipe to dietary needs.
- Troubleshooting: Avoid overmixing batter and cream to maintain optimal cake texture. Ensure pans are level for uniform layers.