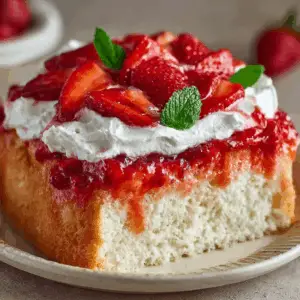
Discover how to create the ultimate No-Bake Cherry Delight, a fuss-free dessert that combines the creamy tang of cream cheese with the crunchy foundation of a graham cracker crust and the bright pop of cherry topping. This recipe is perfect for hot days or last-minute gatherings and requires no oven, making it an ideal addition to any entertaining repertoire.
By embracing a no-bake method, you save precious time and avoid heating your kitchen. The buttery crumbs evoke the original graham cracker experience (see the origin of graham crackers) while offering a sturdy base for the fluffy filling. Explore more no-bake dessert ideas and jump ahead to the Why Choose a No-Bake Cherry Dessert? section for in-depth insights.
With simple ingredients, assemble layers in minutes and chill until set. Follow step-by-step guidance, presentation tips, and customization tricks to elevate your Cherry Delight. Complement this treat with garnishes for a show-stopping finale.
2. Why Choose a No-Bake Cherry Dessert?
Choosing a no-bake cherry dessert offers significant advantages that suit both beginners and seasoned home bakers. By avoiding the oven, you keep your kitchen cool and reduce active cooking time, making this treat an excellent option for summer entertaining and impromptu gatherings. The layered combination of crunchy crust, velvety cream cheese filling, and vibrant cherries ensures a balanced texture that delights every palate.
- Time-saving: Ready in under 10 minutes of preparation.
- Versatility: Perfect for potlucks, BBQs, and birthday parties.
- Make-ahead friendly: Chill overnight to free up time on serving day.
Explore the science behind the no-bake dessert ideas and discover why cream cheese fillings maintain a smooth consistency without baking. For additional inspiration, check our internal guide on Easy Summer Desserts to see how simple techniques elevate flavors without extra heat.
Integrating cherry pie filling enhances both color and taste, using trusted toppings like the classic Cherry Pie variety for consistency. Visit our blog’s section on Party Dessert Trends to learn flavor pairings and garnish ideas, embracing LSI terms such as “easy dessert recipe” and “summer entertaining” for SEO optimization. These NLP keywords help search engines associate related concepts like party desserts, make-ahead sweets, and crowd-pleasing treats, boosting visibility and user engagement.
3. Flavor Profile & Ingredient Highlights
Every element of the No-Bake Cherry Delight contributes a distinct texture and taste, combining crunchy, creamy, and fruity layers into one harmonious bite. Understanding each component helps you optimize flavor balance and achieve that signature dessert experience.
Key ingredient highlights include:
- Graham-cracker crust: Provides a buttery, crunchy base that supports creamy layers.
- Cream cheese filling: Offers a tangy richness balanced by the sweetness of powdered sugar.
- Whipped topping: Adds airiness and lightens texture.
- Cherry pie filling: Delivers vibrant color and a sweet-tart punch.
For more creative Cherry dessert ideas, follow the cherry dessert inspiration board or explore our Easy Summer Desserts guide for additional flavor combos.
Selecting high-quality ingredients ensures optimal taste. Choose full-fat cream cheese for richness and stability, and opt for fresh or premium-brand whipped toppings to maintain a smooth filling consistency without weeping. When sourcing cherries, compare varieties to find your perfect balance of sweetness and tartness. For an in-depth look at cream cheese varieties and more Party Dessert Trends, check out our detailed guides.
These ingredient choices support an easy dessert recipe that excels in summer entertaining. Embrace terms like “quick dessert idea,” “light fluffy filling,” and “crowd-pleasing treat” to enhance flavor and search engine visibility.
4. Essential Equipment & Prep Tips
To assemble this no-bake cherry dessert, gather basic tools and plan chilling times to ensure flawless layers.
- 9×13-inch baking dish or individual parfait glasses for portion control.
- Electric mixer or hand whisk to achieve a smooth cream cheese filling.
- Measuring cups and spoons for precise ingredient balance.
- Spatula to spread layers evenly.
- Plastic wrap to trap moisture during chilling.
- Large mixing bowls for crust and filling prep.
- Offset spatula for decorative swirls and precise layering.
Allow at least 4 hours of refrigeration; overnight yields the best set. For guidance on chilling techniques, see our internal guide on Make-Ahead Dessert Strategies.
5. Step-by-Step Recipe Breakdown
Follow these detailed steps to assemble your No-Bake Cherry Delight with precision and achieve consistent results every time.
1. Make the crust.
- In a large bowl, combine 1¾ cups of finely ground graham cracker crumbs, 5 tablespoons of melted unsalted butter, and 2 tablespoons of granulated sugar.
- Mix until the texture resembles damp sand; if it feels too dry, add a teaspoon of melted butter at a time.
- Press the mixture firmly into the bottom of a 9×13-inch baking dish using the flat base of a measuring cup for uniform thickness.
- For extra stability, refrigerate the crust for 15 minutes before adding the filling; this step prevents a soggy crust and ensures clean slices when serving.
2. Prepare the filling.
In a separate bowl, beat 8 ounces of room-temperature cream cheese until completely smooth. Add ½ cup of powdered sugar and 1 teaspoon of pure vanilla extract, mixing until fully incorporated. Gently fold in 1½ cups of thawed whipped topping, taking care to maintain the airy texture. This process creates a light, velvety filling that contrasts the crunchy base. Refer to the whipped topping brands for quality options and explore our Party Dessert Trends guide to discover flavor pairings that complement summer menus and themed gatherings.
3. Layer the dessert.
- Evenly spread the cream cheese mixture over the chilled crust, smoothing the top with an offset spatula for a professional finish.
- Spoon a 21-ounce can of cherry pie filling starting at the center, then gently spread toward the edges to avoid breaking the crumb layer.
- For visual appeal, tilt the dish slightly while adding the fruit and create gentle swirls with a skewer.
- Browse summer potluck sweets for creative topping arrangements and check parfait presentation tips to inspire individual servings in clear glasses.
4. Chill and serve.
Cover the assembled dessert with plastic wrap and refrigerate for a minimum of 4 hours, or ideally overnight, to ensure each layer is fully set. Extended chilling deepens flavors and enhances texture, resulting in clean, neat slices when serving. For individual portions, spoon into clear jars or parfait glasses and garnish with fresh mint leaves or white chocolate curls. Use a sharp knife warmed under hot water for precise cuts. Discover more strategies in our Make-Ahead Dessert Solutions board to plan ahead and streamline your workflow.
By following this methodical approach, you’ll achieve a harmonious balance of textures—from the crisp crust to the creamy filling and glossy cherry topping—that delights every bite and keeps guests returning for seconds. Consider layering in individual mason jars for portable servings, or top with toasted almond slivers for added crunch. If you prefer a lighter version, substitute Greek yogurt for half the cream cheese and reduce sugar by a tablespoon. Enjoy responsibly.
6. Presentation & Serving Suggestions
Elevate your No-Bake Cherry Delight with thoughtful presentation that transforms a simple dessert into a centerpiece.
- Individual parfait cups: Layer crust, filling, and cherries in clear glasses for elegant single servings.
- Garnishes: Top with fresh mint sprigs, maraschino cherries, or shaved white chocolate to add color and texture.
- Serve with beverages: Pair with a crisp sparkling water, rich espresso, or a lightly sweet dessert wine for a balanced taste experience.
- Visual accents: Dust the edges of serving plates with extra graham-cracker crumbs or a sprinkle of powdered sugar.
For inspiration on stylish layouts, consult our parfait presentation tips board and explore seasonal color schemes in the summer potluck sweets collection.

7. Variations & Customizations
Tailor the Cherry Delight to suit any palate or dietary preference with these simple swaps:
- Fruit swaps: Replace cherry topping with blueberry, strawberry, or mixed-berry pie filling for a different flavor profile.
- Crust alternatives: Use crushed Oreo cookies, almond flour, or gluten-free graham-style crackers to accommodate allergies.
- Flavor boosters: Stir in lemon or orange zest, almond extract, or a splash of liqueur (e.g., Amaretto) to the filling.
- Texture tweaks: Fold in chopped nuts, toasted coconut flakes, or chocolate chips for extra crunch.
Keen for sugar-free options? Swap powdered sugar for a granular sweetener like erythritol or stevia blend, and use a sugar-free cherry pie filling to maintain taste without extra calories.
8. Storage, Make-Ahead & Leftover Strategies
Keep your no-bake dessert fresh and flavorful with these guidelines:
- Refrigeration: Store covered in the fridge for up to 5 days—layers will meld and flavors deepen.
- Freezing: Flash-freeze individual squares on a tray, then wrap tightly in plastic wrap and foil; thaw in the fridge before serving.
- Make-ahead planning: Assemble up to 24 hours ahead for stress-free entertaining—see our internal guide on Make-Ahead Dessert Strategies for timing tips.
- Reviving leftovers: Allow chilled slices to sit at room temperature for 10 minutes to restore creamy consistency before enjoying.
9. Troubleshooting Common Issues
Encounter a hiccup? Here’s how to fix frequent No-Bake Cherry Delight problems:
- Runny filling: Ensure whipped topping is fully thawed and stiff; refrigerate longer to help set.
- Soggy crust: Press crumbs firmly and pre-chill crust 15 minutes before adding filling.
- Cherry topping separation: Gently stir fruit before spooning; avoid over-spreading.
- Difficulty slicing: Use a sharp knife warmed under hot water and wiped between cuts for clean edges.
10. Frequently Asked Questions
Can I use fresh cherries instead of pie filling?
Yes—pit and halve 2 cups of fresh cherries, toss with 2 tablespoons sugar, and let macerate for 30 minutes before layering.
How do I make a sugar-free version?
Replace powdered sugar with a stevia blend and choose a sugar-free cherry pie filling to keep sweetness without added sugar.
Why did my filling become watery?
Overmixing can break down whipped topping; fold gently and ensure all ingredients are cold.
What’s the best way to cut neat slices?
Chill overnight, then use a hot, sharp knife, wiping the blade clean between cuts.
Can I make this in individual jars?
Absolutely—layer ingredients in 8–12 oz jars for portable, single-serve portions ideal for picnics or gifts.
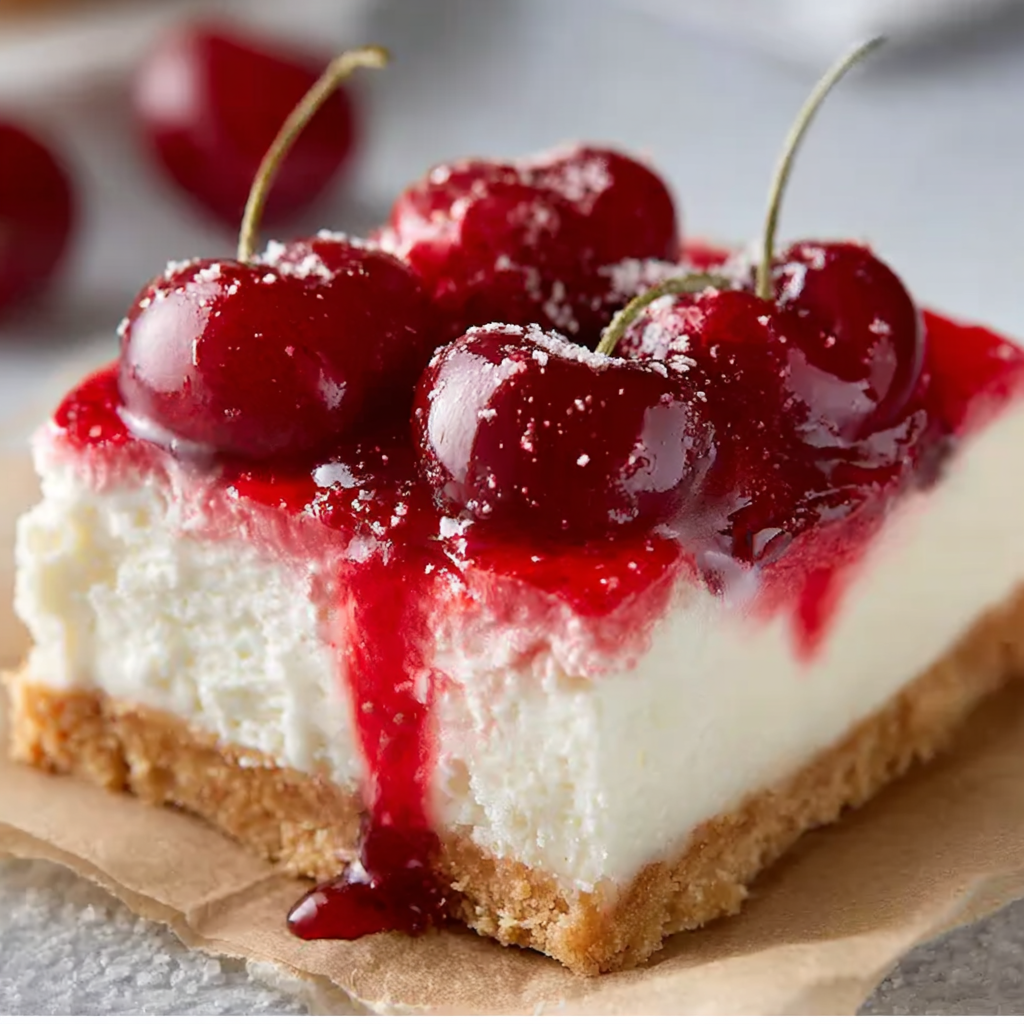
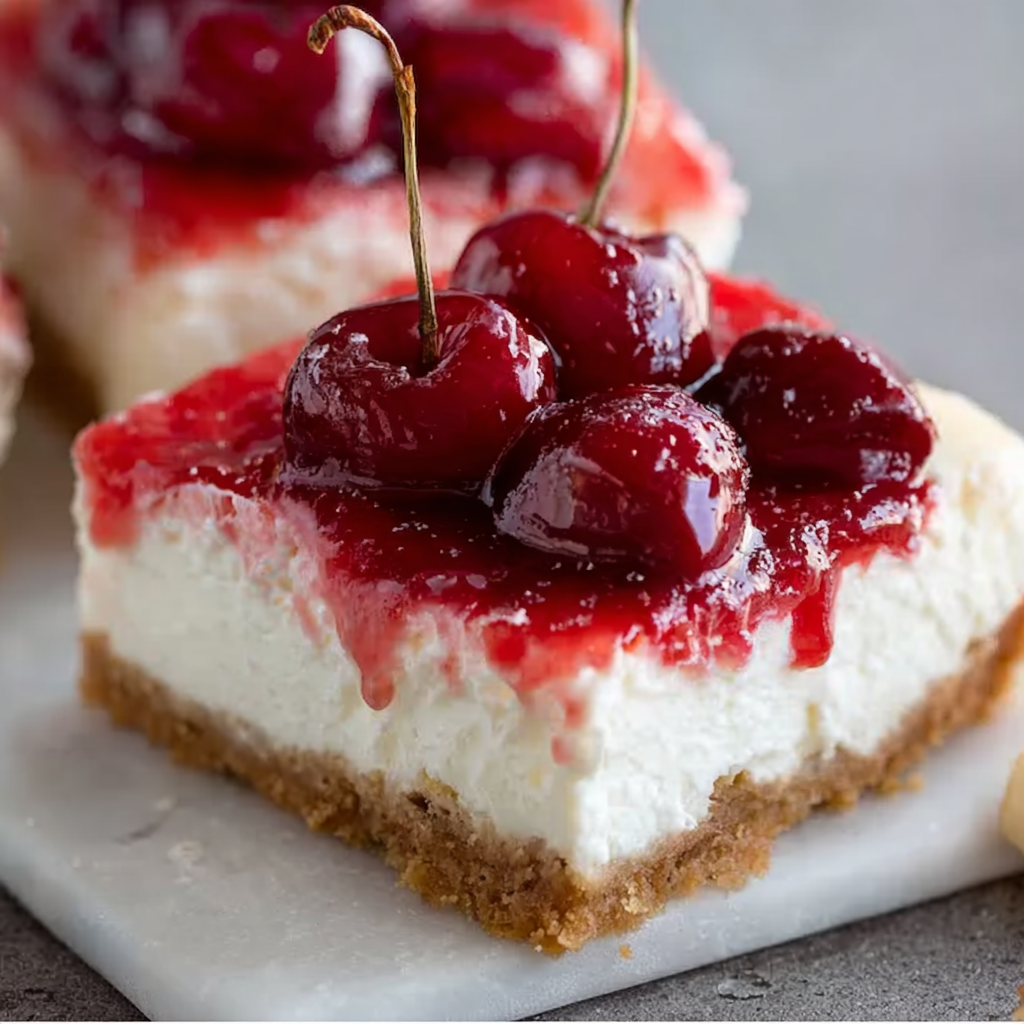
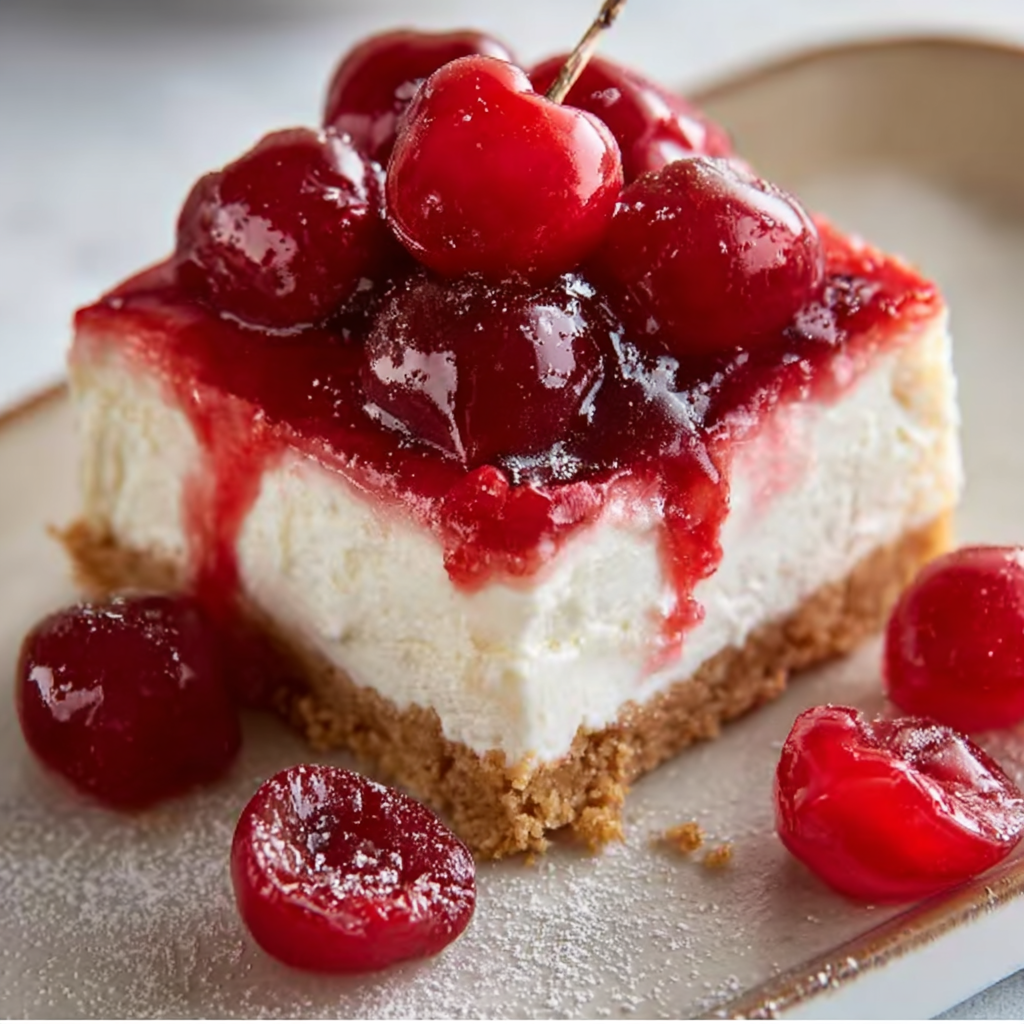
Decadent Cherry Cheese Delight
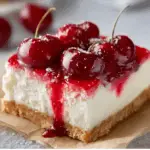
A luscious No-Bake Cherry Delight that layers a buttery graham-cracker crust, velvety cream-cheese filling, and glossy cherry topping. This quick-assembly dessert requires zero oven time and offers customizable options for fruit, crust, and flavor accents. Ideal for hot-weather entertaining, make-ahead simplicity, and crowd-pleasing presentation.
Ingredients
- For the crust:
- 1¾ cups graham cracker crumbs
- 5 tablespoons unsalted butter, melted
- 2 tablespoons granulated sugar
- For the filling:
- 8 oz (225 g) cream cheese, softened
- ½ cup powdered sugar
- 1 teaspoon vanilla extract
- 1½ cups whipped topping (such as Cool Whip), thawed
- For the topping:
- 1 can (21 oz/595 g) cherry pie filling
Instructions
• Combine graham cracker crumbs, melted butter, and granulated sugar in a bowl until the mixture resembles wet sand. Press firmly into the bottom of a 9×13-inch baking dish to form an even crust.
• In a large bowl, beat the softened cream cheese until smooth. Add powdered sugar and vanilla extract, and continue mixing until fully incorporated.
• Gently fold in the thawed whipped topping until no streaks remain and the filling is light and fluffy.
• Spread the cream cheese mixture evenly over the prepared crust.
• Spoon the cherry pie filling over the filling layer, spreading gently to cover.
• Cover the dish with plastic wrap and refrigerate for at least 4 hours, or until set, before slicing and serving.
Notes
- For best texture, chill at least 4 hours; overnight yields cleaner slices.
- Use full-fat cream cheese for stability; low-fat versions may weep.
- To prevent crumbs in filling, line your measuring cup with plastic wrap before pressing crust, then lift out.
- Experiment with extracts (almond, lemon) or liqueurs for unique flavor twists.
- Store leftovers in an airtight container to avoid fridge odors.
- If serving outdoors, keep chilled in a cooler to maintain structure.