If you love classic pizza flavors but want something more convenient and portable, cheesy pizza pockets are the answer. Here’s why they are a must-try:
- Easy to Make: With refrigerated pizza dough, this recipe is simple enough for beginners.
- Customizable: You can add different fillings like mushrooms, bell peppers, sausage, or even pineapple for a tropical twist.
- Perfect for Meal Prep: These pockets can be made ahead of time and stored for a quick snack later.
- Kid-Friendly: A fun and interactive way to get kids involved in the kitchen.
Homemade pizza pockets also allow you to control the ingredients, making them a healthier alternative to store-bought frozen pockets. Instead of relying on preservatives, you get fresh, high-quality ingredients every time.

Ingredients You’ll Need
To make these delicious cheesy pizza pockets, you’ll need:
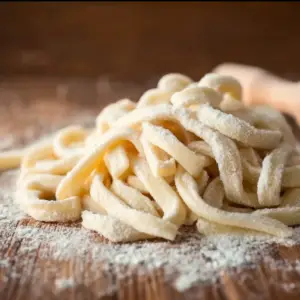
- 1 package refrigerated pizza dough – A convenient base for the pockets.
- 1/2 cup pizza sauce – Classic tomato-based sauce for a rich flavor.
- 1 cup shredded mozzarella cheese – The ultimate cheese for that stretchy, gooey texture.
- 1/2 cup shredded cheddar cheese – Adds extra sharpness and depth to the flavor.
- 1/2 cup pepperoni slices (or turkey pepperoni) – For a savory and slightly spicy kick.
- 1/2 teaspoon dried oregano – Enhances the pizza-like aroma.
- 1/2 teaspoon garlic powder – Adds a subtle garlicky note.
- 1 egg, beaten – Used for the golden, crispy crust.
- 1 tablespoon grated Parmesan cheese (optional) – For an extra cheesy topping.
This simple ingredient list allows for endless variations. If you’re a fan of veggie-loaded pockets, consider adding spinach, olives, or caramelized onions for a fresh and unique twist.
Step-by-Step Instructions to Make Cheesy Pizza Pockets
Making cheesy pizza pockets at home is incredibly simple. Follow these step-by-step instructions for a perfect golden-brown, crispy, and cheesy result.
1. Preheat the Oven
Before you start assembling the pockets, preheat your oven to 375°F (190°C). This ensures even cooking and helps achieve that crispy, golden crust.
2. Prepare the Dough
- Roll out the refrigerated pizza dough on a lightly floured surface to prevent sticking.
- Using a sharp knife or pizza cutter, divide the dough into six equal rectangles.
If you prefer a thinner crust, roll the dough slightly thinner before cutting.
3. Add the Sauce and Cheese
- Spoon a small amount of pizza sauce onto one side of each rectangle, leaving about ½ inch of space around the edges.
- Sprinkle a generous amount of mozzarella and cheddar cheese over the sauce. These two cheeses create the perfect balance of gooey and sharp flavors.
4. Add the Fillings
- Place a few pepperoni slices (or turkey pepperoni) over the cheese.
- If you want to get creative, you can add extras like mushrooms, bell peppers, jalapeños, or cooked sausage for a more flavorful bite.
5. Fold and Seal the Pockets
- Carefully fold the dough over the filling to form a rectangle-shaped pocket.
- Use your fingers to press the edges together, then seal them firmly by pressing with a fork. This prevents the cheese from oozing out while baking.
6. Apply the Egg Wash and Seasoning
- Brush the tops of each pocket with a beaten egg. This step helps create a glossy, golden-brown finish.
- Sprinkle dried oregano, garlic powder, and grated Parmesan cheese on top for extra flavor.
7. Bake to Perfection
- Arrange the pockets on a parchment-lined baking sheet to prevent sticking.
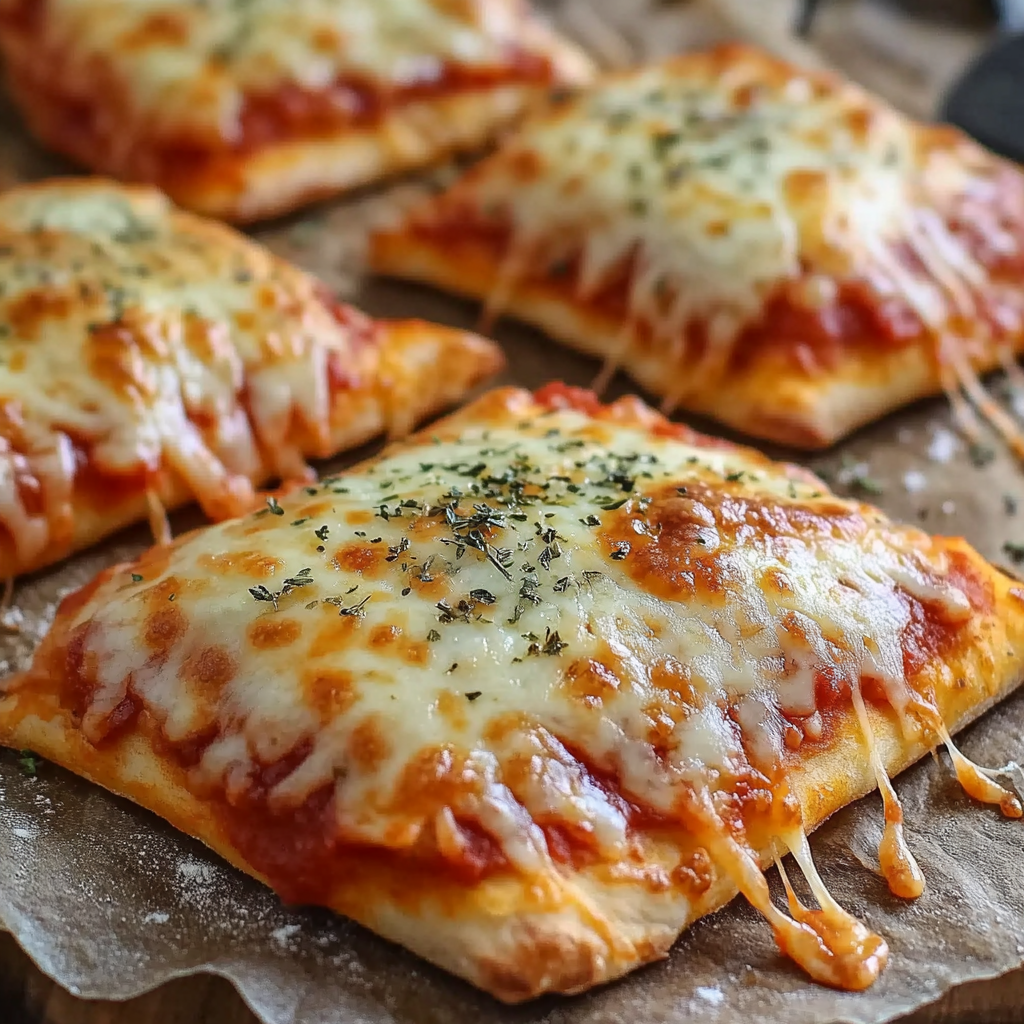
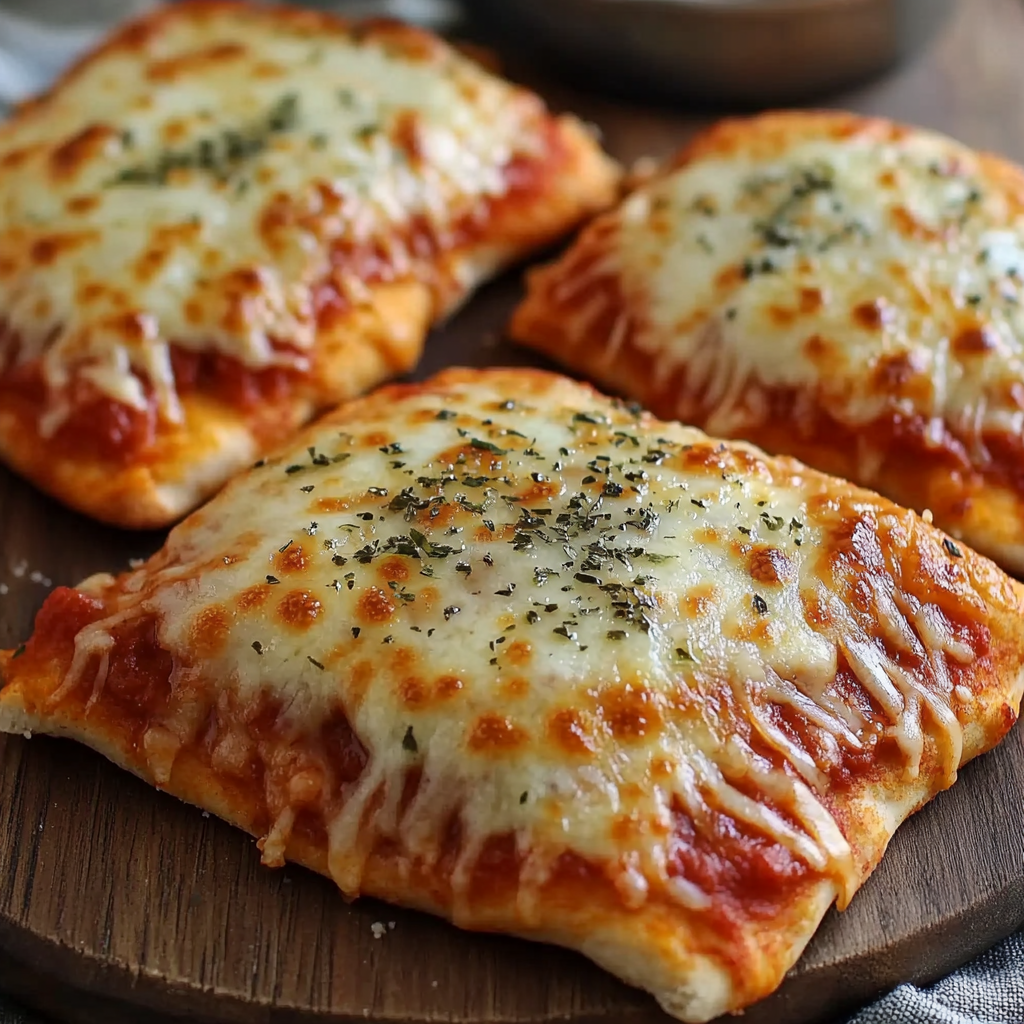
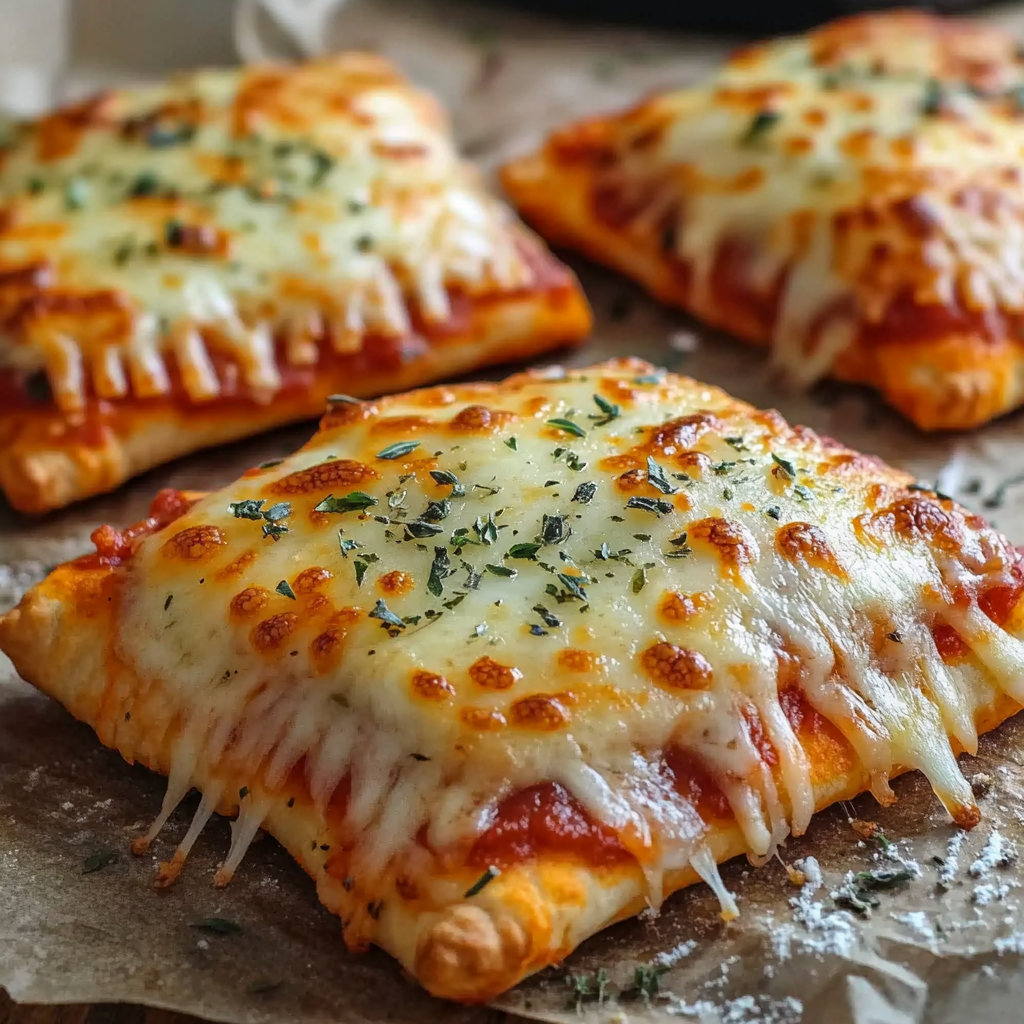
- Bake for 15-18 minutes, or until they turn golden brown and crispy.
8. Let Them Cool and Enjoy
- Allow the cheesy pizza pockets to cool for a few minutes before serving. The cheese inside will be extremely hot, so be careful with the first bite!
- Serve with extra pizza sauce or marinara for dipping.
Now that you know how to make these delicious pockets, let’s explore some creative variations you can try!
Delicious Variations of Cheesy Pizza Pockets
One of the best things about cheesy pizza pockets is how versatile they are. Whether you want a healthier version, a gourmet twist, or something totally unique, there are endless ways to customize this recipe.
1. Veggie-Lovers Pizza Pockets
For a meat-free option packed with flavor, replace the pepperoni with:
- Sautéed mushrooms for a rich, earthy taste.
- Bell peppers for a sweet, crunchy texture.
- Black olives for a briny, Mediterranean touch.
- Spinach for added nutrients and a mild flavor.
2. Meat Lover’s Edition
If you prefer a protein-packed version, try adding:
- Cooked crumbled sausage for a smoky bite.
- Diced ham for a slightly sweet and salty contrast.
- Bacon bits for an extra crispy and savory touch.
3. Four-Cheese Pizza Pockets
If you love extra cheese, mix and match different varieties:
- Mozzarella for a classic stretchy texture.
- Cheddar for sharpness.
- Parmesan for a salty, nutty flavor.
- Ricotta for a creamy, mild twist.
4. Spicy Jalapeño Popper Pockets
For a spicy kick, add:
- Sliced jalapeños for heat.
- Cream cheese for a creamy balance.
- Hot sauce mixed into the pizza sauce for an extra fiery touch.
5. Hawaiian-Style Pizza Pockets
Love the combination of sweet and savory? Try this variation:
- Diced pineapple for a juicy, tropical sweetness.
- Ham or Canadian bacon for a salty, smoky contrast.
- A drizzle of honey to enhance the flavors.
6. BBQ Chicken Pizza Pockets
Swap out the pizza sauce for BBQ sauce and add:
- Shredded cooked chicken for a smoky, hearty bite.
- Red onions for a mild, tangy crunch.
- Cilantro for a fresh finishing touch.
These variations allow you to experiment with different flavors while keeping the same easy preparation method. Whether you’re in the mood for classic flavors or something adventurous, there’s a cheesy pizza pocket for everyone!
Tips for Perfect Cheesy Pizza Pockets
To ensure your cheesy pizza pockets turn out golden, crispy, and full of flavor, follow these expert tips:
1. Use Cold Dough for Easy Handling
- Refrigerated pizza dough is easier to work with when it’s cold. If it gets too warm, it can become sticky and difficult to shape.
- If needed, chill the dough in the fridge for 10-15 minutes before rolling it out.
2. Don’t Overfill the Pockets
- It’s tempting to add extra cheese and toppings, but overfilling can cause leaks during baking.
- Leave about ½ inch of space around the edges to ensure a proper seal.
3. Seal the Edges Properly
- Use a fork to crimp the edges and press firmly to prevent any cheese from oozing out.
- For extra security, brush a little water or egg wash along the edges before sealing.
4. Egg Wash for a Golden, Crispy Crust
- Brushing the tops with a beaten egg creates a beautiful golden-brown color and adds a slight crunch.
- If you prefer a dairy-free option, use olive oil instead.
5. Experiment with Seasonings
- A sprinkle of garlic powder, oregano, or Italian seasoning enhances the classic pizza flavor.
- For a spicy twist, add red pepper flakes or a pinch of smoked paprika.
6. Bake on Parchment Paper for Easy Cleanup
- Using parchment paper prevents sticking and makes cleanup effortless.
- If you don’t have parchment, lightly grease the baking sheet with olive oil or cooking spray.
7. Let Them Cool Before Eating
- The melted cheese inside will be extremely hot right out of the oven.
- Allow the pockets to cool for at least 5 minutes before biting in to avoid burns.
By following these tips, you’ll get perfectly crispy and delicious cheesy pizza pockets every time!
How to Store and Reheat Cheesy Pizza Pockets
One of the best things about cheesy pizza pockets is that they store well, making them perfect for meal prep. Whether you want to refrigerate leftovers or freeze a batch for later, here’s how to keep them fresh and delicious.
1. Storing in the Refrigerator
- Allow the pizza pockets to cool completely before storing. This prevents condensation, which can make the crust soggy.
- Place them in an airtight container or wrap them individually in plastic wrap.
- Store in the fridge for up to 3-4 days.
2. Freezing for Long-Term Storage
- To freeze, first let the pockets cool completely.
- Arrange them in a single layer on a baking sheet and freeze for about 1-2 hours. This prevents them from sticking together.
- Transfer the frozen pockets to a ziplock bag or airtight container.
- Label the bag with the date and use within 2 months for the best quality.
3. How to Reheat Cheesy Pizza Pockets
In the Oven (Best Method)
- Preheat the oven to 350°F (175°C).
- Place the pockets on a baking sheet and bake for 8-10 minutes (if refrigerated) or 15-18 minutes (if frozen).
- This method helps maintain a crispy crust while evenly reheating the filling.
In the Air Fryer (Quick & Crispy)
- Set the air fryer to 350°F (175°C).
- Heat for 5-7 minutes (if refrigerated) or 10-12 minutes (if frozen).
- Flip halfway through for even crispiness.
In the Microwave (Fastest Option)
- Place a cheesy pizza pocket on a microwave-safe plate.
- Cover with a damp paper towel to prevent the dough from drying out.
- Heat on high for 30-45 seconds (if refrigerated) or 1-2 minutes (if frozen).
- For the best results, microwave first, then crisp in a hot skillet for 1-2 minutes.
4. Can You Make Them Ahead of Time?
Yes! You can assemble cheesy pizza pockets ahead of time and store them in the fridge for up to 24 hours before baking. This is perfect for meal prepping or preparing party snacks in advance.
By following these storage and reheating methods, you can enjoy crispy, cheesy goodness anytime—without sacrificing flavor or texture!
Serving Suggestions for Cheesy Pizza Pockets
Cheesy pizza pockets are incredibly versatile and can be served in many delicious ways. Whether you’re making them for a snack, lunch, or party appetizer, pairing them with the right sides and dips can elevate the experience.
1. Best Dipping Sauces
A good dip can take your pizza pockets to the next level. Try these tasty options:
- Classic Marinara Sauce – Enhances the traditional pizza flavor with a tangy tomato base.
- Garlic Butter Sauce – A rich, buttery dip with a hint of garlic.
- Ranch Dressing – A creamy and herby dip that balances the cheesy goodness.
- Buffalo Sauce – For those who love a spicy kick.
- Pesto Sauce – A fresh and flavorful basil-based dip.
- BBQ Sauce – A smoky-sweet complement to meaty fillings.
2. Perfect Side Dishes
If you’re serving cheesy pizza pockets as a meal, consider adding a side dish to complete it:
- Crispy French Fries – A fun, kid-friendly pairing.
- Garlic Knots – Soft, buttery, and full of garlic flavor.
- Side Salad – A fresh mix of greens, cherry tomatoes, and balsamic dressing balances the richness of the pizza pockets.
- Roasted Vegetables – A healthy and flavorful side option.
- Mozzarella Sticks – Double up on the cheesy goodness.
3. Party Platter Ideas
Hosting a gathering? Serve cheesy pizza pockets as part of a snack platter:
- Mini pizza pockets with various fillings – Offer a variety like pepperoni, BBQ chicken, and veggie.
- Assorted dipping sauces – Set up a dipping station with multiple options.
- Cheese and charcuterie board – Pair with cured meats, cheeses, and crackers.
- Stuffed jalapeños and garlic bread – Great for spice lovers and carb enthusiasts.
No matter how you serve them, cheesy pizza pockets are guaranteed to be a crowd-pleaser!
Frequently Asked Questions (FAQs)
1. Can I Use Homemade Pizza Dough Instead of Store-Bought?
Yes! While refrigerated pizza dough is convenient, homemade dough gives you complete control over the ingredients. A simple pizza dough made with flour, yeast, olive oil, and water works perfectly. Just roll it out and follow the same steps in the recipe.
2. How Do I Prevent My Pizza Pockets from Leaking?
To prevent the cheese and sauce from oozing out:
- Don’t overfill the pockets—leave about ½ inch of space around the edges.
- Seal the edges properly by pressing with a fork.
- Brush the edges with egg wash or water before sealing for extra security.
3. Can I Make These Pizza Pockets in an Air Fryer?
Yes! Air frying is a great option for an extra crispy crust. Here’s how:
- Preheat the air fryer to 350°F (175°C).
- Place the pizza pockets in a single layer.
- Air fry for 8-10 minutes, flipping halfway through.
4. What Other Fillings Can I Use?
You can customize cheesy pizza pockets with endless filling options, such as:
- Vegetables: Mushrooms, bell peppers, onions, spinach.
- Meats: Sausage, ham, bacon, shredded chicken.
- Cheeses: Ricotta, feta, provolone, parmesan.
5. Can I Freeze Baked Pizza Pockets?
Yes! Once baked, let them cool completely, then freeze them in an airtight container for up to 2 months. Reheat in the oven or air fryer for the best texture.
6. How Do I Make a Healthier Version?
For a lighter option, try:
- Using whole wheat pizza dough.
- Swapping turkey pepperoni for regular.
- Adding more veggies and reducing the cheese.
7. Can I Make a Sweet Version of Pizza Pockets?
Absolutely! Try stuffing them with:
- Nutella and banana slices for a chocolatey treat.
- Apple pie filling with cinnamon and sugar.
- Peanut butter and jelly for a fun twist.
Cheesy Pizza Pockets: The Ultimate Homemade Snack

Cheesy Pizza Pockets are a quick and delicious homemade alternative to store-bought pizza rolls. Made with refrigerated pizza dough, these pockets are filled with gooey mozzarella and cheddar cheese, savory pepperoni, and flavorful pizza sauce, then baked until golden and crispy. Perfect for snacking, meal prepping, or serving as a party appetizer, these pockets are easy to customize with your favorite fillings. Whether you prefer a classic pepperoni version or a veggie-packed twist, this recipe is sure to be a hit with kids and adults alike!
- Author: Clara
Ingredients
- 1 package refrigerated pizza dough
- 1/2 cup pizza sauce
- 1 cup shredded mozzarella cheese
- 1/2 cup shredded cheddar cheese
- 1/2 cup pepperoni slices (or turkey pepperoni)
- 1/2 teaspoon dried oregano
- 1/2 teaspoon garlic powder
- 1 egg, beaten (for egg wash)
- 1 tablespoon grated Parmesan cheese (optional)
Instructions
Preheat the oven to 375°F (190°C) and line a baking sheet with parchment paper.
Roll out the pizza dough on a lightly floured surface and cut it into 6 equal rectangles.
Spoon a small amount of pizza sauce onto one side of each rectangle, leaving space around the edges.
Sprinkle mozzarella and cheddar cheese over the sauce, then add a few pepperoni slices.
Fold the dough over the filling and press the edges together. Use a fork to crimp the edges and seal them.
Brush the tops with beaten egg and sprinkle with dried oregano, garlic powder, and Parmesan cheese if using.
Place on the prepared baking sheet and bake for 15-18 minutes, or until golden brown.
Let cool slightly before serving.
Notes
- Dough Tip: If using homemade dough, let it rest for at least 30 minutes before rolling it out for easier handling.
- Storage: Store leftovers in an airtight container in the fridge for up to 3-4 days or freeze for up to 2 months.
- Reheating: For the crispiest results, reheat in the oven at 350°F (175°C) for 8-10 minutes or air fry for 5-7 minutes.
- Customization: Try different cheeses, meats, and veggies for endless flavor combinations.
- Serving Suggestion: Pair with marinara, ranch, or garlic butter sauce for dipping.