1`.Why Everyone Loves Cheesy Garlic Chicken Wraps
If you’re craving something cheesy, garlicky, and ridiculously satisfying, cheesy garlic chicken wraps might just be your new favorite go-to. These wraps combine tender shredded chicken, rich and melty cheese, and a creamy garlic sauce that’s as flavorful as it is comforting. It’s a recipe that effortlessly blends convenience with bold taste, making it perfect for lunch, dinner, or even as a hearty snack.
What makes these wraps so irresistible is the harmony between textures and flavors—soft tortillas, gooey cheese, and the slight crisp from pan-toasting. It’s the kind of handheld meal that tastes like something you’d order at a trendy café, yet it’s made with simple pantry staples. Plus, with a short prep time and no complicated steps, they’re ideal for weeknight dinners or quick meal preps.
The popularity of wrap recipes has surged in recent years, especially among busy home cooks and meal preppers looking for portable, customizable meals. Whether you’re trying to use up leftover chicken breast or need something to satisfy the whole family, these cheesy garlic chicken wraps fit the bill. You’ll also find endless inspiration from meal-prep boards like chicken meal prep ideas or quick wrap hacks on lunch wraps for work, showing just how versatile and crave-worthy this dish really is.
Moreover, the love for garlic and cheese spans global cuisines, and dishes like this reflect a universal appeal. Ingredients like garlic, known for both its flavor and health benefits, and cheese, recognized for its richness and meltability in many varieties, elevate this humble wrap into something seriously delicious. If you’re on the hunt for the best chicken wrap recipe with a twist, this cheesy garlic version definitely earns its spot.
Let’s dive into the ingredients that make these wraps stand out and explore exactly how to craft the perfect creamy, cheesy filling.
2. Ingredients Breakdown & What Makes This Recipe Special
Crafting the ultimate cheesy garlic chicken wrap starts with choosing the right combination of ingredients. Each component plays a key role in delivering the perfect balance of creaminess, flavor, and texture. Let’s break down what makes this wrap so special and how you can elevate it even further.
Core Ingredients That Make This Wrap Irresistible:
-
Cooked shredded chicken – The base of the wrap. Using about 2 cups of pre-cooked shredded chicken breast ensures a moist and protein-rich filling. For convenience, rotisserie chicken or leftovers work perfectly. For those curious about preparation methods, see shredded chicken cooking methods.
-
Mozzarella cheese – Known for its smooth melting quality, mozzarella adds that delicious cheesy pull and a mild flavor that doesn’t overpower the garlic.
-
Cheddar cheese – A sharper contrast to mozzarella, cheddar brings a slightly tangy bite and balances the creaminess. Mixing cheeses adds depth and a richer mouthfeel, as supported by this breakdown of types of cheese for melting.
-
Cream cheese – This is the secret ingredient to a creamy garlic sauce. Softened cream cheese binds everything together and provides the velvety texture that makes the wrap so indulgent.
-
Garlic (fresh and powdered) – A double hit of garlic from minced cloves and garlic powder ensures bold, layered flavor. Garlic is not just delicious; it’s also linked to health benefits, including heart support and anti-inflammatory properties (learn more).
-
Parsley – Adds freshness and a bit of herbal contrast to the rich filling.
-
Salt and pepper – Essential for bringing out all the flavors without overpowering them.
-
Flour tortillas – Large tortillas are best for wrapping. You’ll want a tortilla sturdy enough to hold the filling yet soft enough to roll. Different varieties and textures can be explored in this guide on flour tortilla varieties.
-
Olive oil or butter – Used for toasting the wrap to a golden-brown finish. Each option offers a slightly different flavor and texture profile. You can explore skillet techniques through this overview of how to sauté with olive oil.
Optional Add-Ins to Customize Your Wrap:
-
Red pepper flakes – Add a gentle kick for spice lovers.
-
Green onions or chopped chives – Introduce a mild sharpness and freshness.
-
Diced tomatoes or spinach – Great for sneaking in extra veggies without compromising flavor.
This wrap recipe is all about balance: the gooey richness from the cheeses, the juicy texture from the chicken, and the punch from the garlic come together in perfect harmony. The combination of high-protein chicken, healthy fats from cheese, and the potential to include vegetables also makes this meal satisfying and adaptable to your dietary preferences.
In upcoming sections, we’ll walk through how to mix and toast these ingredients into the perfect wrap. Meanwhile, get inspired with this creamy chicken wraps board for even more ideas on how others are putting their spin on this classic.
3. Preparing the Creamy Cheesy Garlic Chicken Filling
The heart of this recipe lies in the creamy, cheesy garlic filling—a rich blend of textures and bold flavors that turn a simple wrap into a crave-worthy meal. Preparing it is quick and easy, but a few expert touches can elevate your results.
Step-by-Step: How to Make the Filling
Start by gathering your prepared ingredients:
-
2 cups shredded chicken breast
-
1 cup shredded mozzarella cheese
-
½ cup shredded cheddar cheese
-
2 tablespoons cream cheese, softened
-
2 minced garlic cloves
-
1 tablespoon chopped parsley
-
½ teaspoon garlic powder
-
Salt and black pepper to taste
In a large mixing bowl, combine all ingredients. Stir thoroughly to ensure the cheeses, garlic, and chicken are evenly distributed. The cream cheese should coat everything, forming a cohesive, spoonable mixture that holds together well.
If the filling seems too stiff or dry, you can loosen it slightly with a teaspoon of milk or a small dollop of Greek yogurt—a healthy and creamy alternative. This technique is popular in lighter chicken wraps featured on Pinterest boards for creamy garlic sauces, which show how easy it is to adjust for dietary needs without sacrificing texture.
Using Pre-Cooked Chicken Efficiently
For convenience, many people use leftover grilled or baked chicken. Store-bought rotisserie chicken is another excellent choice—it’s juicy, flavorful, and reduces prep time. Want to make your own from scratch? Learn more about different shredded chicken cooking methods for better control over moisture and seasoning.
Pro Tips to Enhance the Garlic Flavor:
-
For a deeper flavor, roast your garlic cloves before mincing. Roasted garlic adds a mild sweetness and depth that raw garlic doesn’t.
-
Add a pinch of garlic powder along with fresh garlic to layer the flavor.
-
Avoid pre-minced garlic from jars if possible; fresh cloves provide a sharper, more aromatic taste.
Adjusting Seasoning to Your Taste
-
For spice: Add chili flakes or a dash of hot sauce.
-
For more complexity: Try a pinch of smoked paprika or Italian seasoning.
-
To brighten: A squeeze of lemon juice or a touch of Dijon mustard can cut through the richness.
You can also find creative ways to customize this filling by browsing wrap-related tips and twists from homemade garlic sauce recipe boards or checking for flavor pairings in wrap combinations like those found on chicken meal prep boards.
This filling can be made ahead of time and stored in the fridge for up to 3 days, making it ideal for busy weekdays or prepping multiple wraps for meals on the go. In the next section, we’ll show how to turn this delicious mixture into a neatly rolled, satisfying wrap that holds together and toasts perfectly.
4. Assembling and Wrapping Like a Pro
Once your creamy garlic chicken filling is ready, it’s time to build your wraps. Assembling them the right way ensures they stay intact, heat evenly, and don’t fall apart during toasting. Mastering the wrapping technique turns this from a good wrap into a great one.
How to Assemble the Perfect Wrap
-
Lay out your tortillas
Use large flour tortillas, ideally 10-inch or larger. Place them on a flat surface like a cutting board or clean countertop. Learn more about flour tortilla varieties to choose one that best suits your flavor and texture preferences. -
Spoon the filling
Divide the chicken mixture evenly between four tortillas. Spoon the filling horizontally across the center, leaving about 2 inches of space from the edges. Aim for a compact row of filling—avoid overstuffing. -
Fold the sides inward
Fold both the left and right sides of the tortilla toward the center, partially covering the filling. This prevents the filling from spilling out the ends. -
Roll tightly
Starting from the bottom (the side closest to you), roll the tortilla tightly over the filling, tucking as you go to keep everything snug. Roll all the way to the top, sealing the edge with a gentle press.
If your wraps keep unrolling, you can secure them temporarily with a toothpick before toasting. This technique is common in recipes shared on lunch wraps for work, where stability and portability are key.
Avoiding Common Wrapping Mistakes
-
Overfilling – One of the most frequent issues. If the wrap is too full, it won’t roll tightly and may burst when heated.
-
Torn tortillas – Warm tortillas in the microwave for 10–15 seconds before filling. Warm tortillas are more pliable and less likely to tear.
-
Loose rolling – A loose wrap may fall apart or cook unevenly. Always tuck the filling in as you roll.
Want a Pro Tip? Use a dab of cream cheese or Greek yogurt on the edge of the tortilla to help seal the roll—this adds to both taste and function.
You’ll see this wrapping method used in various handheld meals from paninis to burritos. Learn more about cooking tools and technique from sources like skillet cooking techniques, especially if you’re planning to toast the wraps in the next step.
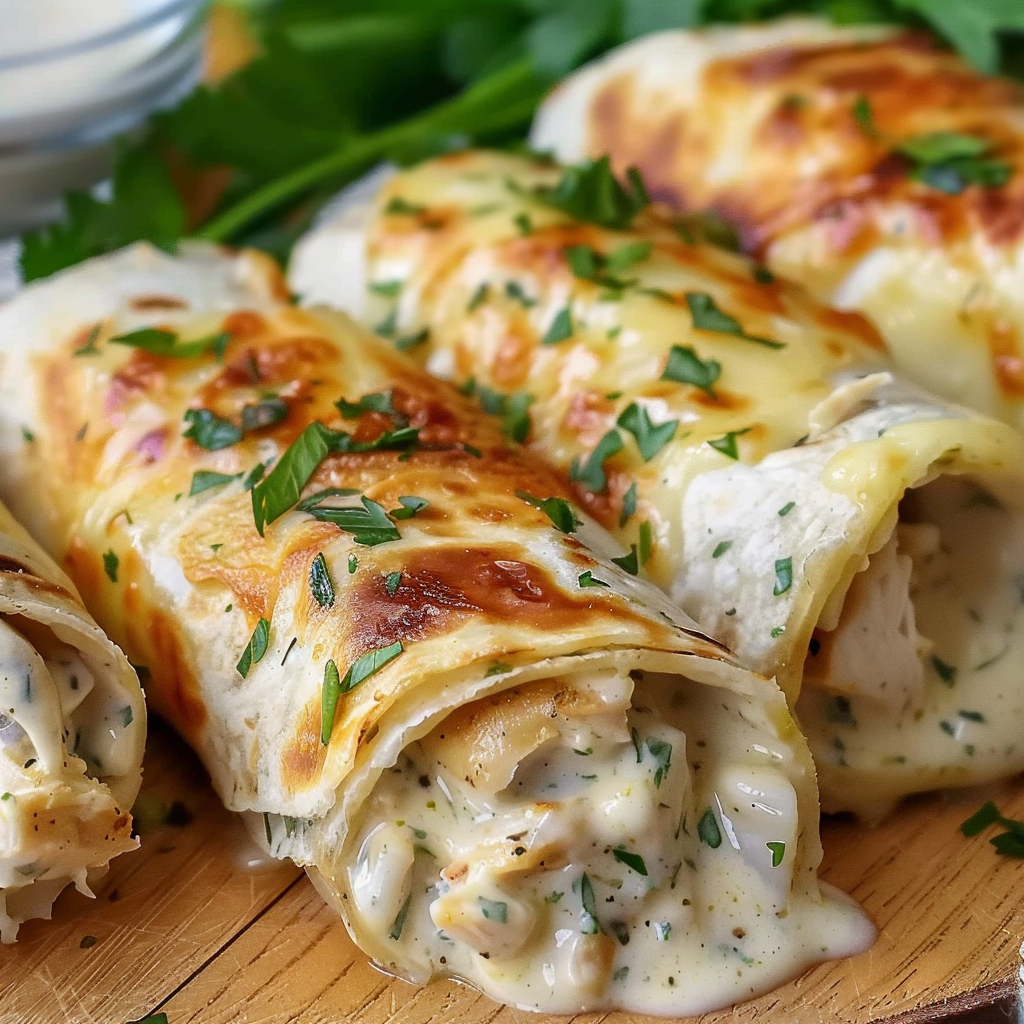
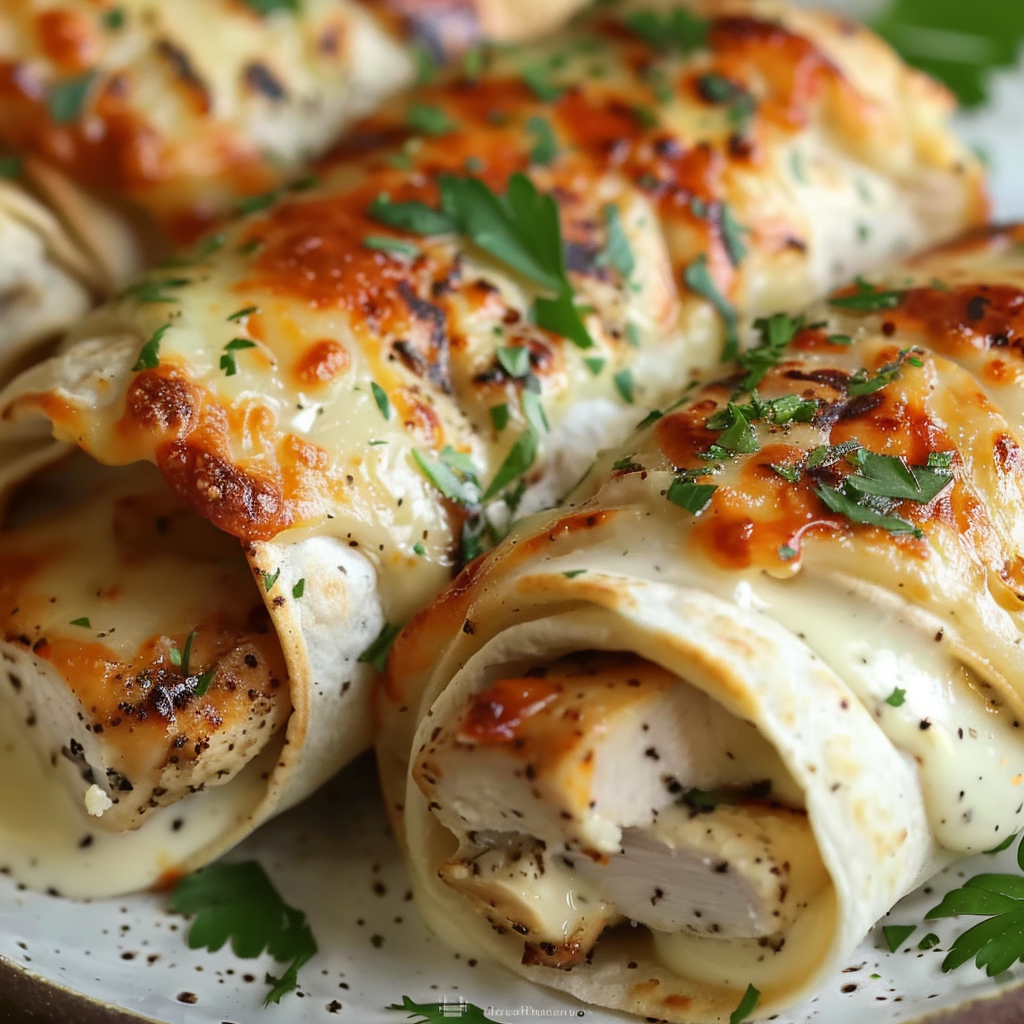
With the wraps fully assembled and sealed, you’re ready to move to the next stage: toasting them until golden brown and irresistibly crisp. This step not only enhances flavor and texture but also melts the cheeses inside for that gooey, satisfying bite.
5. Toasting to Golden Perfection
With your wraps assembled and ready, the final touch is toasting—a simple step that transforms your cheesy garlic chicken wraps from good to absolutely irresistible. A crispy, golden exterior adds contrast to the creamy interior, making every bite more satisfying.
Best Toasting Methods for Perfect Results
You can toast your wraps in several ways depending on what kitchen tools you have on hand. The most popular and reliable method is using a skillet or frying pan.
Skillet or Frying Pan Method (Recommended)
-
Heat a nonstick skillet or frying pan over medium heat.
-
Add 1 tablespoon of olive oil or butter. Olive oil gives a lighter, crisp finish while butter adds rich, savory flavor. Refer to how to sauté with olive oil for more tips.
-
Place the wrap seam side down in the pan to seal it shut.
-
Cook for 2–3 minutes per side, pressing gently with a spatula for even browning.
-
Flip once until both sides are golden brown and the cheese inside is melted.
If making multiple wraps, toast in batches, adding a small amount of oil or butter between each.
Alternative Toasting Methods
-
Panini press or sandwich grill: These create an evenly pressed, café-style wrap with grill marks.
-
Oven-baked: Preheat oven to 375°F (190°C). Place wraps on a baking sheet, brush lightly with oil, and bake for 10–12 minutes, flipping once halfway through.
-
Air fryer: Cook at 370°F for 5–7 minutes, flipping once for crispness.
Tips for Toasting Success
-
Use medium heat to avoid burning the outside before the cheese melts.
-
Cover the skillet with a lid for the first minute if the cheese needs more time to melt.
-
Don’t overcrowd the pan; leave space around each wrap for easy flipping.
You can find delicious inspiration for golden, melty wraps by browsing creamy chicken wraps boards that showcase variations in toasting techniques and presentation. These boards also feature side dish pairings that make your meal complete.
Toasting not only enhances flavor and texture but also helps hold the wrap together, making it easier to cut or serve. Once toasted, let the wraps rest for a minute before slicing—this keeps the filling intact and prevents cheese from spilling out.
In the next section, we’ll explore what to serve alongside these garlic-loaded delights and the best sauces to dip them in.
6. Serving Suggestions & Dipping Sauces
Once your cheesy garlic chicken wraps are perfectly toasted, it’s time to plate them up and elevate the experience with thoughtful pairings and complementary sauces. The beauty of these wraps lies in their versatility—they can be dressed up for a full meal or served as a grab-and-go option.
Best Side Dishes to Serve with Cheesy Garlic Chicken Wraps
-
Crispy potato wedges – A hearty, golden side that complements the wrap’s soft and creamy texture.
-
Sweet potato fries – A slightly sweet, healthier alternative that balances the garlic-heavy filling.
-
Fresh green salad – Adds freshness and crunch, perfect for contrast.
-
Roasted vegetables – Zucchini, bell peppers, or broccoli add nutrients and color.
-
Soup pairing – Tomato basil or creamy potato soup pairs beautifully in colder months.
Looking for presentation ideas? Explore chicken meal prep ideas for visual inspiration and plating options that are practical and aesthetic, especially if you’re packing these wraps for lunch.
Dipping Sauces That Take It Over the Top
-
Creamy garlic sauce – For extra garlic punch, serve a simple homemade sauce made from Greek yogurt, garlic powder, lemon juice, and parsley.
-
Garlic aioli – Rich and smooth, this option works as both a spread and dip.
-
Ranch dressing – A classic crowd-pleaser that balances richness with tang.
-
Spicy mayo – Add heat to cut through the cheese and creaminess.
-
BBQ sauce – Introduces a smoky-sweet contrast to the garlic-forward wrap.
Pinterest has plenty of ideas for wraps with sauce pairings, such as those featured in homemade garlic sauce recipe boards that show how easily garlic-based sauces can be customized.
These wraps are already loaded with flavor, but the right dip or side dish can turn them into a full, well-rounded meal. Whether you’re hosting friends, prepping lunches, or enjoying a weeknight dinner, serving thoughtfully adds value to your meal experience.
7. Customization Ideas & Add-Ons
One of the best features of cheesy garlic chicken wraps is how easily you can personalize them. Whether you’re catering to different taste preferences or dietary needs, small tweaks can turn this recipe into something uniquely yours.
Add Spice and Heat
-
Add chopped jalapeños to the filling.
-
Mix in hot sauce or sriracha for a spicy kick.
-
Sprinkle chili flakes over the cheese before rolling.
Load Up on Vegetables
-
Add sautéed mushrooms, onions, or bell peppers for texture and nutrition.
-
Fold in a handful of baby spinach for a mild, earthy flavor.
-
Use finely chopped sun-dried tomatoes for a rich, tangy element.
These customizations not only add flavor but also align with popular additions seen in viral lunch wraps for work and creamy chicken wraps inspiration pins.
Switch Up the Cheese
-
Use pepper jack for added heat and a creamier melt.
-
Try provolone or Swiss cheese for a slightly nutty flavor.
-
Sprinkle a little Parmesan into the mix for an umami boost.
Alternative Proteins
-
Swap chicken for shredded turkey, beef, or even tofu for a vegetarian twist.
-
Combine chicken with bacon crumbles for a smoky variation.
These additions help keep the wraps exciting and suitable for repeat meal prep. For even more ideas, see wrap combinations inspired by Pinterest boards for creamy garlic sauces.
8. Make-Ahead and Meal Prep Instructions
These cheesy garlic chicken wraps are incredibly meal-prep friendly. You can prepare the filling and even assemble the wraps in advance, making them ideal for busy weekdays.
Prep Ahead Tips
-
Filling: Make and refrigerate for up to 3 days in an airtight container.
-
Assembled Wraps: Store uncooked wraps in a sealed container or wrap them individually in foil.
-
Toasting Later: Toast right before eating to ensure crispness.
If you’re into batch cooking, consider making a double portion of the filling and storing it separately. Many chicken meal prep ideas use this approach for flexible weekday meals.
Freezing Instructions
-
Wrap each un-toasted wrap tightly in foil or plastic wrap.
-
Store in a freezer-safe bag for up to 2 months.
-
To cook from frozen: thaw in the fridge overnight and toast as directed, or toast straight from frozen on low heat with a lid until heated through.
Reheating
-
Skillet: Use medium-low heat with a lid to prevent drying.
-
Microwave: Wrap in a damp paper towel and heat in 30-second intervals.
-
Oven: Reheat at 350°F for 10–12 minutes.
With minimal effort, you can enjoy the flavor and comfort of garlic chicken wraps all week long.
9. Nutritional Information and Healthier Swaps
While these wraps are indulgent and satisfying, they can be easily tweaked for a healthier version without losing flavor.
Estimated Nutritional Breakdown (per wrap):
-
Calories: ~450–500
-
Protein: 28–32g
-
Carbs: 28–35g
-
Fat: 22–25g
-
Fiber: 2–4g
Healthier Ingredient Swaps
-
Cheese: Use reduced-fat mozzarella and cheddar to lower saturated fat.
-
Cream Cheese: Substitute with Greek yogurt for a protein boost and lighter texture.
-
Tortillas: Swap standard flour tortillas for whole wheat, low-carb, or high-fiber alternatives.
-
Butter/Oil: Use a small amount of olive oil spray instead of butter to reduce calories.
Making these swaps can cut the calorie content by up to 100 calories per wrap. For those looking for lighter lunch options, explore balanced versions in Pinterest wrap meal prep boards.
These changes also make the wraps suitable for people watching their macros or following modified low-carb diets while keeping all the creamy, cheesy satisfaction intact.
10. Common Mistakes and How to Fix Them
Even simple recipes like this have a few pitfalls. Here’s how to avoid the most common mistakes when making cheesy garlic chicken wraps.
Overstuffing the Wrap
-
Causes the wrap to tear or leak.
-
Fix: Use only the recommended portion of filling (about ½ cup per tortilla) and flatten it before rolling.
Wrap Falling Apart During Toasting
-
Often caused by loose rolling or cold tortillas.
-
Fix: Warm the tortillas slightly before assembling and roll tightly. Place seam side down when toasting.
Cheese Not Melting
-
Usually from toasting over high heat.
-
Fix: Use medium heat and cover the pan with a lid for a minute or two to trap heat and melt the cheese.
Wraps Getting Soggy
-
This happens when wraps sit too long after toasting.
-
Fix: Let them rest for only a minute, then serve immediately, or reheat briefly in a pan if serving later.
Check out additional solutions and tips from skillet cooking techniques if you want better heat distribution during the toasting process.
Following these small adjustments ensures you get perfect, café-quality results every time.
11. Storing Leftovers the Right Way
If you’ve made a big batch or have leftovers, proper storage will help maintain freshness and texture.
Refrigeration
-
Store wraps in an airtight container or wrap individually in foil.
-
Keep in the fridge for up to 3 days.
Freezing
-
Wrap each individually in parchment and foil.
-
Store in a labeled freezer bag for up to 2 months.
Reheating
-
Skillet: Toast over medium-low heat to crisp them back up.
-
Oven: Reheat at 350°F for about 10–12 minutes.
-
Microwave: Use only if necessary, and wrap in a paper towel to reduce sogginess.
Always reheat until the internal temperature reaches 165°F (74°C) for food safety.
12. Frequently Asked Questions (FAQs)
What’s the best way to keep wraps from falling apart?
Warm the tortillas before rolling and don’t overfill them. Rolling tightly and placing seam side down in the pan helps keep everything sealed.
Can I make cheesy chicken wraps ahead of time?
Yes, both the filling and fully wrapped tortillas can be made ahead. Store in the fridge and toast just before serving.
How do I store leftover chicken wraps?
Wrap tightly in foil or place in an airtight container. Refrigerate for up to 3 days or freeze for up to 2 months.
What other sauces go well with cheesy garlic chicken wraps?
Garlic aioli, ranch, BBQ sauce, spicy mayo, or even tzatziki work well depending on your flavor preference.
Can I bake the wraps instead of pan-frying?
Absolutely. Bake at 375°F (190°C) for 10–12 minutes, flipping once for even browning.
Are these wraps freezer-friendly?
Yes. Freeze before or after toasting. Thaw overnight or cook from frozen on low heat.
Can I make this recipe gluten-free?
Use certified gluten-free tortillas and ensure all other ingredients (especially seasonings and sauces) are gluten-free.
What’s the best cheese combination for flavor and melt?
A blend of mozzarella for meltability and sharp cheddar for flavor provides the best balance. Pepper jack or provolone are great alternatives.
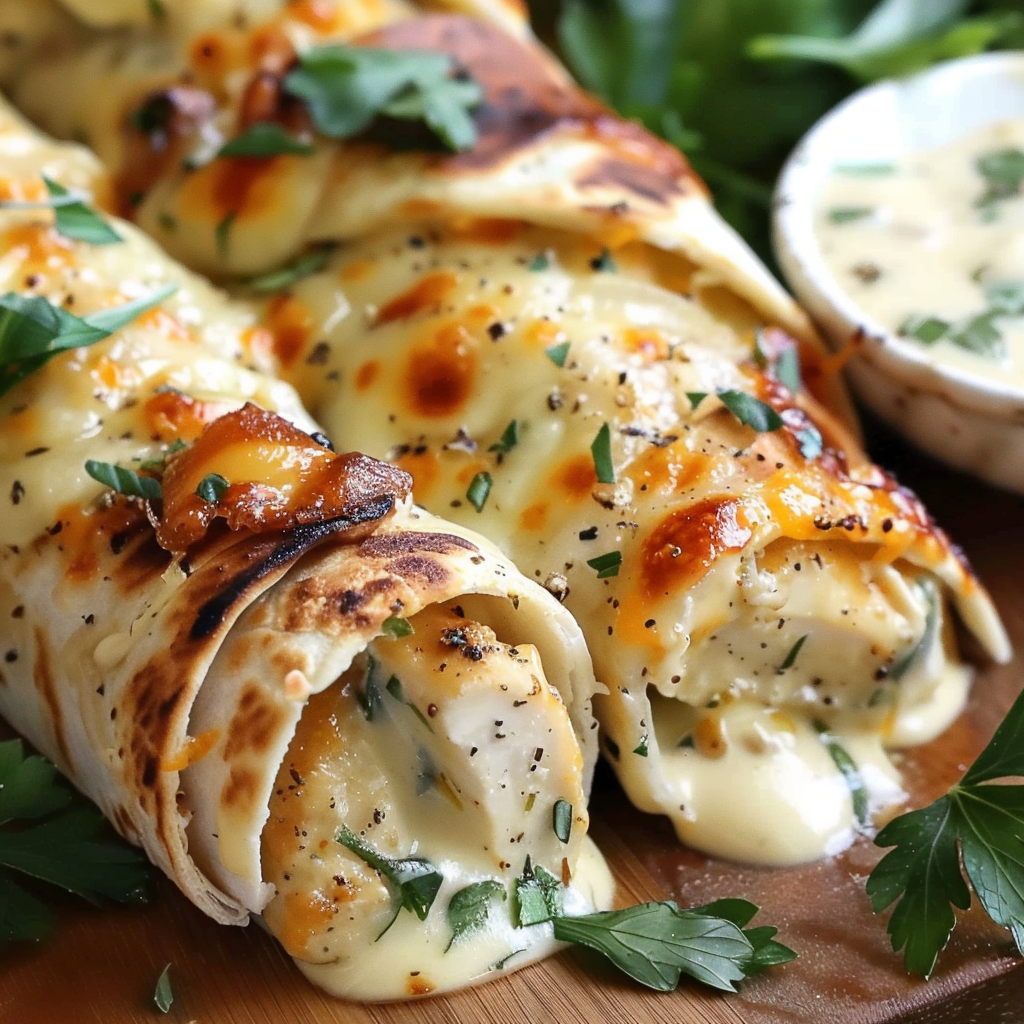
Cheesy Garlic Chicken Wraps with Creamy Garlic Sauce

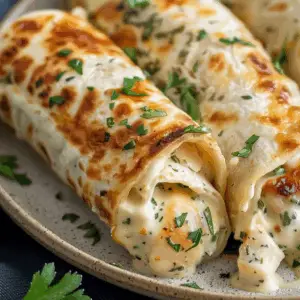
These cheesy garlic chicken wraps are packed with juicy shredded chicken, a gooey blend of mozzarella and cheddar, and a smooth cream cheese-based garlic sauce. Wrapped in a golden-toasted flour tortilla, they offer the perfect balance of crispy, creamy, cheesy, and savory in every bite. Ideal for lunch, dinner, or on-the-go snacks, they’re customizable, freezer-friendly, and crowd-pleasing every time.
- Author: Clara
Ingredients
- 2 cups cooked chicken breast, shredded
- 1 cup shredded mozzarella cheese
- ½ cup shredded cheddar cheese
- 2 tablespoons cream cheese, softened
- 2 garlic cloves, minced
- 1 tablespoon chopped parsley
- ½ teaspoon garlic powder
- Salt and pepper to taste
- 4 large flour tortillas
- 1 tablespoon olive oil or butter (for toasting wraps)
Instructions
- In a large bowl, combine the shredded chicken, mozzarella, cheddar, cream cheese, minced garlic, parsley, garlic powder, salt, and pepper. Mix until everything is well combined.
- Lay out the tortillas and divide the chicken mixture evenly among them, placing it in the center of each tortilla.
- Fold the sides of each tortilla inward, then roll it up tightly like a burrito to form wraps.
- Heat olive oil or butter in a skillet over medium heat.
- Place the wraps seam side down in the skillet and cook for 2–3 minutes per side, or until golden brown and the cheese inside is melted.
Notes
-
Use warm tortillas to prevent tearing during rolling.
-
Rotisserie chicken saves time and adds flavor.
-
Toast seam-side down first to keep wraps sealed.
-
Add a dab of cream cheese on the tortilla edge to help seal if needed.
-
Double the batch and freeze for quick future meals.
-
For lighter wraps, swap cream cheese for Greek yogurt and use whole wheat tortillas.
-
Serve with a fresh salad or crispy potato wedges for a complete meal.
-
Store leftovers in foil and reheat in a skillet for best results.