Best Butterfinger Pie Quick and No-Bake Easy Dessert With Butterfinger Candy
See Butterfinger and our no-bake desserts for quick inspiration.
Crust options: graham crackers or chocolate cookies; explore peanut butter desserts for creamy ideas more.
Quick Snapshot: Time, Yield, Difficulty
-
Prep: 10 minutes (crust + filling), plus 4 hours chill.
-
Yield: 1 (9-inch) pie, 8–10 slices.
-
Difficulty: easy, no-bake filling; optional brief bake for crust.
-
Ideal for: parties, holidays, potlucks; quick make-ahead dessert.
-
Equipment: 9-inch pie plate, mixer, spatula.
-
Serves best chilled; slices clean with warmed knife and gentle wiping.
Why You’ll Love This Butterfinger Pie
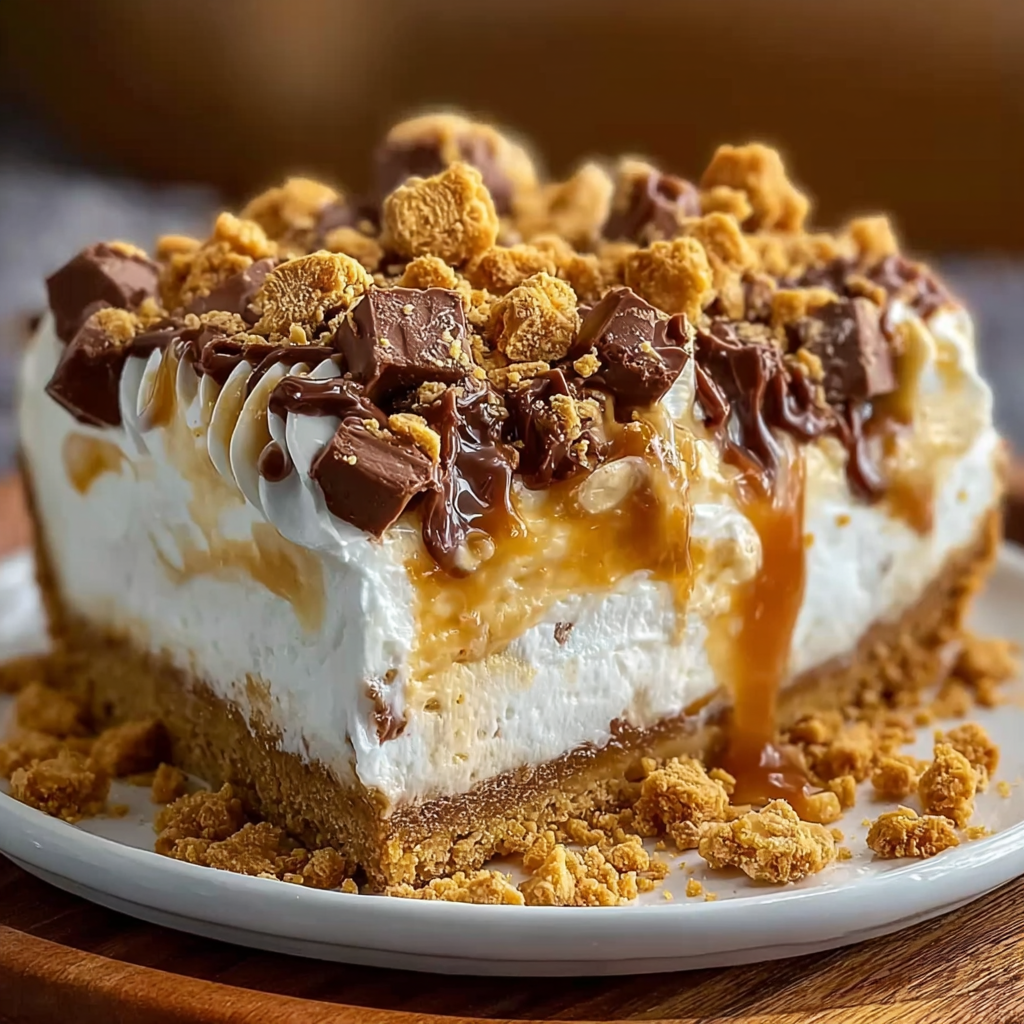
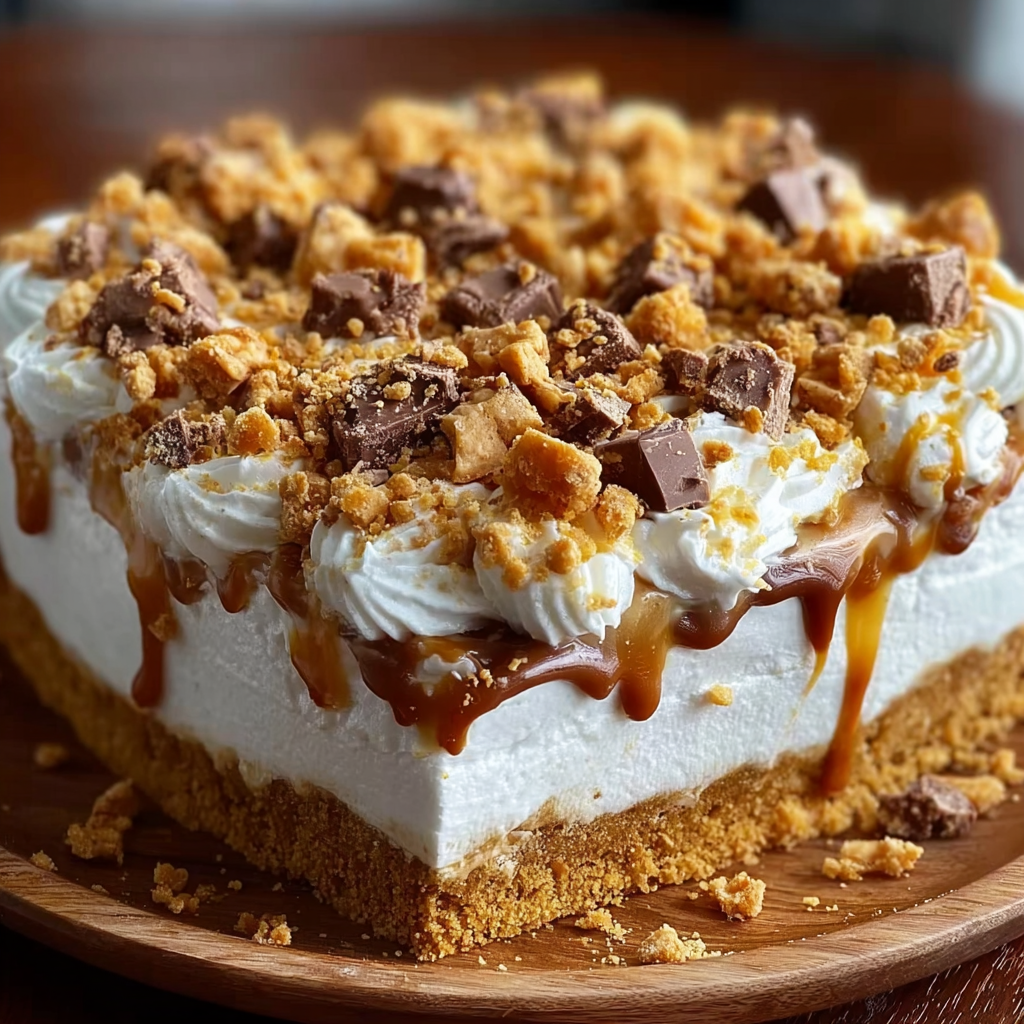
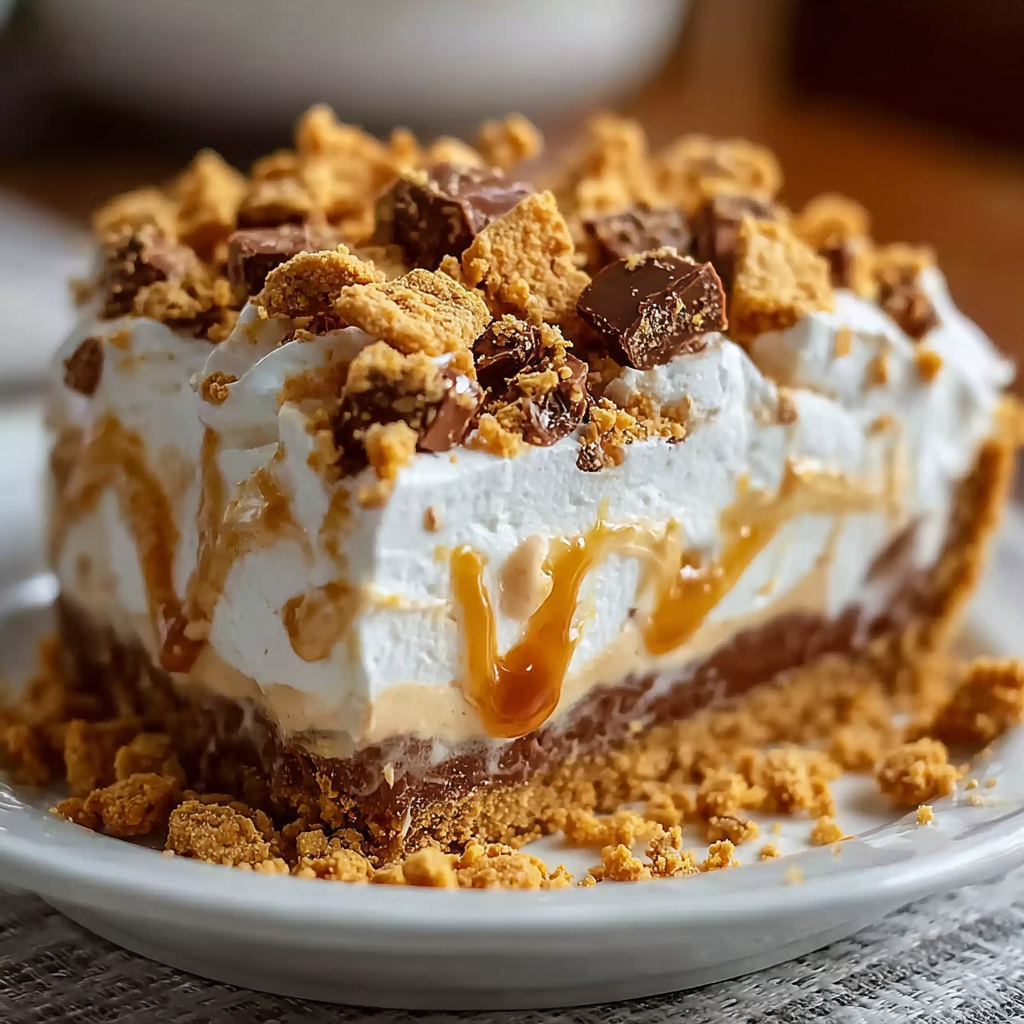
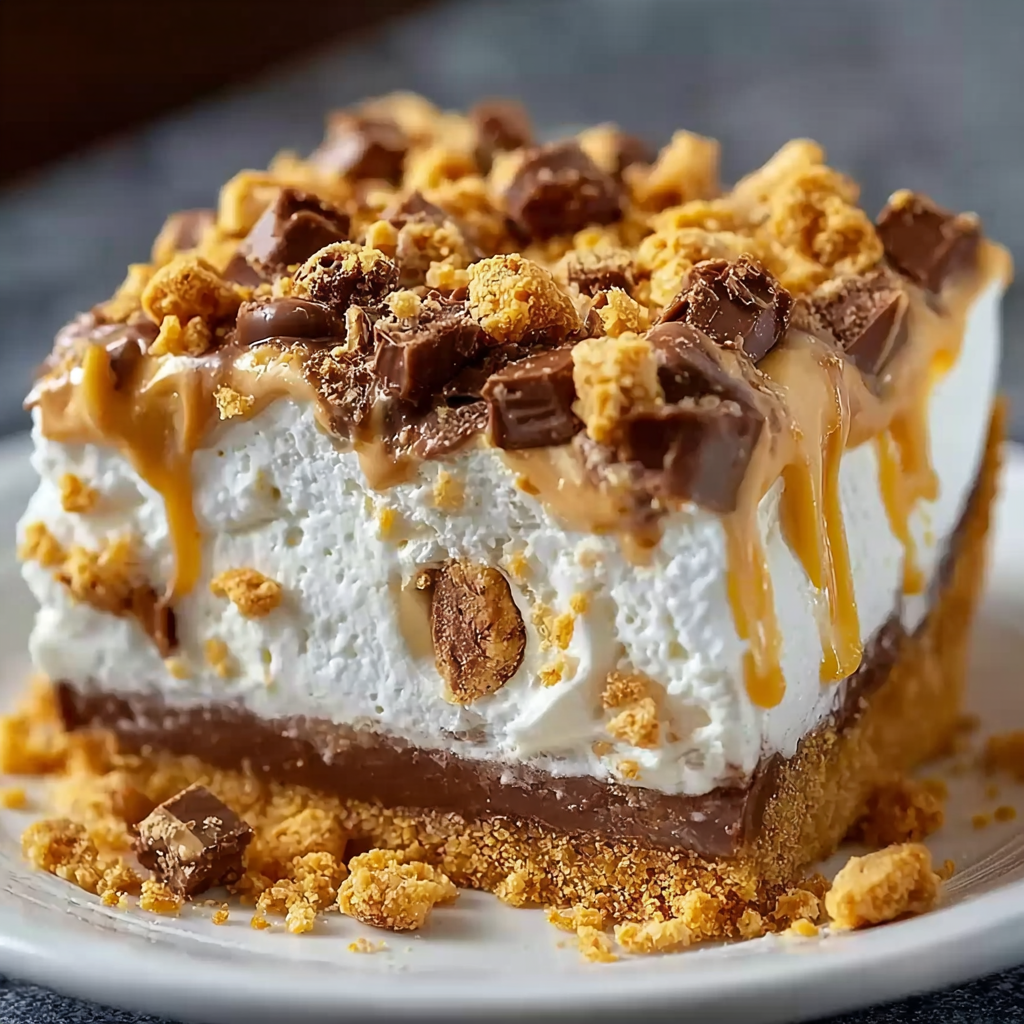
Crave a no-bake treat that’s quick? This Butterfinger Pie delivers creamy richness, Butterfinger crunch, and a slice-clean finish. Assemble in minutes, then chill until the texture is cloud-light yet sturdy—perfect for weeknights or parties.
The creamy base marries softened cream cheese with peanut butter for velvety lift and nutty depth; learn about peanut butter and how its fats emulsify. For indulgence, explore our chocolate desserts pairing with this candy-crunch pie.
Light, stable loft comes from gently folding in whipped topping or softly whipped cream—see how whipped cream creates airy structure. Planning ahead? Browse seasonal holiday pies and add a glossy finish with a drizzle of chocolate for sparkle and contrast.
Ingredient Spotlight & Substitutions
A great Butterfinger Pie starts with balanced components that complement each other in flavor, texture, and appearance. Below is a breakdown of the essential elements and how you can adapt them to suit your pantry or guests’ needs.
For the crust
-
Graham cracker crumbs — provide a sweet, slightly nutty crunch. Learn more about graham cracker crumbs and why they make such a stable pie base.
-
Chocolate cookie crumbs — deepen the cocoa flavor, pairing perfectly with peanut butter and Butterfinger candy.
-
Butter — binds the crumbs; unsalted works best to control flavor.
-
Sugar + pinch of salt — balances sweetness and enhances the crust’s overall taste.
-
Substitutions: crushed Oreos (skip added sugar/salt), digestive biscuits, or gluten-free cookies for dietary needs.
For the filling
-
Cream cheese — tangy and rich; see its properties on cream cheese.
-
Creamy peanut butter — offers nutty smoothness; no-stir brands create the most stable filling.
-
Powdered sugar — fine texture blends seamlessly without grittiness.
-
Vanilla extract — enhances the overall dessert profile.
-
Whipped topping or whipped cream — creates the lightness; explore how whipped cream stabilizes airy fillings.
-
Butterfinger bits — the candy’s crisp peanut butter center and chocolate coating add crunch and flavor bursts.
Optional toppings
-
Additional whipped cream swirls.
-
Extra Butterfinger bits.
-
Chocolate drizzle made from semisweet chips melted with coconut oil or butter; see chocolate drizzle ideas for creative presentation tips.
Dietary swaps
-
Nut-free: sunflower seed butter + Crunch bar bits (check allergy safety).
-
Gluten-free: cookie crust made with certified GF cookies.
-
Lighter version: reduced-fat cream cheese, less candy, or light whipped topping.
Tools & Equipment
To create the best Butterfinger Pie, make sure you have:
-
9-inch pie plate (deep-dish if possible).
-
Mixing bowls in varying sizes.
-
Hand mixer or stand mixer for smooth blending.
-
Rubber spatula and offset spatula for easy spreading.
-
Measuring cups/spoons.
-
Knife and cutting board for chopping candy bars.
-
Optional: food processor for fine crumbs, piping bag for decorative topping.
For more no-bake dessert ideas, check Pinterest inspiration or see our own no-bake pie recipes for creative variations.
Step-by-Step Instructions (with Photo Cues)
1. Prepare the crust
-
Stir crumbs, melted butter, sugar, and salt until evenly moistened.
-
Press firmly into a 9-inch pie plate, going up the sides. Use a flat-bottom measuring cup for even packing.
-
Chill 15–20 minutes to set, or bake at 350°F/175°C for 7–8 minutes for extra stability. Cool completely if baked.
2. Make the filling
-
Beat softened cream cheese until smooth and fluffy to avoid lumps.
-
Beat in peanut butter, powdered sugar, and vanilla until creamy.
-
Gently fold in whipped topping until no streaks remain.
-
Fold in about 1¼ cups of the Butterfinger bits.
3. Assemble and chill
-
Spread the filling into the crust, smoothing the top.
-
Cover and refrigerate at least 4 hours or overnight for clean slices.
4. Optional topping
-
Spread or pipe whipped topping over the pie.
-
Sprinkle remaining Butterfinger bits.
-
Drizzle melted semisweet chocolate mixed with coconut oil or butter.
-
Chill 10 minutes to set the drizzle before slicing.
For creative topping inspiration, check candy bar dessert ideas.
Pro Tips for Fail-Proof Results
-
Soften cream cheese fully before beating to ensure a silky filling.
-
Use no-stir peanut butter for the most consistent texture.
-
Fold, don’t whip, whipped topping into the filling to preserve airiness.
-
Pack the crust firmly to prevent crumbling.
-
Chill the pie fully for a neat slice; overnight works best.
-
Slice with a warmed knife and wipe clean between cuts.
See more plating ideas on pie crust inspiration for a polished look.
Make-Ahead, Storage & Freezing
-
Make-ahead: Assemble the day before; add topping just before serving.
-
Storage: Keep covered in the refrigerator for up to 4 days.
-
Freezing: Freeze without whipped topping for up to 1 month. Thaw in the fridge overnight and top fresh before serving.
-
Transport: Keep chilled in a cooler with ice packs if traveling.
Nutrition & Dietary Swaps
This pie is rich and indulgent. Per slice, expect a calorie-dense treat with high peanut butter and chocolate content.
-
Lighter swaps: reduced-fat cream cheese, fewer candy bits, light whipped topping.
-
Gluten-free: certified GF crust.
-
Nut-free: use alternative seed butters and a safe candy substitute.
Variations & Flavor Ideas
-
Chocolate cookie crust — amplifies cocoa flavor.
-
Frozen pie — serve semi-frozen for a firmer texture.
-
Mini pies — make individual portions in muffin tins.
-
Pie bars — spread filling in a 9×13-inch pan and cut into squares.
-
Extra-chocolate — add cocoa powder to the filling and top with chocolate curls.
-
Salted peanut butter — sprinkle flaky sea salt on top.
-
Candy mashup — mix in Reese’s Pieces or chopped peanuts with Butterfinger bits.
-
Holiday twist — add festive sprinkles or shape into a tart.
Troubleshooting & Common Mistakes
-
Loose filling: Chill longer; ensure whipped topping isn’t watery.
-
Lumpy filling: Cream cheese wasn’t softened enough before beating.
-
Crumbling crust: Pack more firmly or add a touch more butter.
-
Greasy crust: Too much butter; measure accurately.
-
Soggy base: Cool crust fully before adding filling.
-
Candy sinking: Fold candy in gently and reserve some for the topping.
Serving & Presentation
-
Use a warm knife for clean slices, wiping between cuts.
-
Garnish with whipped cream swirls, chocolate shavings, or a ring of Butterfinger bits.
-
Serve with milk, coffee, or hot chocolate for a cozy pairing.
-
For plated presentation, drizzle chocolate sauce on the plate before placing the slice.
Leftovers Remix
-
Parfaits: Layer pie cubes with whipped cream.
-
Milkshake: Blend with milk and ice cream.
-
Pie pops: Freeze small wedges on sticks, dip in chocolate.
-
Trifle: Combine cubed pie, pudding, and whipped cream in layers.
FAQ
Is Butterfinger Pie no-bake?
Yes—filling is no-bake. Crust can be chilled or baked briefly.
Can I use homemade whipped cream?
Yes, softly whipped to medium peaks with light sweetening works.
How long should it chill?
At least 4 hours; overnight is best.
Can I freeze it?
Yes, without topping for up to 1 month.
What peanut butter works best?
No-stir creamy for stability.
Can I make mini pies?
Yes—muffin tins or tart shells, chill 2–3 hours.
Can I make it without cream cheese?
Yes, but texture will be softer; use mascarpone or stabilized whipped cream.
Best crust options?
Graham crackers, Oreos, chocolate wafers, or gluten-free cookies.
How far ahead can I make it?
Up to 24 hours before serving; top later.
How to prevent crust crumbling?
Use fine crumbs, pack firmly, and optionally bake.
No-Bake Easy Dessert With Butterfinger Candy

A creamy, peanut butter base folded with light whipped topping, studded with crunchy Butterfinger bits, all resting in a buttery graham cracker or chocolate crust. Topped with whipped cream, candy pieces, and a chocolate drizzle, this pie is a crowd-pleaser ready in minutes plus chill time.
- Author: Clara
Ingredients
For the crust:
- 1½ cups graham cracker crumbs (or chocolate cookie crumbs)
- 6 tbsp unsalted butter, melted
- 2 tbsp granulated sugar
- Pinch of salt
For the filling:
- 8 oz cream cheese, softened
- 1 cup creamy peanut butter
- 1 cup powdered sugar
- 1 tsp vanilla extract
- 8 oz whipped topping (thawed) or 2 cups lightly sweetened whipped cream
- 1½ cups Butterfinger bits (or 6 regular bars, chopped), divided
For the topping (optional but great):
- 1 cup whipped topping or whipped cream
- 1 Butterfinger bar, chopped
- ½ cup semisweet chocolate chips + 1 tsp coconut oil or butter (for drizzle)
Instructions
- Stir crumbs, melted butter, sugar, and salt until evenly moistened. Press firmly into a 9-inch pie plate, going up the sides. Chill 15–20 minutes to set (or bake at 350°F/175°C for 7–8 minutes, then cool completely).
- Beat cream cheese until smooth and fluffy. Beat in peanut butter, powdered sugar, and vanilla until creamy.
- Fold in the whipped topping until no streaks remain. Fold in about 1¼ cups of the Butterfinger bits.
- Spread the filling into the crust, smoothing the top. Cover and refrigerate at least 4 hours or overnight until set.
- For topping, spread or pipe whipped topping over the pie, sprinkle with remaining Butterfinger, and drizzle melted chocolate mixed with coconut oil. Chill 10 minutes to set the drizzle before slicing.
Notes
-
No-bake friendly with optional crust bake for extra crispness.
-
Make-ahead up to 24 hours; freeze (without topping) up to 1 month.
-
Use no-stir peanut butter for the most consistent texture.
-
Slice with a warmed knife for picture-perfect servings.