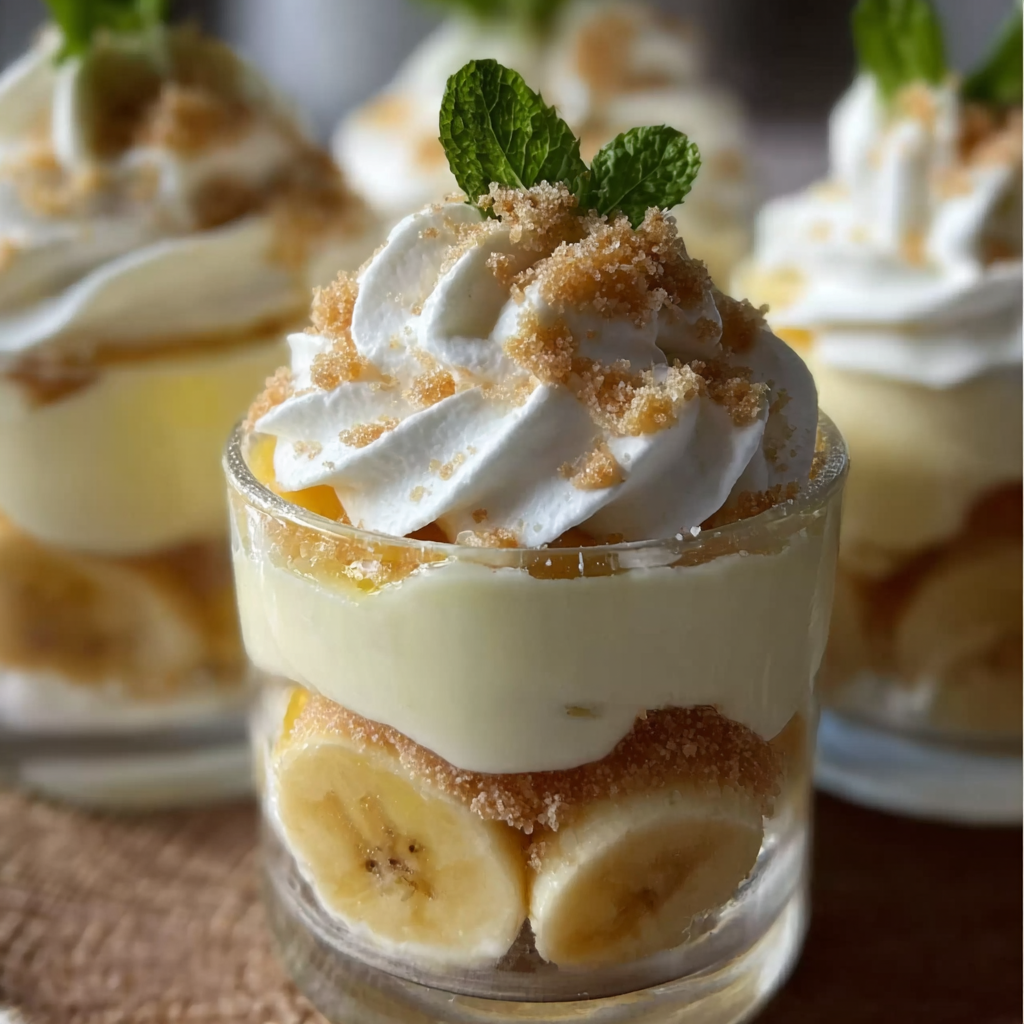

Why You’ll Love These Banana Pudding Cups
Banana Pudding Cups are more than just a dessert; they are a crowd-pleasing experience. Here’s why they deserve a place in your recipe collection:- No baking required
- Perfect for make-ahead preparation
- Simple pantry-friendly ingredients
- Beautiful presentation in individual servings
- Kid-friendly and adult-approved
- Easy to customize
Ingredients for Banana Pudding Cups
Using simple, accessible ingredients ensures this dessert is both affordable and easy to prepare. Below is everything you need, with exact measurements.For the Pudding Layer:
- 2 cups (480 ml) cold whole milk
- 1 package (3.4 ounces / 96 g) instant vanilla pudding mix
- 1 cup (240 ml) heavy whipping cream
- 2 tablespoons powdered sugar
For the Layers:
- 3–4 ripe bananas, sliced into ¼-inch rounds
- 2 cups (about 150 g) vanilla wafer cookies
- 1 teaspoon pure vanilla extract
Optional Toppings:
- ½ cup (120 ml) whipped cream
- Crushed vanilla wafers
- Banana slices for garnish
How to Make Banana Pudding Cups
This easy no bake dessert comes together in just a few simple steps.Step 1: Prepare the Pudding
In a large mixing bowl, whisk together 2 cups (480 ml) cold whole milk and the 3.4-ounce (96 g) instant vanilla pudding mix for about 2 minutes until thickened. Let it sit for 5 minutes to fully set.Step 2: Whip the Cream
In a separate bowl, add 1 cup (240 ml) heavy whipping cream and 2 tablespoons powdered sugar. Beat with an electric mixer until stiff peaks form. This usually takes 3–4 minutes.Step 3: Combine
Gently fold the whipped cream into the prepared pudding mixture. Add 1 teaspoon vanilla extract and mix until smooth and fluffy. Be careful not to overmix, as you want to maintain the light texture.Step 4: Assemble the Cups
In individual dessert cups or small mason jars:- Add a layer of vanilla wafers (whole or slightly crushed).
- Add a layer of sliced bananas.
- Spoon a layer of pudding mixture on top.
- Repeat the layers once more until the cups are filled, finishing with pudding on top.
Step 5: Chill
Cover and refrigerate for at least 2 hours, or up to 24 hours, allowing the flavors to meld and the cookies to soften slightly.Step 6: Garnish and Serve
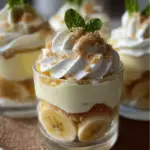
Before serving, top with whipped cream, crushed wafers, or additional banana slices.
Tips for the Best Banana Pudding Cups
Use Ripe but Firm Bananas
Choose bananas that are yellow with small brown spots. Overripe bananas may become too soft and mushy.Chill for Optimal Texture
Allowing the pudding cups to chill ensures the wafers soften just enough to create that classic layered texture.Assemble Close to Serving Time (If Needed)
If you’re concerned about bananas browning, lightly brush the slices with lemon juice before layering.Customize Your Layers
Try alternating between crushed and whole wafers for varied texture.Creative Variations
Banana Pudding Cups are versatile and easy to adapt.Chocolate Banana Version
Add ½ cup (85 g) mini chocolate chips between layers.Peanut Butter Swirl
Mix ¼ cup (60 g) creamy peanut butter into the pudding before folding in whipped cream.Strawberry Banana Twist
Add thinly sliced fresh strawberries between layers.Gluten-Free Option
Use gluten-free vanilla sandwich cookies instead of traditional wafers.Make-Ahead and Storage Tips
These no bake banana pudding cups are ideal for preparing in advance.- Store covered in the refrigerator for up to 3 days.
- For best texture, consume within 24 hours.
- Avoid freezing, as the texture of the pudding and bananas may change.
Serving Ideas for Special Occasions
These individual banana pudding desserts work beautifully for:- Birthday parties
- Baby showers
- Potlucks
- Holiday dinners
- Picnic desserts
- School events
Frequently Asked Questions About Banana Pudding Cups
1. Can I use homemade pudding instead of instant pudding mix?
Yes, you can absolutely use homemade vanilla pudding in this recipe. If you prefer to make pudding from scratch, prepare approximately 3 cups (720 ml) of thick vanilla custard-style pudding and allow it to cool completely before assembling the cups. Homemade pudding gives a richer flavor and slightly denser texture compared to instant pudding mix. However, keep in mind that the pudding must be fully chilled before folding in the whipped cream; otherwise, it may deflate the cream and create a thinner consistency. For best results, press plastic wrap directly onto the surface of the pudding while it cools to prevent a skin from forming. Whether you use instant or homemade, both options create delicious and creamy banana pudding cups.2. How do I keep bananas from turning brown?
Bananas naturally oxidize and brown when exposed to air. To minimize browning, use bananas that are ripe but still firm. You can lightly brush the banana slices with 1–2 teaspoons of lemon juice before layering them into the cups. The citrus slows oxidation without noticeably altering the flavor. Another helpful tip is to ensure the banana slices are fully covered by the pudding layer, limiting their exposure to air. Assembling the dessert close to serving time and keeping it chilled also helps preserve freshness and color.3. Can I prepare Banana Pudding Cups a day in advance?
Yes, this dessert is perfect for make-ahead preparation. In fact, allowing the pudding cups to chill for several hours improves the texture as the vanilla wafers soften and absorb moisture from the pudding. You can prepare them up to 24 hours in advance for best results. If storing longer than a day, note that the bananas may begin to darken slightly and the cookies may become very soft. For the freshest presentation, consider adding fresh banana slices and whipped cream garnish just before serving.4. Can I make this dessert lighter or lower in calories?
There are several ways to lighten up this recipe while maintaining flavor. You can substitute whole milk with 2% milk or a plant-based milk alternative that works with instant pudding mix. Use light whipped topping instead of freshly whipped cream if desired. Additionally, you can reduce the number of wafer layers and increase the fruit layers to create a lighter texture. Keep in mind that lower-fat substitutions may slightly affect the creaminess and richness, but the dessert will still be satisfying and delicious.
Final Thoughts
Banana Pudding Cups are proof that simple ingredients can create a truly memorable dessert. With their creamy layers, fresh banana slices, and soft vanilla wafers, they capture everything people love about traditional banana pudding while offering the convenience of individual servings. There is something special about serving desserts in personal portions — they feel thoughtful, festive, and perfectly sized. What makes this recipe especially appealing is its versatility. You can dress it up for elegant gatherings in glass dessert cups or keep it casual in small jars for backyard parties. The no bake preparation removes the stress of baking, making it accessible for cooks of all experience levels. Even children can help assemble the layers, turning dessert-making into a fun family activity. Beyond its ease, this recipe carries a sense of nostalgia. Many people associate banana pudding with family traditions, celebrations, and comforting meals. By transforming it into individual cups, you preserve that familiar flavor while adding a modern presentation. Whether you are making these Banana Pudding Cups for a special occasion or simply to satisfy a sweet craving, they are guaranteed to bring smiles. Once you try them, they are sure to become a repeat favorite in your kitchen. PrintBest Banana Pudding Cups Recipe – Creamy No Bake Dessert
Ingredients
2 cups (480 ml) cold whole milk
1 package (3.4 ounces / 96 g) instant vanilla pudding mix
1 cup (240 ml) heavy whipping cream
2 tablespoons powdered sugar
3–4 ripe bananas, sliced
2 cups (about 150 g) vanilla wafer cookies
1 teaspoon pure vanilla extract
½ cup (120 ml) whipped cream for topping (optional)
Instructions
-
In a bowl, whisk together 2 cups (480 ml) cold milk and the 3.4-ounce (96 g) instant vanilla pudding mix for 2 minutes. Let stand 5 minutes to thicken.
-
In a separate bowl, beat 1 cup (240 ml) heavy whipping cream with 2 tablespoons powdered sugar until stiff peaks form.
-
Fold the whipped cream and 1 teaspoon vanilla extract into the pudding mixture until smooth and fluffy.
-
In individual cups, layer vanilla wafers, banana slices, and pudding mixture. Repeat layers once more, ending with pudding on top.
-
Cover and refrigerate for at least 2 hours before serving.
-
Garnish with whipped cream or crushed wafers if desired.
Notes
Use firm, ripe bananas for best texture.
Chill at least 2 hours for optimal flavor and consistency.
For best freshness, consume within 24 hours.