In a world where time is limited but sweet cravings are constant, no bake desserts have become the go-to solution for anyone looking to whip up a fast, satisfying treat. These desserts are beloved for their simplicity, minimal equipment needs, and the sheer joy of avoiding a hot oven—especially in the summer. Whether you’re a busy parent, a college student, or just someone who enjoys fuss-free sweets, no bake caramel pretzel crack bars offer an irresistible balance of salty and sweet that takes just minutes to prepare.
These dessert bars are the perfect introduction to the world of no bake treats, combining pantry staples like chocolate, pretzels, and caramel to create a snack that’s crunchy, gooey, and addictive. If you’ve ever wondered why they’re called “crack bars,” it’s because they’re just that hard to stop eating. For anyone exploring dessert options without baking, the no-bake dessert category is a great place to start, and these bars are among the easiest to master.
As food culture grows more creative, flavor combinations like peanut butter, milk chocolate, and caramel continue to trend, especially in easy, shareable forms. You can even explore more snack-style sweets by checking out Pinterest boards like pretzel dessert recipes or easy party snack ideas, which highlight the growing popularity of similar bar recipes. These no bake bars are ideal for after-school snacks, holiday potlucks, or as a quick late-night treat.
🥨 What are no bake caramel pretzel crack bars?
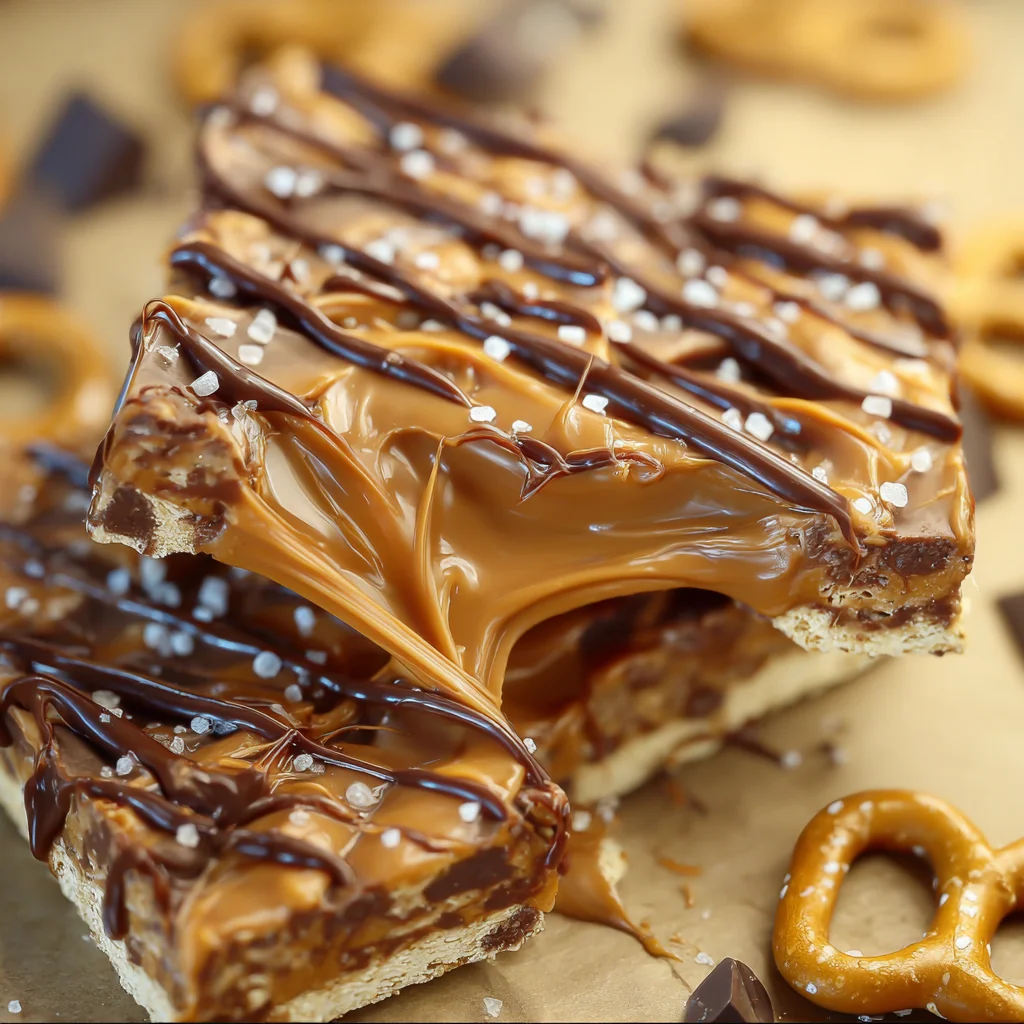
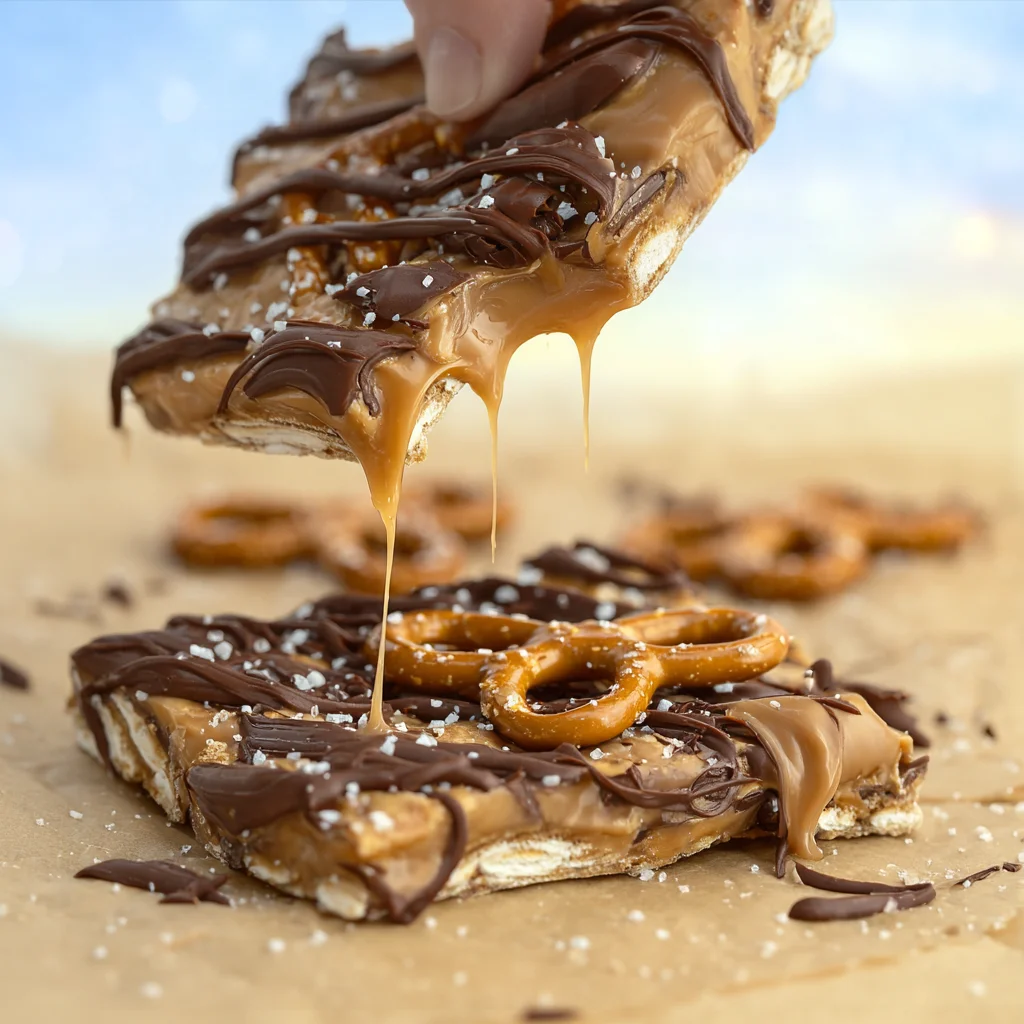
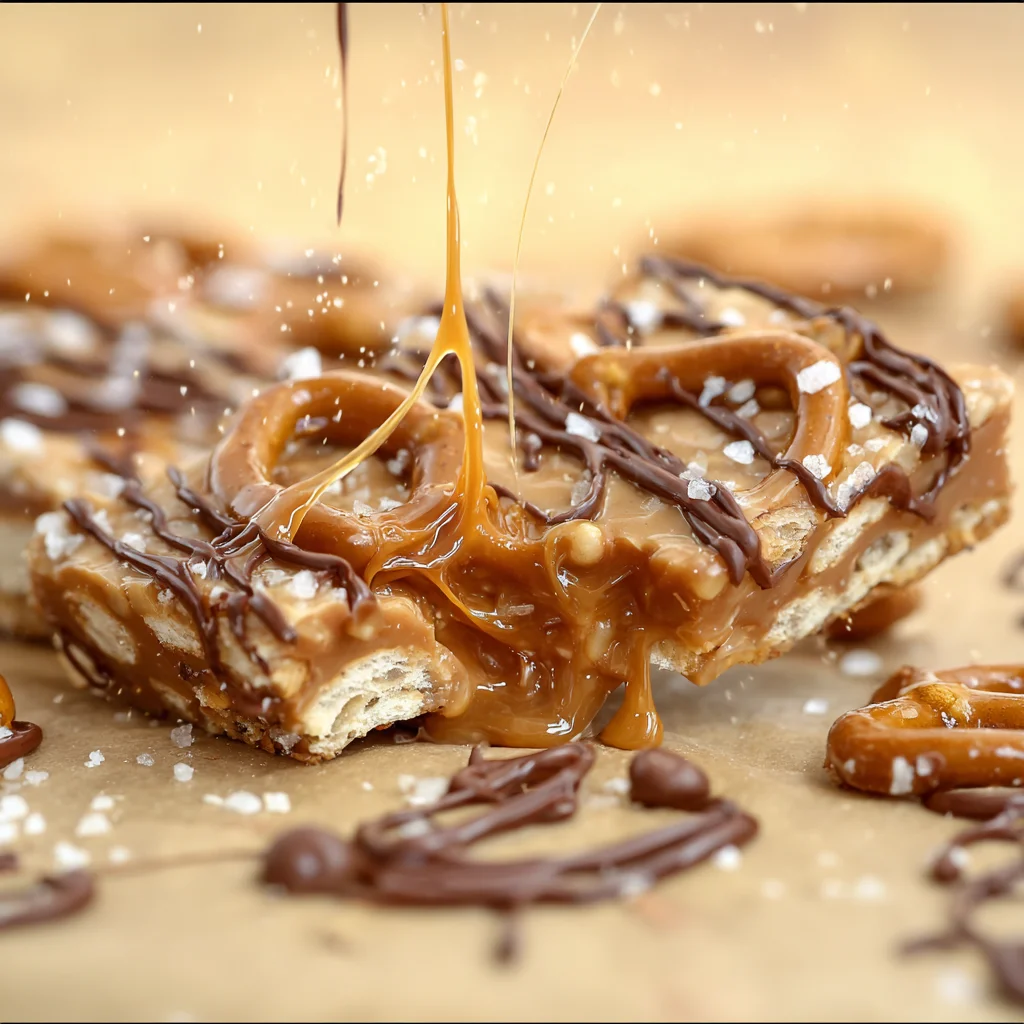
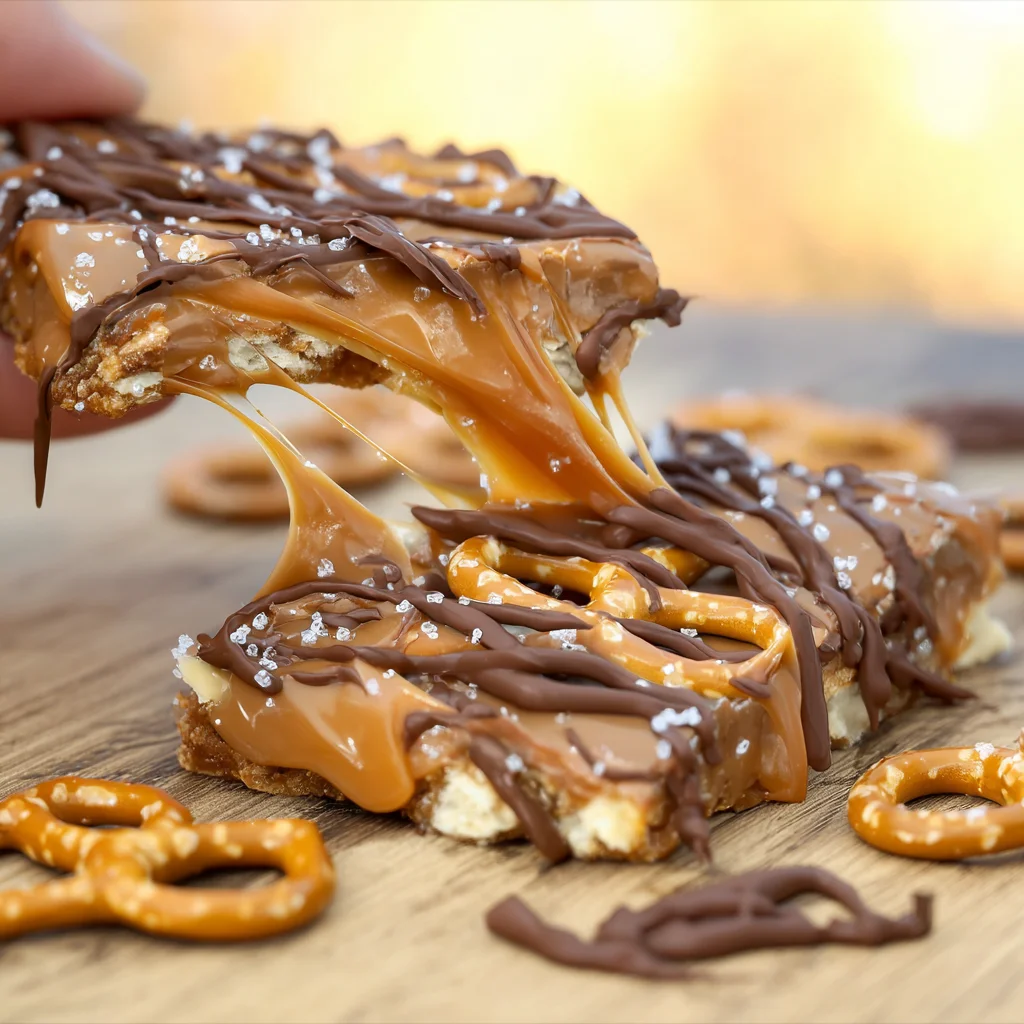
No bake caramel pretzel crack bars are a sweet and salty dessert that combines melted milk chocolate, chewy caramel, crunchy mini pretzels, and smooth peanut butter in one indulgent square. These bars are prepared without the use of an oven, making them a great option for all skill levels. The recipe calls for basic melting, assembling, and cooling, which means it’s quick, convenient, and kid-friendly.
The name “crack bars” has less to do with the ingredients and more with how addictive these bars are. The combination of sweet, salty, creamy, and crunchy textures makes it nearly impossible to stop at just one piece. This irresistible quality has made these bars go viral across platforms like Pinterest, especially when dressed up for different holidays or made into festive variations.
These bars are also very forgiving—you can swap out ingredients, add toppings, or use different kinds of chocolate based on preference. The chocolate caramel and pretzel combination is what makes the base so iconic. With each bite, you get a layered crunch from the pretzels, a silky sweetness from the chocolate, and that luxurious chewiness from melted caramel.
🍬 Ingredients breakdown
The key to perfect no bake caramel pretzel crack bars lies in the quality and balance of your ingredients. Here’s what you’ll need:
-
1 (11.5 oz) bag Hershey’s Milk Chocolate Chips – milk chocolate melts smoothly and pairs perfectly with salty pretzels.
-
1 (11 oz) bag Kraft Caramel Bits – Easy to melt and blend, they form the gooey middle layer.
-
½ cup Reese’s Peanut Butter Chips – Adds a nutty richness and creamy drizzle to the top.
-
8 oz Mini Twist Pretzels – The backbone of the crunch; use fresh, salty twists.
-
2 tablespoons water – Used to soften the caramel bits while melting.
Optional additions:
-
Sea salt flakes for extra contrast.
-
M&Ms or crushed nuts for added texture.
-
White chocolate drizzle for visual flair.
These ingredients are not just tasty—they’re also versatile. You can substitute peanut butter chips with almond butter chips or even use dark chocolate instead of milk chocolate for a richer flavor. If you’re interested in how chocolate and caramel work together scientifically, the Maillard reaction explains how heating sugars and proteins produces that familiar deep, toasted flavor in caramel.
For those curious about the science behind some of these ingredients, here are a few more resources:
-
Learn more about chocolate
-
Discover the history of caramel
-
Explore what makes peanut butter so versatile in desserts
🍯 Step-by-step instructions with tips
Making no bake caramel pretzel crack bars is all about layering flavors and letting each component set properly. Follow these steps for a flawless finish.
Step 1: Melt the chocolate
In a glass bowl, add the Hershey’s milk chocolate chips, reserving ¼ cup for later. Microwave in 20-second intervals, stirring each time, until smooth. This prevents overheating, which can cause chocolate to seize. For better results, use a silicone spatula and make sure the bowl is dry.
Step 2: Spread the base
Line a cookie sheet with parchment paper. Pour the melted chocolate onto the sheet and spread evenly. Make sure it’s not too thin—this layer acts as the base.
Step 3: Add the pretzels
Place the mini pretzels on top of the chocolate. They can overlap, but pressing them in lightly helps them stay in place.
Step 4: Melt and drizzle caramel
Place caramel bits in a bowl with 2 tablespoons of water. Microwave for 1½ to 2 minutes until melted and smooth. Stir thoroughly. Carefully drizzle and spread over the pretzel layer using a spatula or spoon.
Step 5: Final drizzles
Melt the reserved ¼ cup of chocolate chips and drizzle over the cooled caramel layer. Repeat the same with the peanut butter chips. Use a fork or spoon to create thin, beautiful lines.
Step 6: Cool and serve
Allow the bars to cool completely at room temperature or refrigerate for faster setting. Once firm, cut into squares using a warm knife for clean edges.
Pro tips:
-
Use baking chocolate tips from Pinterest to avoid overheating.
-
Chill the bars before slicing to prevent sticking.
-
Use parchment paper for easy removal.
😋 Why this recipe works
This recipe succeeds because it hits all the right notes:
-
Sweet and salty combo: The classic marriage of chocolate and pretzels never fails.
-
Textural contrast: Crunchy pretzels meet gooey caramel and creamy peanut butter.
-
No oven needed: Saves time and reduces risk for beginner cooks.
-
Crowd-pleasing flavors: Universally loved ingredients make it a hit at parties and potlucks.
This is one of those recipes where each bite offers something different yet harmoniously balanced. It’s also customizable, which makes it easy to fit into a variety of dietary needs or seasonal themes.
🧊 How to store and freeze no bake bars
Once cooled, these bars can be stored in different ways depending on how long you want them to last.
Room Temperature:
-
Store in an airtight container for up to 3 days.
-
Keep in a cool, dry place to prevent chocolate melting.
Refrigerator:
-
Keeps bars firmer, especially in warmer climates.
-
Store up to 1 week.
Freezer:
-
Wrap each square in parchment paper and store in a zip-lock bag.
-
Keeps well for up to 2 months.
-
Thaw at room temperature for 20–30 minutes before serving.
Proper storage ensures the bars retain their texture and don’t become soggy or too hard. Always separate layers with wax paper if stacking.
🎨 Easy recipe variations
There are countless ways to elevate this recipe and customize it to your taste or the season.
Flavor variations:
-
Dark chocolate base: Use 70% cocoa chips for a richer flavor.
-
White chocolate drizzle: Adds visual contrast and sweetness.
-
Crushed nuts: Almonds or pecans add more crunch.
-
Gluten-free pretzels: Make it accessible for gluten-sensitive eaters.
Holiday themes:
-
Christmas: Add red & green M&Ms or crushed peppermint.
-
Halloween: Use Reese’s Pieces or candy corn.
-
Valentine’s Day: Drizzle pink candy melts on top.
-
Fourth of July: Decorate with red, white, and blue sprinkles.
Use Pinterest boards like holiday dessert bar ideas for inspiration. These tweaks turn a basic treat into something festive and fun.
🧁 Tips for perfect no bake crack bars
Even though the recipe is simple, here are a few tricks to make them flawless:
-
Always stir chocolate and caramel slowly to avoid burning.
-
Use quality parchment paper to prevent sticking.
-
Let each layer cool before adding the next to maintain definition.
-
Use a sharp knife dipped in hot water for cleaner cuts.
-
Don’t overload with toppings—it can make the bars messy and hard to slice.
Using these best practices ensures your bars look as good as they taste.
⚠️ Common mistakes to avoid
Here’s what to watch out for:
-
Overheating chocolate: Causes it to seize and clump.
-
Skipping parchment paper: Makes removal difficult.
-
Not cooling between layers: Results in smearing.
-
Too much caramel: Leads to a sticky, unmanageable top.
-
Loose pretzels: They should be slightly pressed in to stay put.
Avoiding these errors keeps your prep smooth and your end product Instagram-worthy.
🎉 Best occasions to serve these bars
These bars are perfect for:
-
Holiday gatherings
-
School bake sales
-
Potluck parties
-
Family movie nights
-
Picnic snacks
Their portability and wide appeal make them a great option for any setting where you want to impress without too much effort.
🧾 Nutritional info
These bars are indulgent, so moderation is key. Here’s an approximate nutritional breakdown per serving (1 bar):
-
Calories: 210
-
Total Fat: 11g
-
Sugar: 20g
-
Carbohydrates: 26g
-
Protein: 2g
Want to reduce the sugar? Use dark chocolate, limit caramel, or switch to a sugar-free peanut butter chip option.
❓ FAQs
Can I use regular caramels instead of caramel bits?
Yes! Just unwrap and chop them into smaller pieces. Add water and melt as instructed.
What’s the best way to melt chocolate without burning it?
Use short microwave intervals or a double boiler. Stir every 20 seconds.
Are these bars gluten-free?
Only if you use certified gluten-free pretzels. All other ingredients are generally gluten-free.
Can I make these in advance for a party?
Absolutely. They store well in the fridge for up to a week.
How do I keep the bars from sticking to the pan?
Always use parchment paper. It makes removal and slicing super easy.
No Bake Caramel Pretzel Crack Bars

These No Bake Caramel Pretzel Crack Bars are the perfect combination of sweet, salty, chewy, and crunchy! Made with rich milk chocolate, gooey caramel, and crispy mini pretzels, they’re quick, addictive, and require zero oven time. A crowd-pleasing treat ideal for holidays, potlucks, or a fast family dessert.
- Prep Time: 15 minutes
- Cook Time: 30 minutes
- Total Time: 45 minutes
- Yield: 16–20 bars (depending on cut size) 1x
- Category: Dessert
- Method: No-Bake
- Cuisine: American
Ingredients
11.5 oz bag Hershey’s Milk Chocolate Chips (reserve ¼ cup separately)
11 oz bag Kraft Caramel Bits
½ cup Reese’s Peanut Butter Chips
8 oz Mini Twist Pretzels
2 tablespoons water (for melting caramel)
Instructions
Step 1: Melt the chocolate base
-
In a microwave-safe bowl, add 11.5 oz Hershey’s milk chocolate chips, reserving ¼ cup for later.
-
Microwave in 20-second intervals, stirring in between, until melted and smooth.
-
Line a cookie sheet or baking tray with parchment paper.
-
Spread the melted chocolate in an even layer to form the base.
Step 2: Add the pretzel layer
-
Arrange the mini twist pretzels directly on top of the melted chocolate.
-
It’s okay if they overlap slightly—just make sure they’re pressed in gently.
Step 3: Melt the caramel
-
Add 11 oz of Kraft Caramel Bits and 2 tablespoons of water to a bowl.
-
Microwave for 1½ to 2 minutes, stirring halfway through, until smooth and melted.
-
Pour and spread the caramel evenly over the pretzel layer.
Step 4: Drizzle chocolate and peanut butter
-
Melt the reserved ¼ cup of chocolate chips in a small bowl.
-
In a separate bowl, melt ½ cup Reese’s Peanut Butter Chips using 20-second intervals, stirring each time.
-
Drizzle both melted mixtures over the top of the caramel using a spoon or piping bag for decorative effect.
Step 5: Set and serve
-
Let the bars cool completely at room temperature or refrigerate until firm.
-
Once set, lift from the pan using parchment paper and slice into bars using a sharp knife.
Notes
-
Avoid burning chocolate: Always melt in short intervals and stir frequently.
-
Use a hot knife: For clean slices, run your knife under hot water and wipe dry between cuts.
-
Storage: Store in an airtight container at room temperature for 3 days or in the fridge for up to a week.
-
Freezing: Wrap bars individually in wax paper and store in a freezer-safe bag for up to 2 months.
-
Optional toppings: Sea salt, holiday sprinkles, or crushed candy add flair.
-
Dietary note: Use gluten-free pretzels to make this recipe gluten-free.