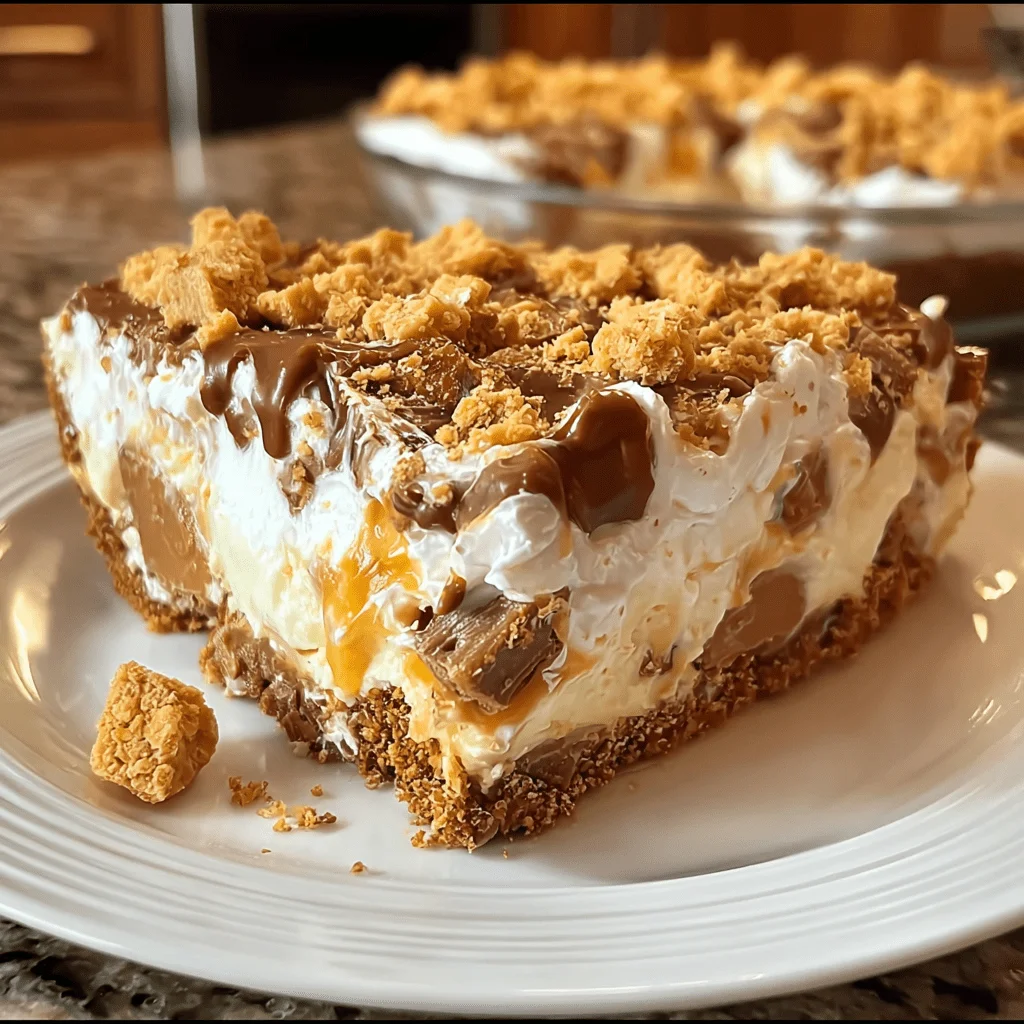
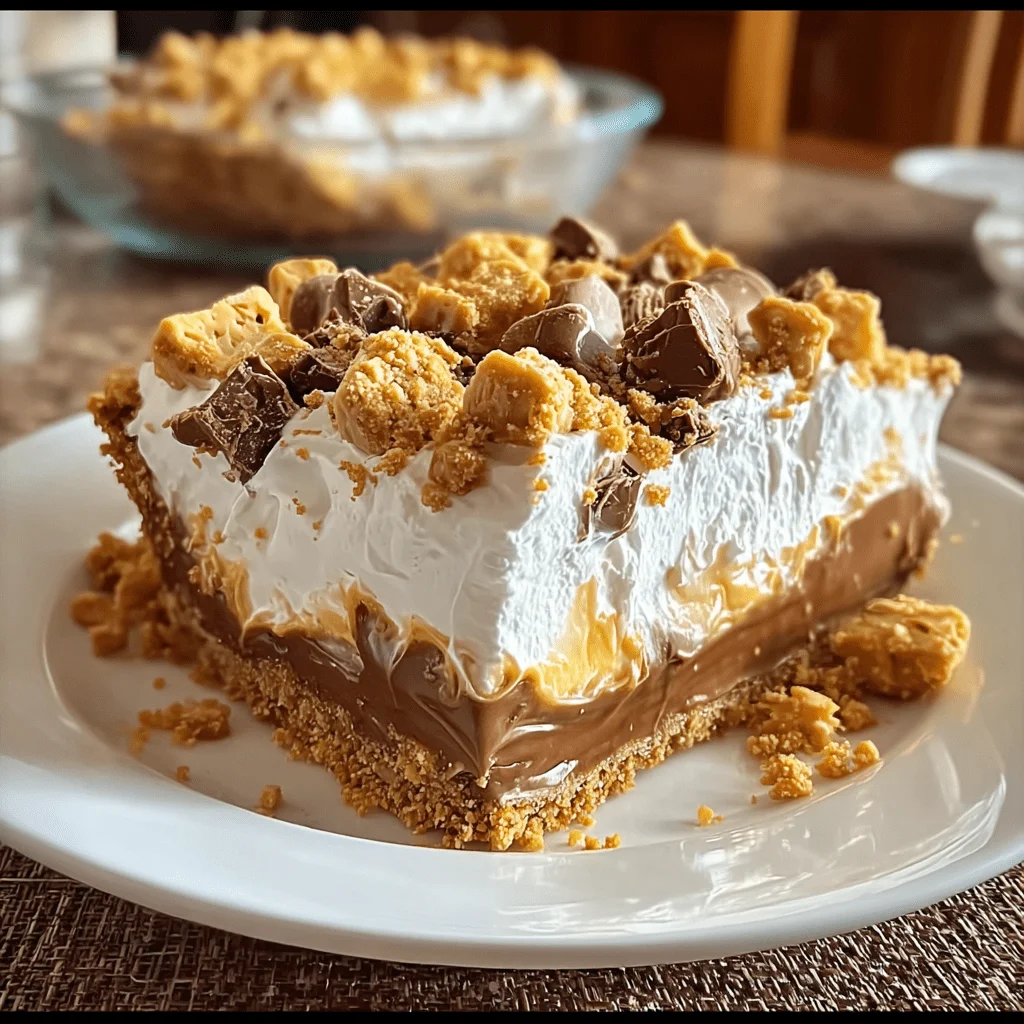
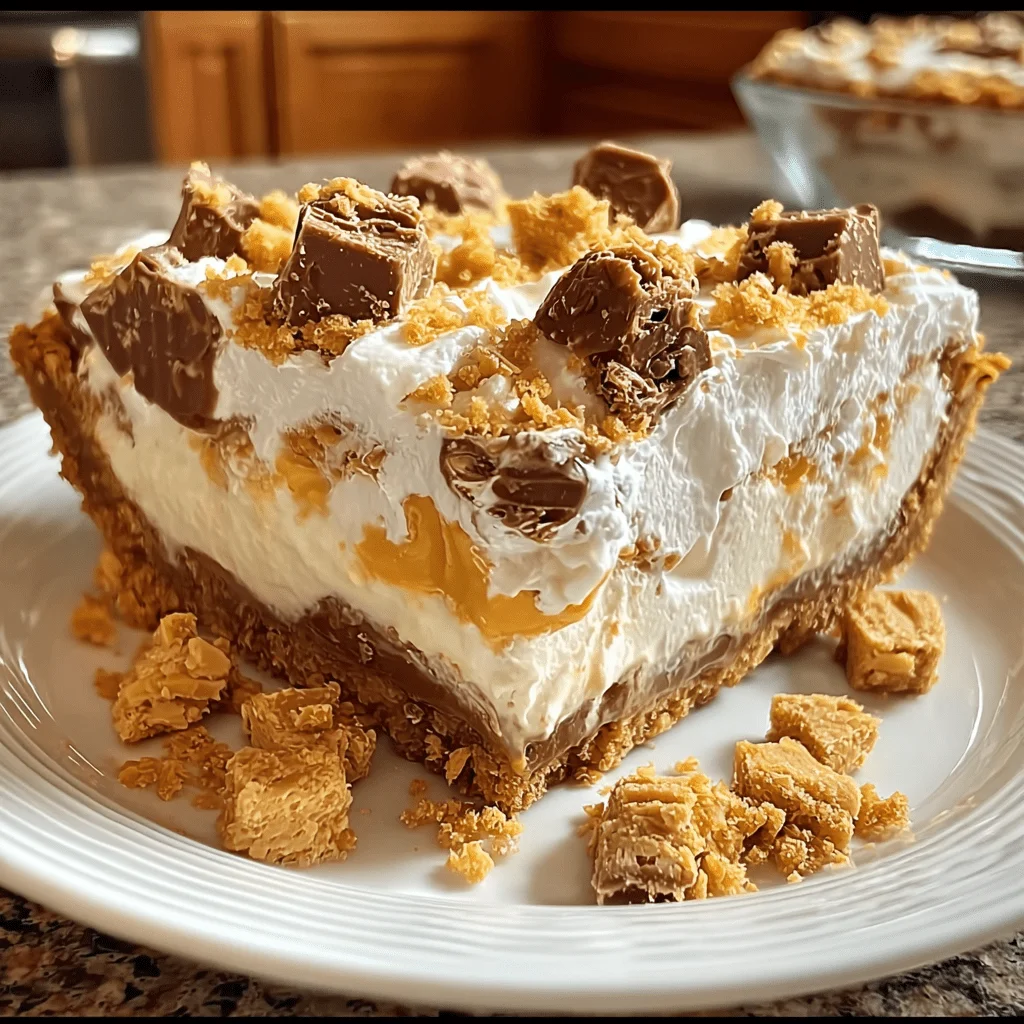
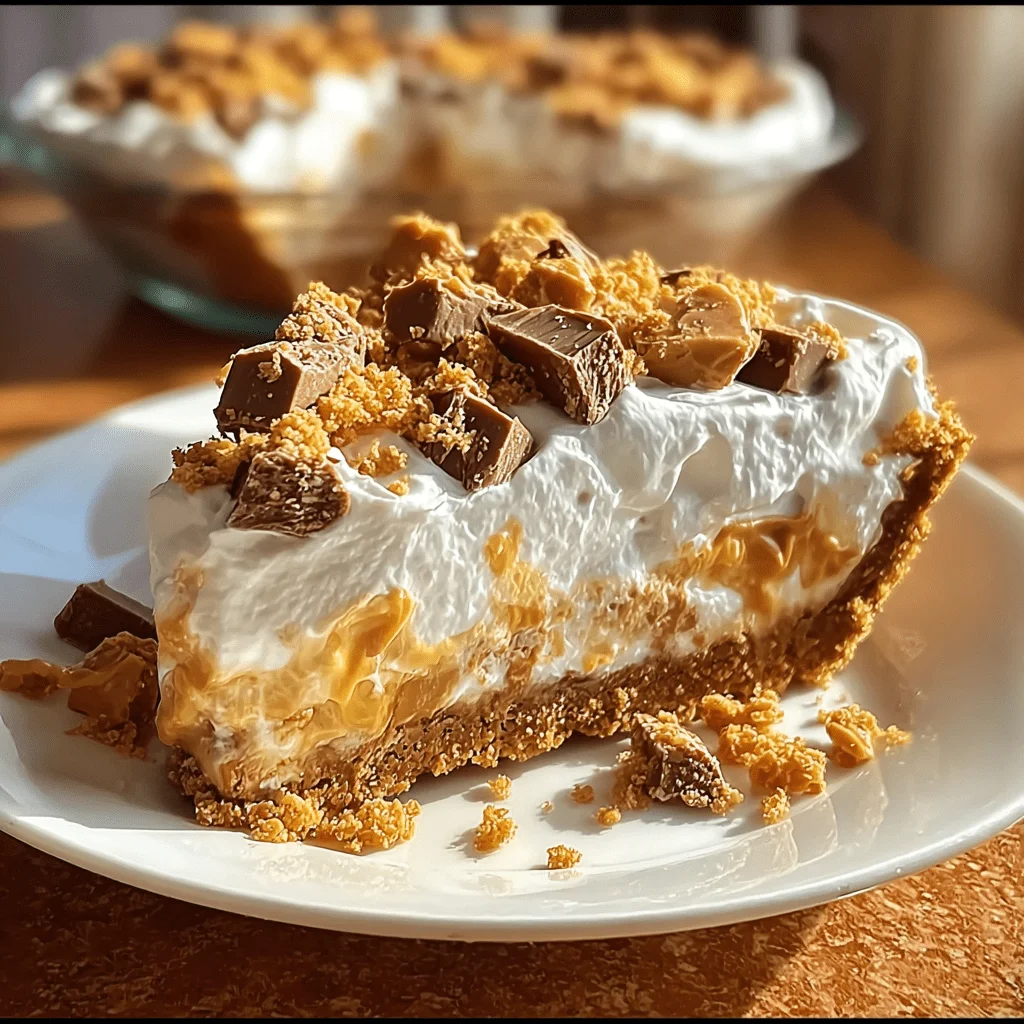
Butterfinger Pie is the ultimate no-bake dessert for peanut butter lovers who want an indulgent, crunchy, and creamy treat without spending hours in the kitchen. Originating from the idea of combining the rich flavors of peanut butter, cream cheese, and the irresistible crunch of Butterfinger candy bars, this dessert has become a household favorite for family gatherings, potlucks, and holiday feasts.
The magic lies in how this pie manages to deliver an ice cream-like texture while staying completely oven-free. Whether you’ve got last-minute guests or just want a sweet fix, this recipe guarantees rave reviews and empty plates. And with no complicated baking skills required, it’s one of the easiest desserts to whip up.
If you’re curious about the origins of some of its star ingredients, the history of cream cheese reveals how it became a staple in desserts, while peanut butter has an equally fascinating story. Even the humble graham cracker, which forms the buttery crust, has a quirky backstory tied to health food movements of the 19th century.
🍫 What makes butterfinger pie special?
The secret to Butterfinger Pie’s charm is the perfect balance of textures and flavors. The creamy peanut butter filling blends with fluffy whipped topping to create a light yet indulgent bite. Every mouthful offers the satisfying crunch of crushed Butterfinger bars, delivering that signature mix of chocolate and peanut butter.
Unlike other peanut butter pies, this one keeps the flavor playful and candy-like rather than overly rich or heavy. The no-bake element means you skip the risk of overbaking or drying out your dessert, making it ideal for beginners and busy bakers alike.
In fact, this pie belongs to a category of no-bake desserts that’s growing in popularity. Pinterest searches for no-bake desserts and pie recipes show how people are looking for simple yet impressive sweets they can make without turning on the oven. The combination of simplicity, nostalgia, and flavor punch makes Butterfinger Pie stand out from the crowd.
🕒 Quick facts about butterfinger pie
-
Prep time: 15 minutes
-
Chill time: Minimum 4 hours
-
Total time: Around 4 hours 15 minutes
-
Difficulty level: Easy
-
Servings: 8–10 slices
Whether you’re hosting a birthday celebration, a casual dinner party, or a holiday feast, Butterfinger Pie is versatile enough to fit any occasion.
🛒 Ingredient list with details
For this recipe, you’ll need:
-
1 package (8 oz) cream cheese, softened – This forms the silky base of the filling and adds a subtle tang.
-
1 container (8 oz) whipped topping – Makes the pie airy and light.
-
1 cup powdered sugar – Smooth sweetness without graininess. Learn more about powdered sugar.
-
½ cup creamy peanut butter – Gives the pie its nutty richness. Choose a high-quality brand for the best flavor.
-
3 Butterfinger candy bars, crushed – The star of the show, adding crunch and caramelized peanut butter flavor. The history of candy bars is a fun read if you’re curious.
-
1 pre-made graham cracker crust – You can use a store-bought version or make your own from crushed graham crackers.
-
½ teaspoon vanilla extract – A small addition that enhances the overall flavor profile. More about vanilla extract.
🥄 Choosing the best ingredients
Quality matters. For cream cheese, go for full-fat varieties—low-fat versions can make the filling less creamy. When selecting peanut butter, a creamy, no-stir brand works best so the texture stays consistent. Always check the expiration date on whipped topping for freshness.
As for Butterfinger bars, fresher ones maintain their crisp texture better once crushed. If making your own crust, crush graham crackers finely so the base holds together without crumbling.
📋 Step-by-step instructions
-
Beat cream cheese and powdered sugar until smooth and lump-free. This is crucial for avoiding a gritty filling.
-
Add peanut butter and vanilla extract, mixing until the blend is consistent and creamy.
-
Fold in whipped topping gently to keep the mixture airy. Overmixing can deflate it.
-
Stir in two crushed Butterfinger bars, reserving one for garnish.
-
Spoon the mixture into the graham cracker crust and smooth the top with a spatula.
-
Sprinkle the remaining crushed Butterfinger over the top for a crunchy finish.
-
Refrigerate for at least 4 hours or overnight to allow the pie to set properly.
💡 Pro tips for perfect butterfinger pie
-
Chill thoroughly – The longer it chills, the cleaner your slices will be.
-
Use cold utensils – A chilled spatula helps keep the whipped topping firm during assembly.
-
Cut with a hot knife – Run it under warm water, wipe dry, and slice for neat edges.
-
Layer crushed candy strategically – Putting some in the middle as well as on top creates extra crunch.
🍨 Flavor variations
Want to change things up? Here are some twists on the classic Butterfinger Pie:
-
Swap the candy – Use Reese’s Peanut Butter Cups or Snickers for a different flavor profile.
-
Add a drizzle – Warm chocolate or caramel sauce over the top for extra indulgence.
-
Make it frozen – Place the pie in the freezer for a summer-friendly, ice cream-like dessert.
🍽 Serving suggestions
Presentation matters! Serve each slice with:
-
A dollop of whipped cream
-
A few extra candy pieces
-
A drizzle of chocolate or caramel sauce
-
Pair with strong coffee, hot chocolate, or a tall glass of milk
If serving for a party, place slices on decorative plates and sprinkle with extra crushed candy for visual appeal.
🧊 Storing & make-ahead tips
-
Refrigerator storage: Keep covered for up to 4 days.
-
Freezing: Wrap tightly and freeze for up to 1 month. Thaw in the fridge before serving.
-
Make-ahead: Assemble the pie a day before your event for the best flavor and texture.
📊 Nutritional information
| Nutrient | Per Slice (1/10 pie) |
|---|---|
| Calories | 420 |
| Total Fat | 24g |
| Saturated Fat | 12g |
| Carbohydrates | 46g |
| Sugars | 32g |
| Protein | 6g |
| Sodium | 280mg |
🍬 History of butterfinger candy bar
The Butterfinger candy bar was first created in 1923 by the Curtiss Candy Company in Chicago. Its name came from a public contest, and over the years, it has become a cultural icon, appearing in commercials, movies, and even dessert recipes worldwide. Known for its crispy peanut butter center coated in chocolate, it’s a perfect match for creamy dessert bases.
❓ Frequently asked questions
Can I make Butterfinger Pie without peanut butter?
Yes. Replace it with almond butter or sunflower seed butter for a nut-free version.
Can I use Cool Whip instead of whipped cream?
Absolutely. In fact, whipped topping like Cool Whip is traditional for this pie.
How do I crush Butterfinger bars easily?
Place them in a sealed plastic bag and hit gently with a rolling pin.
Can I make this gluten-free?
Yes. Use gluten-free graham crackers for the crust.
How long can Butterfinger Pie sit out?
No more than 2 hours at room temperature.
Can I use a chocolate cookie crust instead?
Definitely—it adds a richer chocolate flavor.
🎯 Conclusion & final thoughts
Butterfinger Pie is proof that sometimes the simplest desserts are the most unforgettable. With its perfect balance of creamy filling, candy crunch, and effortless preparation, it’s bound to become a go-to recipe in your dessert rotation. Don’t hesitate to experiment with variations and toppings—you might just create your own signature version.
PrintButterfinger Pie

This Butterfinger Pie is a dreamy, no-bake dessert loaded with creamy peanut butter, fluffy whipped topping, silky cream cheese, and plenty of crushed Butterfinger candy bars for a sweet, crunchy finish. Perfect for family gatherings, holidays, or whenever you need an easy yet indulgent treat.
- Prep Time: 15 minutes
- Chill time: 4 hours minimum
- Cook Time: 0 minutes (no bake)
- Total Time: 4 hours minimum
- Yield: 12 servings 1x
- Category: Dessert
- Method: No-Bake
- Cuisine: American
Ingredients
For the filling:
- 1 package (8 oz) cream cheese, softened
- 1 cup powdered sugar
- ½ cup creamy peanut butter (no-stir works best)
- ½ teaspoon vanilla extract
- 1 container (8 oz) whipped topping, thawed
- 3 Butterfinger candy bars, crushed (2 for filling, 1 for topping)
For the crust:
- 1 pre-made graham cracker crust (9-inch)
Instructions
-
Beat cream cheese and powdered sugar
-
In a large mixing bowl, use an electric mixer to blend softened cream cheese and powdered sugar until completely smooth and lump-free.
-
-
Add peanut butter and vanilla
-
Mix in the peanut butter and vanilla extract until the mixture is fully combined and creamy.
-
-
Fold in whipped topping
-
Using a spatula, gently fold the whipped topping into the mixture until light and fluffy. Avoid overmixing to keep the texture airy.
-
-
Add crushed Butterfinger bars
-
Stir in two crushed Butterfinger bars, saving the third for garnishing the top of the pie.
-
-
Assemble the pie
-
Spoon the filling into the graham cracker crust, smoothing the top with a spatula.
-
-
Top with remaining candy
-
Sprinkle the last crushed Butterfinger evenly over the surface of the pie.
-
-
Chill
-
Cover and refrigerate for at least 4 hours, or overnight, to let the flavors meld and the filling set.
-
-
Serve
-
Slice with a warm knife for neat edges and enjoy chilled.
-
Notes
-
Chilling: Longer chilling time makes the pie firmer and easier to slice.
-
Alternative crust: Swap graham cracker crust for chocolate cookie crust for a richer flavor.
-
Candy crushing tip: Freeze Butterfinger bars for 15 minutes before crushing—they’ll break into cleaner pieces.
-
Storage: Store covered in the refrigerator for up to 4 days. Can be frozen for 1 month.